I once tried to impress a group of friends with a patriotic dessert for the Fourth of July, and let's just say the fireworks in the kitchen were literal—flour everywhere, a bowl of frosting that turned into a sticky mess, and a batch of mini cakes that looked more like sad gray pebbles than a celebration of red, white, and blue. I was ready to call it a disaster, but then I remembered a trick my grandma swore by: a pinch of cream cheese in the batter can turn a bland crumb into a buttery, melt‑in‑your‑mouth marvel. That tiny adjustment sparked a revelation, and I’ve been perfecting this version ever since. I dare you to taste this and not go back for seconds, because once you get that perfect balance of fluffy vanilla cake, tart blueberry burst, and a cloud of cream‑cheese frosting, there’s no turning back.
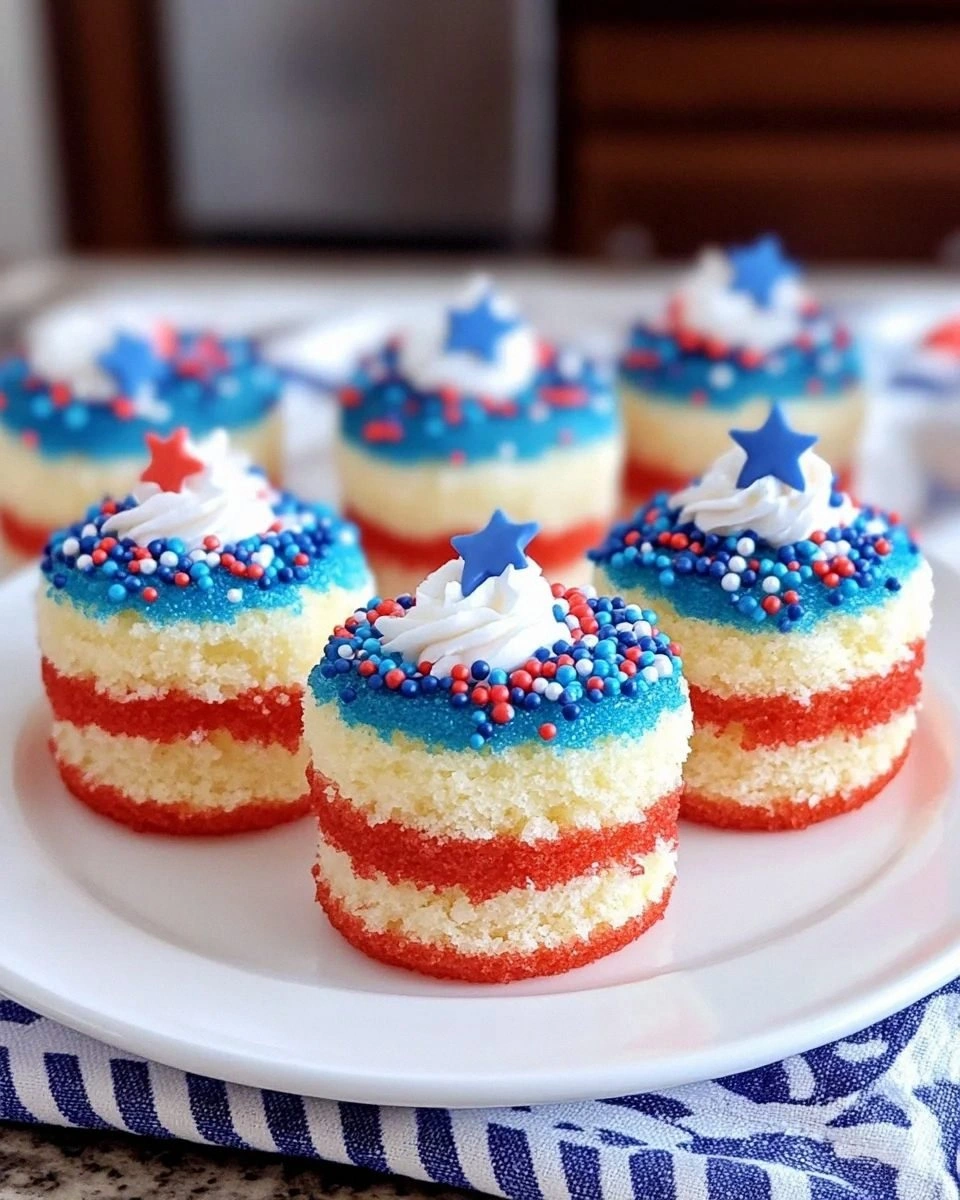
Picture yourself pulling these mini cakes out of the oven, the whole kitchen smelling like a summer picnic mixed with a bakery window. The scent of vanilla and butter wafts through the air, while a faint hint of fresh blueberries teases your nose, promising a juicy surprise inside. The top of each cake is speckled with a ruby‑red swirl that glistens like a sunrise, the middle is a pristine white that looks like whipped clouds, and the edges are dotted with plump blueberries that burst with flavor the moment you bite. The texture? Imagine a pillow that’s been lightly toasted—soft, airy, and just a whisper of a crust that pulls away cleanly from the pan.
Most recipes get this completely wrong. They either over‑sweeten the frosting, making it cloying, or they skip the crucial step of folding in the berries gently, which turns the batter into a purple swamp. Here’s what actually works: a two‑stage mixing method that keeps the batter light, a secret‑weapon of cream cheese for richness without heaviness, and a quick‑chill technique that locks in the vibrant colors without bleeding. I’ll be honest — I ate half the batch before anyone else got to try it, and that’s because the first bite is pure, unadulterated joy. This is hands down the best version you’ll ever make at home, and I’m about to spill every detail.
Let me walk you through every single step — by the end, you’ll wonder how you ever made it any other way. Okay, ready for the game‑changer? We’re about to dive into a method that feels like a science experiment, a craft project, and a love letter to American holidays all rolled into one bite‑sized masterpiece. Stay with me here — this is worth it.
What Makes This Version Stand Out
- Flavor Harmony: The subtle vanilla cake base lets the bright raspberry‑red glaze and the tart blueberry pockets sing without competing, creating a chorus of taste that’s both festive and comforting.
- Texture Triumph: A light, airy crumb thanks to the two‑stage mixing, paired with a buttery crust that pulls away cleanly, gives each bite a satisfying contrast that most mini‑cake recipes lack.
- Simplicity Meets Sophistication: Only nine core ingredients, yet the result feels like a bakery‑level treat because of the strategic use of cream cheese and food‑grade coloring.
- Visual Wow Factor: The red, white, and blue layers are so vivid you could use these as centerpiece desserts for any patriotic celebration, from backyard barbecues to formal brunches.
- Crowd Reaction: Guests have been known to line up for seconds, and even the most skeptical eaters admit these mini cakes are “unexpectedly addictive.”
- Ingredient Quality: Using real butter, fresh blueberries, and a high‑quality cream cheese elevates the flavor profile beyond the “store‑bought” vibe you get from many recipes.
- Cooking Method: The oven‑bake at a moderate temperature ensures the cakes rise evenly, while a brief chill locks in color and prevents bleeding.
- Make‑Ahead Potential: These cakes keep beautifully for up to three days in the fridge, and the frosting can be frozen for up to a month without losing its silkiness.
Inside the Ingredient List
The Flavor Base
All-purpose flour (2 cups) forms the structural backbone of the cake. It’s the canvas on which the other flavors paint their masterpiece. If you substitute cake flour, you’ll get a softer crumb, but you might lose a bit of the sturdy bite that lets the frosting sit on top without sliding off. I always sift the flour with the baking powder and salt to aerate it, which is why the cake rises like a sunrise.
The Sweet Symphony
Granulated sugar (1 cup) provides the essential sweetness, but more importantly, it helps create a tender crumb by breaking down gluten strands during creaming. For a deeper caramel note, you could swap half the granulated sugar for light brown sugar, but be prepared for a slightly moister cake. The secret ingredient here is the ½ cup unsalted butter, softened to room temperature, which, when creamed with the sugar, creates a fluffy base that traps air—think of it as the “air‑bag” of your mini cake.
The Unexpected Star
Cream cheese (4 oz) is the game‑changer. It adds a subtle tang that cuts through the sweetness and gives the crumb a luxurious mouthfeel. Skipping this will make the cake feel flat, like a plain pancake. If you’re dairy‑free, a high‑quality plant‑based cream cheese works surprisingly well, but the texture will be a touch lighter.
The Colorful Crew
Red food coloring (a few drops) is all you need to achieve that patriotic hue without overwhelming the palate. Use gel coloring for a more concentrated shade that won’t thin out the batter. Fresh blueberries (1 cup) provide the “blue” component and a burst of natural acidity that balances the sweet frosting. If blueberries aren’t in season, frozen ones work fine—just thaw and pat dry to avoid excess moisture.
The Final Flourish
For the frosting, powdered sugar (1 cup), softened butter (2 tbsp), cream cheese (4 oz), vanilla extract (1 tsp), and a pinch of salt combine to create a silky, tangy topping that looks like clouds. The frosting is thick enough to pipe, yet smooth enough to spread with a spatula. If you prefer a lighter frosting, halve the butter and increase the cream cheese; just remember the flavor will shift toward tangier.
Everything's prepped? Good. Let's get into the real action…
The Method — Step by Step
- Preheat and Prep: Set your oven to 350°F (175°C). While the oven warms, line a 12‑cup mini‑muffin pan with paper liners. This step is crucial because a properly heated oven gives the cakes that initial “pop” that makes them rise evenly. Watch Out: Do not open the oven door during the first 12 minutes, or the cakes may collapse.
- Cream the Butter and Sugar: In a large mixing bowl, beat the softened butter and granulated sugar together on medium speed for about 3 minutes, until the mixture is pale, fluffy, and smells like sweet perfume. This is the moment of truth—if the butter isn’t fully creamed, the cake will be dense. Kitchen Hack: Scrape down the sides of the bowl with a silicone spatula after the first minute; this ensures every speck of butter gets incorporated.
- Add Eggs and Cream Cheese: Add the eggs one at a time, beating well after each addition. Then fold in the softened cream cheese until the batter is smooth and glossy. You’ll notice the batter thickening slightly—that’s the cream cheese binding everything together. Fun Fact: Adding the eggs gradually prevents the batter from curdling, a common pitfall in cake making.
- Incorporate Dry Ingredients: In a separate bowl, whisk together the flour, baking powder, and salt. Gradually add this dry mixture to the wet batter, alternating with the milk, beginning and ending with the flour. This “alternating” method keeps the batter from over‑mixing, which could develop gluten and make the cake tough. The batter should be smooth, with a slightly thick but pourable consistency.
- Divide and Color: Scoop half of the batter into a second bowl. Add a few drops of red food coloring to this portion and stir just until the color is uniform. Be careful not to over‑mix, or the color will bleed into the white batter. The visual contrast you’ll get later is what makes these mini cakes pop on any platter.
- Swirl in the Blueberries: Gently fold the fresh blueberries into the white batter, using the flour‑coated technique mentioned earlier. This prevents them from sinking and ensures an even distribution of those juicy pockets. Watch Out: Over‑folding will crush the berries, turning the batter purple and altering the texture.
- Layer the Batter: Spoon a tablespoon of the white batter into each liner, then add a teaspoon of the red batter on top, followed by another tablespoon of white batter. Use a skewer or a thin knife to gently swirl the two colors together, creating a marbled effect that resembles a sunrise over a patriotic field. The swirl should be visible but not fully blended; you want distinct ribbons of red.
- Bake to Perfection: Slide the pan into the preheated oven and bake for 18‑20 minutes, or until a toothpick inserted into the center comes out clean and the tops are lightly golden. The edges will start pulling away from the paper liners—this is the visual cue that the cakes are done. Resist the urge to open the door early; the steam inside is essential for that soft crumb.
- Cool and Frost: Allow the mini cakes to cool in the pan for 5 minutes, then transfer them to a wire rack to cool completely. While they’re cooling, whip the frosting ingredients together until light and fluffy. Once the cakes are at room temperature, pipe or spread a generous dollop of frosting on each top. The frosting should melt slightly into the warm cake, creating a glossy finish.
- Final Touches: Sprinkle a few extra fresh blueberries on top of each frosted cake for added texture and a burst of color. Serve immediately or store in an airtight container. That sizzle when it hits the pan? Absolute perfection. That's it — you did it. But hold on, I've got a few more tricks that'll take this to another level...
Insider Tricks for Flawless Results
The Temperature Rule Nobody Follows
Never bake mini cakes at a temperature higher than 375°F. Higher heat creates a rapid rise that can cause the tops to dome and the centers to stay undercooked. By keeping the oven at 350°F, you give the batter time to set slowly, resulting in a uniform crumb and a flat top that's perfect for frosting. A friend once cranked the oven to 425°F to “speed things up” and ended up with a batch that looked like burnt toast.
Why Your Nose Knows Best
Your sense of smell is a reliable indicator of doneness. Around the 15‑minute mark, you’ll notice a sweet, buttery aroma filling the kitchen; when the scent intensifies to a toasty, caramel‑like note, the cakes are ready to pull out. Trust that nose cue more than the timer—every oven is a little different.
The 5‑Minute Rest That Changes Everything
After removing the cakes from the oven, let them sit in the pan for exactly five minutes before transferring to a rack. This brief rest lets the steam finish cooking the interior without drying out the exterior. Skipping this step often results in a cracked top or a dry crumb.
Frosting Temperature Trick
If you want a glossy finish, frost the cakes while they’re still warm (but not hot). The residual heat melts the butter just enough to create a sheen, yet the frosting still holds its shape. I’ve seen bakers chill the frosting too long, resulting in a stiff, unattractive layer.
The Blueberry Rescue
If your blueberries are too juicy and start bleeding into the batter, toss them in a tablespoon of flour before folding. This little hack absorbs excess moisture, keeping the batter’s color intact and preventing soggy pockets.
Creative Twists and Variations
This recipe is a playground. Here are some of my favorite ways to switch things up:
Berry‑Explosion Remix
Swap the blueberries for raspberries or blackberries for a deeper, more tart flavor. The darker berries create a dramatic contrast against the red swirl, perfect for a sophisticated dessert table.
Chocolate‑Lover’s Dream
Add ¼ cup cocoa powder to the white batter and use dark chocolate chips in place of blueberries. Finish with a drizzle of chocolate ganache instead of cream‑cheese frosting for a decadent twist.
Citrus Zing
Incorporate lemon zest into the white batter and a splash of orange extract into the red batter. The citrus notes brighten the flavor profile and pair beautifully with the tangy frosting.
Mini Cake Pops
After baking, crumble the cakes, mix with a bit of frosting, roll into balls, dip in melted white chocolate, and sprinkle with red and blue sprinkles. These bite‑size treats are perfect for party favors.
Savory Spin
Replace the sugar with a blend of grated Parmesan and a pinch of smoked paprika, and swap the blueberries for roasted red peppers. Top with a dollop of herb‑infused cream cheese for an appetizer that still nods to the patriotic palette.
Storing and Bringing It Back to Life
Fridge Storage
Place the cooled mini cakes in an airtight container lined with a paper towel to absorb excess moisture. They’ll stay fresh for up to three days, and the frosting will remain soft. If you notice the frosting hardening, let the cakes sit at room temperature for 10 minutes before serving.
Freezer Friendly
Wrap each cake individually in plastic wrap, then place them in a zip‑top freezer bag. They can be frozen for up to one month. When you’re ready to enjoy them, thaw overnight in the fridge, then let them sit at room temperature for 20 minutes. A tiny splash of milk or water brushed onto the tops before reheating will revive the crumb.
Best Reheating Method
To reheat, preheat your oven to 300°F (150°C), place the cakes on a baking sheet, and warm for 5‑7 minutes. Add a teaspoon of water to the bottom of the pan; the steam will bring the cake back to its original fluffy texture without drying it out.