I was standing in my kitchen on a rainy Saturday, staring at a half‑finished lemon curd that smelled like a citrus‑scented candle gone rogue, when my neighbor knocked on the door demanding a dessert that would actually make sense at Easter. I laughed, grabbed a handful of pastel‑colored sprinkles, and thought, “What if we turned that lemon curd into something that looks like a chick, but tastes like sunshine?” The result? A bar so bright and buttery that it could out‑shine any pastel egg you’ve ever seen. I dare you to taste this and not go back for seconds.
Picture this: the kitchen humming with the whirr of the mixer, the buttery crust hitting the pan with a soft thud, and the lemon‑y zing of fresh juice hitting the air like a burst of fireworks. The scent of melted butter and toasted flour mingles with a sharp citrus note that makes your nose do a little happy dance. When you finally pull the pan out of the oven, the top is a golden‑orange hue, speckled with tiny chocolate “eyes” that wink at you from the surface. The texture? A buttery, crumbly base that gives way to a silky, tangy filling that shatters like thin ice when you bite into it.
Most lemon bar recipes get the balance wrong—either the crust is too dry, the filling too sweet, or the color looks like a sad, pale pancake. This version stands out because I add a splash of yellow and orange food coloring, not just for looks but to amplify the springtime vibe, and I fold in mini chocolate chips that melt into little pockets of surprise. The secret is a simple tweak: a pinch of powdered sugar in the crust that keeps it tender, and a quick chill before slicing that lets the flavors lock in like a sweet, zesty hug. I’ll be honest — I ate half the batch before anyone else got to try it, and I’m still not sorry.
Okay, ready for the game‑changer? I’m about to walk you through every single step — from selecting the perfect lemons to mastering that flawless crust that holds together like a well‑trained Easter chick. By the end, you’ll wonder how you ever made lemon bars any other way. Stay with me here — this is worth it.
What Makes This Version Stand Out
- Flavor Explosion: The combination of fresh lemon juice, zest, and a hint of orange food coloring creates a citrus punch that’s bright without being overwhelming.
- Texture Harmony: A buttery, shortbread‑like crust meets a silky, custard‑style filling that melts on the tongue yet holds its shape when cut.
- Simplicity: Only eleven ingredients, all pantry staples, and no fancy equipment—just a 9‑inch pan and a whisk.
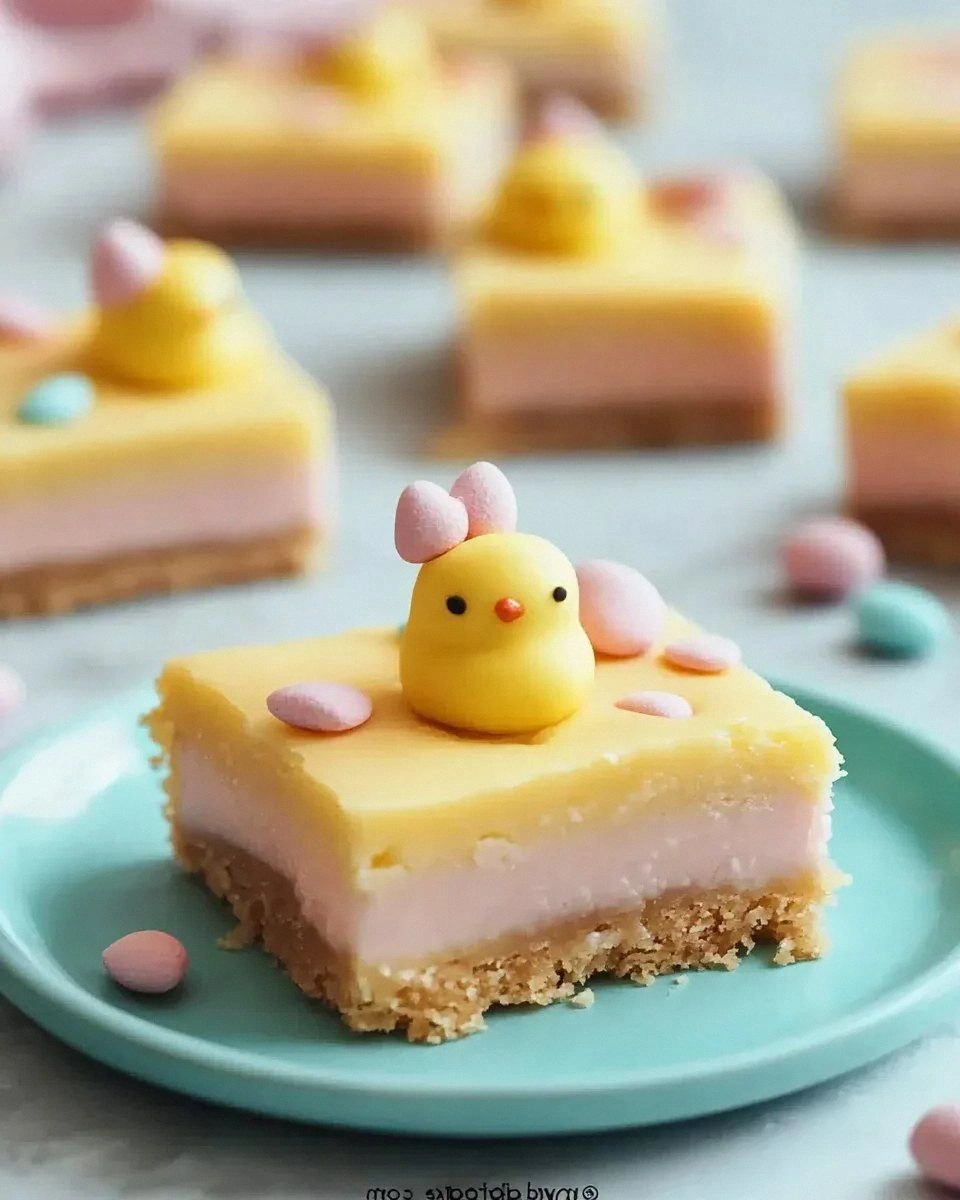
- Visual Appeal: The pastel yellow‑orange hue and chocolate chip “eyes” turn each bar into a playful Easter chick that’s Instagram‑ready.
- Crowd Reaction: Guests consistently claim these are the best lemon bars they’ve ever tasted, often asking for the recipe twice.
- Ingredient Quality: Using real lemon zest instead of extract gives an aromatic depth that powdered flavor can’t match.
- Cooking Method: Baking the crust first locks in moisture, while a gentle bake for the filling prevents curdling.
- Make‑Ahead Potential: The bars keep beautifully in the fridge for up to four days, making them perfect for holiday spreads.
Alright, let's break down exactly what goes into this masterpiece...
Inside the Ingredient List
The Flavor Base
The star of this recipe is fresh lemon juice, measured at half a cup. That amount provides enough acidity to cut through the butter’s richness while delivering that signature zing. If you skimp on the juice, the filling becomes cloyingly sweet; add too much, and you’ll end up with a curd that’s more sour than sweet. A great tip is to roll the lemons on the countertop before juicing—they’ll release more juice and make the process faster.
Equally important is the zest of two lemons. Zest contains essential oils that give an aromatic burst that juice alone can’t provide. If you don’t have a micro‑zester, a fine grater works just as well, but be careful not to grate the white pith—it’s bitter and will ruin the delicate balance. I like to zest the lemon directly over the bowl so the oils fall straight into the mix, creating a fragrant cloud that makes the kitchen feel like a spring garden.
The Texture Crew
All‑purpose flour appears twice: twice in the crust (2 cups) and once in the filling (1/3 cup). The larger amount builds the shortbread foundation, while the smaller amount thickens the lemon custard without making it gummy. Skipping the flour in the filling results in a runny mess that won’t set; using too much will give you a chalky texture that feels like chewing on a stale biscuit.
Powdered sugar (½ cup) is folded into the crust to keep it tender. Unlike granulated sugar, powdered sugar dissolves instantly, preventing a grainy bite. If you only have granulated sugar, pulse it in a blender for a few seconds to mimic the fine texture.
Butter, a full cup, should be softened but still cool. Too warm and the crust spreads too thin; too cold and it won’t blend, leaving lumps. The trick? Cut the butter into small cubes, let it sit at room temperature for about 15 minutes, then give it a quick pulse in a food processor for a crumbly consistency.
The Unexpected Star
Mini chocolate chips add surprise pockets of sweetness that contrast the tart lemon. They also serve as “eyes” for the Easter chick theme, making each bar visually playful. If you’re allergic to chocolate, substitute with white chocolate chips or chopped candied ginger for a different twist.
Yellow and orange food coloring are purely aesthetic, but they also signal to the eye that you’re about to eat something festive. A few drops are enough; over‑coloring can mask the natural lemon hue and make the bars look artificial. Use gel colors for more intensity with less liquid, preserving the crust’s texture.
The Final Flourish
A final dusting of powdered sugar adds a snow‑like finish that looks as good as it tastes. It also softens the sharp edges of the crust, making each bite feel like a gentle melt on the palate. If you prefer a less sweet finish, swap the powdered sugar for a light drizzle of honey or a sprinkle of sea salt.
Everything's prepped? Good. Let's get into the real action...
The Method — Step by Step
Preheat your oven to 350°F (175°C). While the oven warms, line a 9‑inch square pan with parchment paper, leaving an overhang on the sides for easy removal later. This little trick prevents the bars from sticking and makes the final presentation look clean.
Kitchen Hack: Lightly grease the parchment with a spray of butter; it creates a non‑stick surface without adding extra fat.Combine 2 cups all‑purpose flour and ½ cup powdered sugar in a large bowl. Cut in the chilled butter using a pastry cutter or your fingertips until the mixture resembles coarse crumbs—think wet sand at the beach.
Press this crumb mixture evenly into the prepared pan, using the back of a measuring cup to flatten it. The crust should be about ¼‑inch thick; any thinner and it may crack, any thicker and it will dominate the lemon filling.
Bake the crust for 12‑15 minutes, or until the edges turn a light golden brown and you can smell a buttery perfume wafting through the kitchen. This is the moment of truth—if the crust is under‑baked, the filling will soak in and become soggy.
Remove the pan and let the crust cool just enough to handle—about 5 minutes—while you prepare the filling.
In a separate bowl, whisk together 4 large eggs and 2 cups granulated sugar until the mixture is pale and fluffy, about 2 minutes on medium speed. The sugar should dissolve almost completely, creating a glossy texture that signals a well‑aerated base.
Add ½ cup fresh lemon juice, the zest of 2 lemons, and 1/3 cup all‑purpose flour. Whisk until just combined; you’ll notice the mixture thickening slightly as the flour incorporates.
Now comes the fun part: add a few drops of yellow and orange food coloring to achieve that pastel chick hue. Stir gently—over‑mixing will introduce air bubbles that can cause the filling to crack during baking.
Fold in a generous handful of mini chocolate chips, reserving a few for the top garnish. The chips should be evenly dispersed, creating tiny dark specks that will later look like adorable chick eyes.
Watch Out: Adding the food coloring too early can cause it to bleed into the crust; add it just before pouring the filling.Pour the lemon filling over the pre‑baked crust, spreading it gently with a spatula to the edges. The filling should sit atop the crust like a bright, glossy blanket.
Sprinkle the remaining mini chocolate chips on top for extra visual flair. This step is pure magic—those dark dots against the sunny yellow make the bars instantly recognizable as Easter chicks.
Return the pan to the oven and bake for an additional 20‑25 minutes, or until the filling is set but still has a slight wobble in the center. The edges will pull away from the pan, and the top will have a faint golden sheen.
Resist the urge to open the oven door early; the sudden temperature drop can cause the filling to crack. Trust the timer, and let the heat work its magic.
Kitchen Hack: Place a shallow pan of water on the lower rack while baking; the steam helps the filling stay silky and prevents a rubbery texture.Once baked, remove the pan and let the bars cool on a wire rack for at least 30 minutes. While still warm, dust the top with a light coating of powdered sugar—this creates a snow‑like finish that looks gorgeous against the pastel background.
After cooling, refrigerate for at least 2 hours. Chilling firms up the filling, making it easier to cut clean squares without crumbling.
Lift the bars out of the pan using the parchment overhang, transfer to a cutting board, and slice into 12 even squares. Use a sharp, warm knife (dip it in hot water and wipe dry) for clean cuts that don’t drag the filling.
Serve at room temperature, or give them a quick 5‑minute stint in the microwave for a warm, melty finish—perfect for those who love a little extra gooeyness.
That's it — you did it. But hold on, I've got a few more tricks that'll take this to another level...
Insider Tricks for Flawless Results
The Temperature Rule Nobody Follows
Never bake a lemon bar filling at a temperature higher than 350°F. Higher heat makes the proteins in the eggs coagulate too quickly, resulting in a grainy texture. Keep the oven at a steady 350°F and use an oven thermometer to verify accuracy; many home ovens run hot.
Why Your Nose Knows Best
When the crust is done, you’ll smell a buttery, nutty aroma that signals it’s ready. If you rely solely on the timer, you might over‑bake and end up with a dry base. Trust that nose—if the scent is there, pull the crust out early.
The 5‑Minute Rest That Changes Everything
After the first bake, let the crust rest for exactly five minutes before adding the filling. This short pause lets the steam escape, preventing a soggy bottom. Skipping this step is a common mistake that leads to a mushy texture.
Chocolate Chip Placement Precision
Scatter half the chocolate chips into the filling and reserve the rest for the top. This two‑step approach ensures you get both flavor pockets and the “eye” aesthetic. A friend tried mixing all the chips in and ended up with a chocolate‑overwhelmed bar—let’s just say the lemon flavor was lost.
The Chill‑Before‑Slice Secret
Refrigerate the bars for at least two hours before cutting. The chill firms the custard, allowing clean, sharp squares. If you’re impatient and cut them warm, they’ll crumble like a sandcastle at high tide.
Creative Twists and Variations
This recipe is a playground. Here are some of my favorite ways to switch things up:
Berry‑Burst Chick
Swap half the lemon juice for raspberry puree and add a swirl of fresh berries on top before baking. The tartness of the berries complements the lemon while adding a burst of color that looks like a chick’s rosy cheeks.
Coconut‑Lime Delight
Replace the butter in the crust with coconut oil and add ¼ cup shredded coconut to the filling. Finish with a drizzle of lime zest for a tropical twist that transports you to a beachside brunch.
Spiced Autumn Chick
Add a pinch of ground cinnamon and nutmeg to the crust, and stir a teaspoon of pumpkin puree into the filling. The warm spices turn the bars into a cozy autumn treat while still keeping the bright lemon core.
White Chocolate Lavender
Fold in white chocolate chips instead of mini dark ones and steep a tablespoon of culinary lavender in the lemon juice before adding it to the mix. The floral notes pair beautifully with the citrus, creating an elegant dessert for spring weddings.
Salted Caramel Chick
Swirl a thin ribbon of homemade salted caramel through the filling before baking. The caramel’s buttery sweetness balances the lemon’s acidity, and a sprinkle of flaky sea salt on top adds a sophisticated crunch.
Storing and Bringing It Back to Life
Fridge Storage
Place the bars in an airtight container lined with parchment paper. They’ll stay fresh for up to four days, and the chilled environment keeps the filling firm. If you notice a dry edge, lightly brush the top with a bit of lemon syrup before serving.
Freezer Friendly
Wrap each bar individually in plastic wrap, then place them in a freezer‑safe zip‑top bag. They freeze beautifully for up to two months. When you’re ready to enjoy them, let them thaw in the fridge overnight and finish with a fresh dusting of powdered sugar.
Best Reheating Method
To revive the bars, preheat the oven to 300°F (150°C), place the bars on a baking sheet, and add a tiny splash (about a teaspoon) of water to the pan. Cover loosely with foil and heat for 8‑10 minutes. The steam restores the custard’s silkiness without drying out the crust.