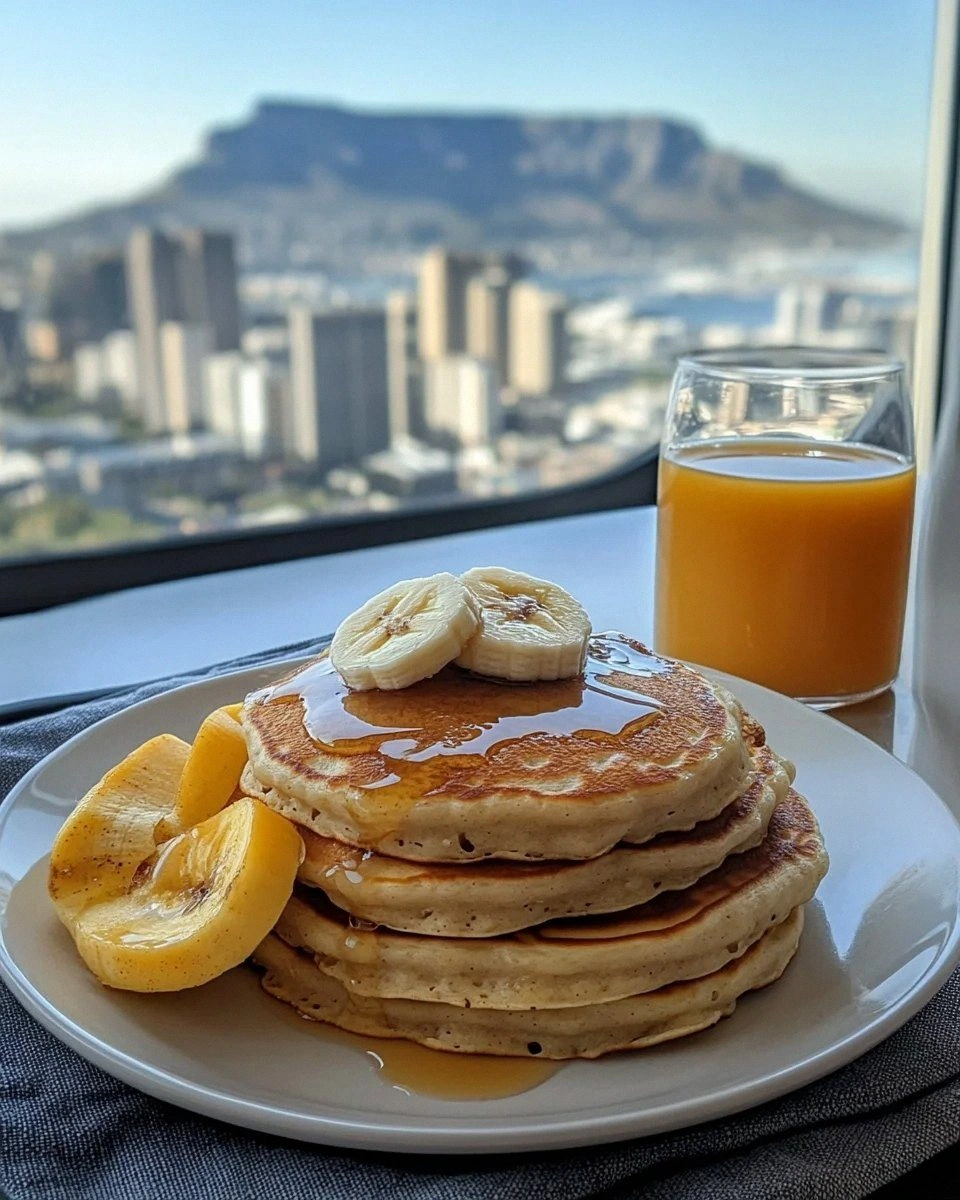
I’ll be honest — the first time I tried to make banana pancakes, they turned out flatter than a pancake‑less pancake. The kitchen smelled like burnt toast, the batter was a gloopy mess, and my roommate walked in, stared at the sad pan, and dared me to “make something actually edible.” That moment sparked a midnight experiment that has now become the holy grail of breakfast comfort. I tossed in a pinch of baking soda, a splash of melted butter, and a secret weapon that turned the whole thing from drab to divine. The result? A stack of golden‑brown clouds that are so fluffy they practically float, with a sweet banana aroma that fills the whole house like a sunrise in a jar.
Picture yourself pulling this out of the skillet, the whole kitchen smelling incredible, the steam rising like a gentle fog that whispers promises of buttery bliss. The first bite is a symphony: the outer edge has a crisp, caramelized kiss, while the interior is pillowy soft, cradling the sweet, mellow banana flavor that never overpowers. The texture is a perfect balance between a traditional American pancake and a delicate crepe, yet it holds its shape like a well‑trained gymnast. I dare you to taste this and not go back for seconds, because once you’ve experienced this level of fluffy perfection, ordinary pancakes become a distant memory.
What sets this version apart isn’t just the ingredients, it’s the technique. Most recipes get the batter too thick, the heat too high, or the bananas too ripe, leading to soggy, gummy outcomes. Here, we’ll treat the batter like a delicate perfume, whisking just enough to combine, then letting it rest so the gluten relaxes and the leavening agents can work their magic. I’ll also reveal a game‑changing tip involving a quick “rest‑and‑rise” that turns every pancake into a cloud‑like marvel. This isn’t a hack; it’s a science‑backed method that makes the difference between a pancake that’s merely good and one that’s hands down the best version you’ll ever make at home.
Okay, ready for the game‑changer? We’ll be using a combination of baking powder and a dash of baking soda, plus a splash of buttermilk‑style acidity from a splash of lemon juice to activate the soda. This creates tiny air pockets that expand when the batter hits the pan, giving each pancake its signature lift. And don’t worry about the bananas turning mushy; the right ripeness level and the gentle folding technique keep the batter airy. Let me walk you through every single step — by the end, you’ll wonder how you ever made it any other way.
What Makes This Version Stand Out
- Flavor Harmony: The natural sweetness of ripe bananas pairs with a whisper of vanilla and a hint of cinnamon, creating a balanced profile that never feels cloying.
- Texture Triumph: A light, airy crumb inside with a crisp, golden edge that shatters like thin ice when you bite into it.
- Simplicity: Only pantry staples are needed; no fancy equipment or exotic spices, making it perfect for a lazy Sunday or a rushed weekday.
- Unique Technique: The batter rest and gentle fold preserve air bubbles, delivering that cloud‑like lift that most recipes miss.
- Crowd Reaction: Even the most skeptical breakfast skeptics end up reaching for the syrup, then asking for the recipe.
- Ingredient Quality: Using fully ripe bananas and real butter elevates the flavor beyond the bland, store‑bought mixes.
- Cooking Method: A medium‑low heat ensures even cooking without burning, giving you that perfect golden hue.
- Make‑Ahead Potential: The batter can be prepared ahead of time and refrigerated, saving precious morning minutes.
Inside the Ingredient List
The Flavor Base
Ripe Bananas: The star of the show, ripe bananas (the ones with brown spots) bring natural sweetness and moisture. Their sugars caramelize during cooking, giving the pancakes a subtle, almost buttery depth. If you skip them, you lose the signature aroma that makes these pancakes unforgettable. As a swap, you can use unsweetened applesauce, but expect a milder flavor.
Vanilla Extract: Just a teaspoon, but it adds a fragrant undertone that lifts the banana flavor without overpowering it. Opt for pure vanilla; imitation can taste harsh and clash with the delicate batter. If you’re out, a splash of maple syrup can mimic the sweet, aromatic quality.
The Texture Crew
All‑Purpose Flour: Provides the structure; we use 2 cups for a balanced crumb. Using cake flour would make the pancakes too tender, while bread flour would make them dense. Look for a flour that feels soft to the touch, and sift it to avoid lumps. If you’re gluten‑free, a blend of rice flour and tapioca starch works well, but you may need an extra egg to bind.
Baking Powder & Baking Soda: The dynamic duo that creates lift. Baking powder gives an initial rise, while baking soda reacts with the acidic lemon juice for a secondary boost. Too much soda can leave a metallic aftertaste, so measure precisely. If you only have one, double the powder and add a pinch more salt.
Milk: The liquid that hydrates the dry ingredients and creates a smooth batter. Whole milk adds richness; you can substitute almond or oat milk for a dairy‑free version, but the pancakes will be slightly less fluffy.
The Unexpected Star
Melted Butter: Adds richness and helps the pancakes develop that coveted crisp edge. Butter also carries flavor better than oil, giving each bite a buttery mouthfeel. For a healthier twist, swap half the butter for a light olive oil, but expect a slightly different flavor profile.
Eggs: The binding agent that holds everything together while contributing to the rise. Two large eggs provide structure without making the batter too heavy. If you’re vegan, replace each egg with a “flax egg” (1 tbsp ground flaxseed + 3 tbsp water) and add a pinch of extra baking powder.
The Final Flourish
Salt: Just a teaspoon, but it amplifies the sweetness and balances the flavors. Skipping salt makes the pancakes taste flat, like a bland canvas. Sea salt or kosher salt works best for texture.
Cinnamon (optional): A pinch adds warmth and a subtle spice that pairs beautifully with banana. Too much can dominate the flavor, so keep it light. If you love spice, try a dash of nutmeg instead.
Everything's prepped? Good. Let's get into the real action...
The Method — Step by Step
In a large mixing bowl, whisk together the flour, baking powder, baking soda, sugar, salt, and optional cinnamon. This dry blend should look uniform, with no clumps of flour. The whisking incorporates air, which is crucial for a light crumb later. Watch the texture: it should feel powdery, not gritty.
In a separate bowl, mash the ripe bananas with a fork until they’re almost pureed, leaving a few small chunks for texture. Add the melted butter, eggs, vanilla extract, and a splash of lemon juice (about 1 teaspoon). Whisk until the wet mixture is glossy and slightly frothy. That sizzle when it hits the pan? Absolute perfection.
Create a well in the center of the dry ingredients and pour the wet mixture in. Gently fold with a rubber spatula, turning the batter over on itself rather than stirring vigorously. This technique preserves the air bubbles you just created, preventing a dense pancake.
Kitchen Hack: Let the batter rest for 5 minutes after mixing; the flour will hydrate fully, and the leaveners will start their magic.While the batter rests, heat a non‑stick skillet or griddle over medium‑low heat and brush lightly with melted butter or oil. The surface should be hot enough that a few drops of water dance, but not so hot that they evaporate instantly. Temperature check: Aim for about 320°F (160°C) if you have an infrared thermometer.
Spoon about 1/4 cup of batter onto the skillet for each pancake. The batter should spread gently; if it spreads too fast, the pan is too hot. Let the edges start to set and the surface develop tiny bubbles — this usually takes 2‑3 minutes. When the edges pull away slightly and the tops look set, it’s time to flip.
Flip the pancake with a thin, flexible spatula, and cook for another 1‑2 minutes until the second side is golden brown.
Watch Out: Resist the urge to press down on the pancake; this squeezes out the air and makes them dense.Transfer the cooked pancakes to a warm plate and keep them covered with foil to retain heat while you finish the batch. This prevents them from cooling too quickly and losing that fluffy interior. If you’re making a large batch, you can keep the finished pancakes in a 200°F (95°C) oven.
Once all pancakes are cooked, drizzle with maple syrup, a dollop of Greek yogurt, or a sprinkle of toasted nuts for added crunch. The contrast of warm, sweet pancakes with cool, tangy yogurt is a textural delight that elevates the dish.
Serve immediately, and watch as your guests scramble for the plate. That moment when they realize they’ve just tasted a pancake that’s both airy and buttery? Pure joy. And if you’re still not convinced, I dare you to try making a second batch — you’ll be amazed at how consistent the results are.
That's it — you did it. But hold on, I've got a few more tricks that'll take this to another level, from topping ideas to secret sauces that will make your breakfast the talk of the town.
Insider Tricks for Flawless Results
The Temperature Rule Nobody Follows
Most home cooks crank the heat to “high” hoping for faster cooking, only to end up with burnt edges and raw centers. Keep the skillet at medium‑low (around 320°F) and be patient; the batter needs gentle, even heat to rise properly. A quick tip: sprinkle a few drops of water on the surface; if they dance, you’re at the right temperature.
Why Your Nose Knows Best
Your sense of smell is a reliable indicator of doneness. When the pancakes start to emit a nutty, caramel scent, you’re approaching the perfect flip moment. If you rely solely on visual cues, you might flip too early and lose that airy interior.
The 5‑Minute Rest That Changes Everything
After mixing, let the batter sit for five minutes. This short rest allows the flour to fully hydrate and the leavening agents to activate, resulting in a noticeably higher rise. Skipping this step is the most common reason for flat pancakes.
Butter Brush Technique
Instead of tossing a lot of butter into the pan, lightly brush the surface with melted butter using a silicone pastry brush. This creates an even coating, prevents sticking, and adds a thin, buttery crust without greasiness.
The Secret Sweetener Swap
Swap half the granulated sugar for coconut sugar for a subtle caramel note that pairs beautifully with banana. The texture remains the same, but the flavor depth is elevated, making the pancakes taste like a gourmet brunch.
Creative Twists and Variations
This recipe is a playground. Here are some of my favorite ways to switch things up:
Chocolate Chip Banana Bliss
Fold a half‑cup of dark chocolate chips into the batter just before cooking. The molten chocolate pockets add richness, turning a classic breakfast into a dessert‑like treat that kids adore.
Berry‑Burst Surprise
Add a handful of fresh blueberries or sliced strawberries to the batter for a burst of acidity that cuts through the sweetness. The berries caramelize slightly, creating pockets of juicy flavor.
Nutty Crunch Variation
Stir in a quarter cup of chopped toasted walnuts or pecans for added texture and a buttery, nutty undertone that complements the banana perfectly.
Spiced Autumn Edition
Swap the cinnamon for a blend of pumpkin spice (cinnamon, nutmeg, ginger, cloves) and add a tablespoon of pumpkin puree to the batter for a cozy, fall‑inspired pancake.
Savory Breakfast Flip
Omit the sugar and add a pinch of smoked paprika, a dash of chopped chives, and a grated cheddar cheese swirl. Serve with a poached egg for a hearty, savory twist.
Vegan Coconut Dream
Replace the butter with coconut oil, use almond milk, and swap eggs for flax “eggs.” Top with toasted coconut flakes for an exotic, dairy‑free version that still packs the fluff.
Storing and Bringing It Back to Life
Fridge Storage
Place cooled pancakes in an airtight container and store them in the refrigerator for up to 3 days. Layer parchment paper between each pancake to prevent sticking.
Freezer Friendly
Stack the pancakes with wax paper, seal them in a zip‑top freezer bag, and freeze for up to 2 months. When ready to eat, reheat directly from frozen for best texture.
Best Reheating Method
For a quick revival, sprinkle a tiny splash of water over the pancake, cover with a damp paper towel, and microwave for 30‑45 seconds. The steam restores fluffiness without making them soggy.