I was standing in my kitchen on a rainy Tuesday, staring at a half‑empty pumpkin can and a pile of flour that looked more like a snowdrift than an ingredient list. The thunder outside was a perfect soundtrack for the kind of culinary experiment that usually ends in a burnt disaster, but that night I promised myself I would finally conquer the elusive “soft pumpkin scone” that has haunted my brunch dreams for years. I whisked, I measured, I even sang a little off‑key to keep the vibes light, and when the first batch came out of the oven, the whole apartment filled with a scent that could convince even the grumpiest neighbor to break out of their work‑from‑home slump.
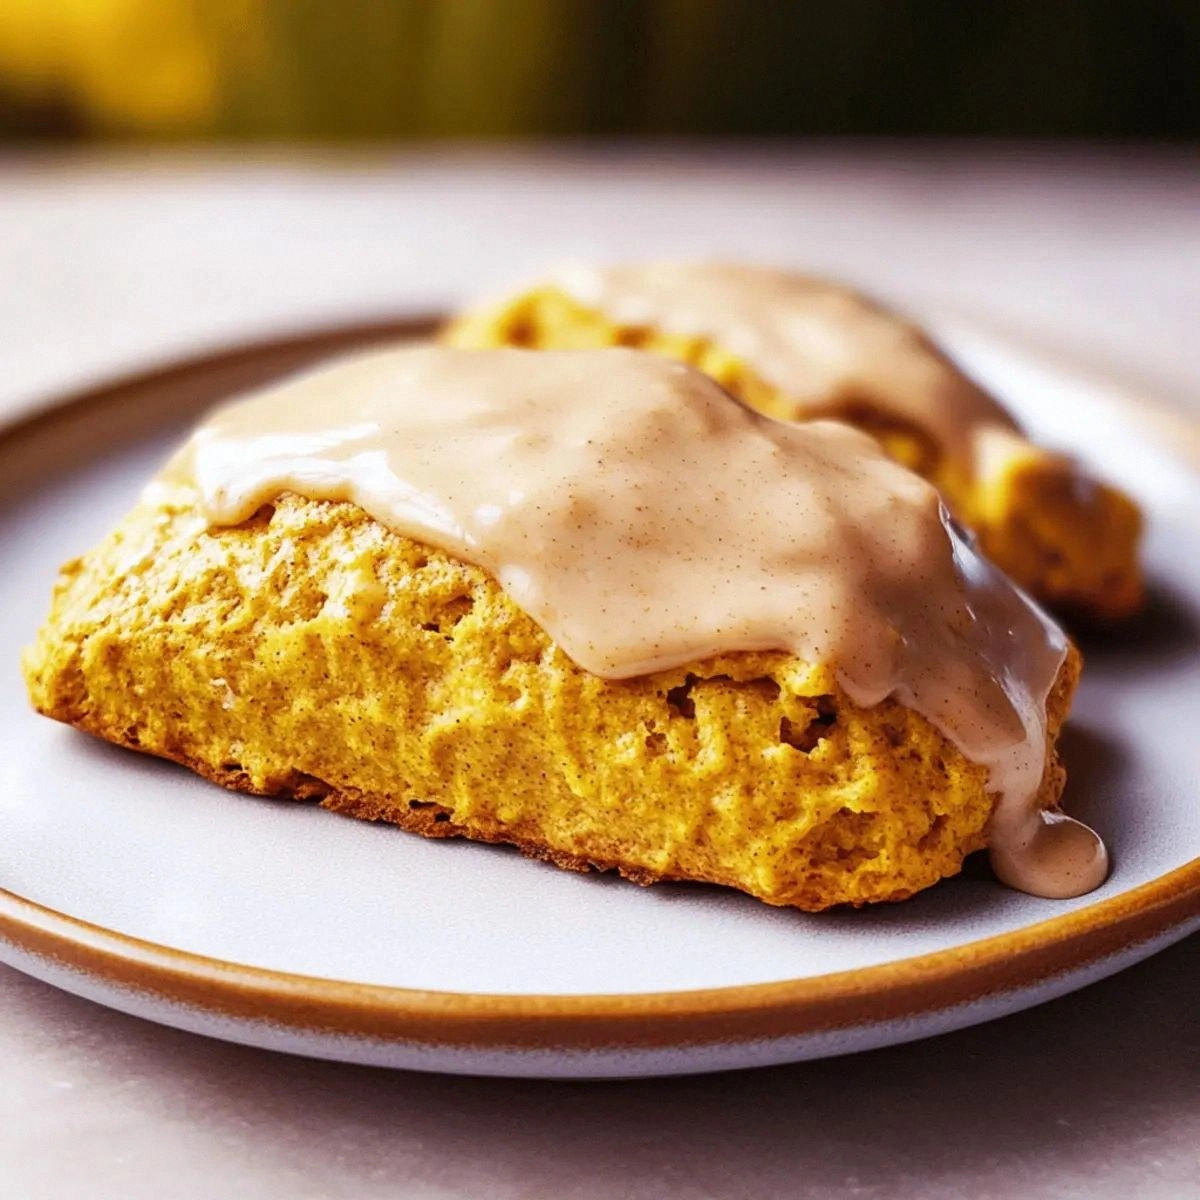
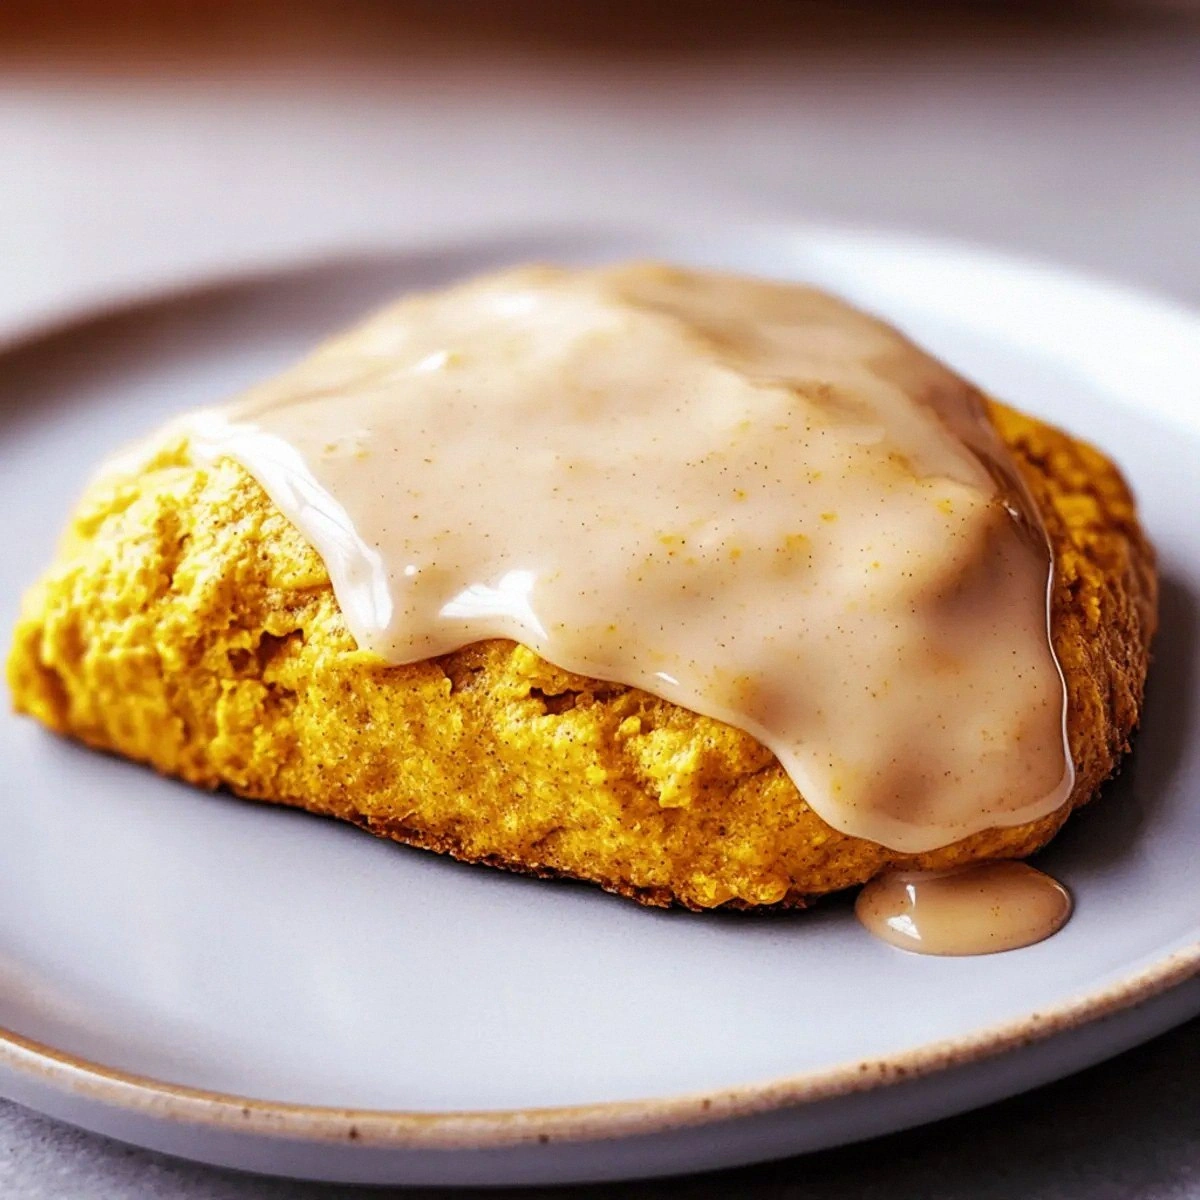
Picture this: a golden‑brown crust that cracks just enough to reveal a cloud‑like interior, speckled with flecks of cinnamon that look like tiny fireworks. The glaze on top is a sweet, amber river that pools into every crevice, glistening like a polished marble countertop. When you bite into it, the texture is so tender that it practically melts on your tongue, while the pumpkin and spice flavors dance together like a well‑rehearsed jazz trio. I dare you to taste this and not go back for seconds; the combination is that addictive.
Most pumpkin scone recipes I’ve tried either turned out dry, crumbly, or overly dense, as if someone had swapped the butter for a brick. The secret here is a precise balance of moisture from the pumpkin puree, the richness of cold butter, and the lift from both baking powder and a pinch of baking soda. I’ll be honest — I ate half the batch before anyone else got to try it, and that was the only crime I committed that day. This is hands down the best version you’ll ever make at home, and I’m about to spill every detail, from the exact way to fold in the butter to the moment you drizzle the glaze.
Let me walk you through every single step — by the end, you’ll wonder how you ever made it any other way. Okay, ready for the game‑changer? The next part? Pure magic. Stay with me here — this is worth it.
What Makes This Version Stand Out
- Flavor Fusion: The combination of pumpkin, warm spices, and a sweet glaze creates a flavor profile that feels both comforting and festive, perfect for any season.
- Feather‑Light Texture: By cutting cold butter into the flour and then gently folding in the wet ingredients, the scones achieve a melt‑in‑your‑mouth softness that most recipes miss.
- Simple Technique: No fancy mixers or special pans required; a simple hand‑mix and a basic baking sheet do the trick.
- Ingredient Quality: Using real pumpkin puree (not pumpkin pie filling) and fresh spices ensures a bright, natural taste without any artificial aftertaste.
- Crowd‑Pleaser: Even the most skeptical brunch‑goer will be converted after the first bite, and the glaze adds a visual wow factor that’s Instagram‑ready.
- Make‑Ahead Potential: These scones freeze beautifully, and the glaze can be stored separately, so you can prep ahead for a stress‑free holiday spread.
- Balanced Sweetness: The glaze provides just enough sugar to complement the pumpkin without overwhelming the subtle spice notes.
Inside the Ingredient List
The Flavor Base
Pumpkin puree is the heart of this recipe, delivering moisture, natural sweetness, and that unmistakable autumnal aroma. Using a canned, 100% pumpkin puree (not pumpkin pie filling) ensures you get a pure, unadulterated flavor without extra sugar or spices. If you’re feeling adventurous, you can roast fresh pumpkin cubes and blend them yourself for an even deeper, caramelized note. Skipping the pumpkin would be a crime; the scones would lose their signature softness and the subtle earthiness that makes them special.
Ground cinnamon, ginger, nutmeg, and cloves form the spice quartet that turns ordinary pumpkin into a celebration. Each spice contributes a different layer: cinnamon adds warmth, ginger gives a gentle bite, nutmeg offers a sweet earthiness, and cloves bring a hint of piney sharpness. If you’re out of one, you can substitute an extra pinch of the others, but the balance will shift slightly.
The Texture Crew
All‑purpose flour provides the structural backbone, while the combination of baking powder and a dash of baking soda creates a light lift. The soda reacts with the acidity in the buttermilk (or heavy cream) to produce tiny air pockets that keep the crumb airy. If you replace the flour with a gluten‑free blend, add a tablespoon of xanthan gum to mimic the elasticity, but the texture will be a tad denser.
Cold, cubed butter is the secret weapon for those flaky layers. When the butter melts during baking, it creates steam pockets that puff the scone from the inside out. Using softened butter will result in a dense, biscuit‑like texture that defeats the purpose of “soft” scones.
The Unexpected Star
Buttermilk (or heavy cream) adds tang that cuts through the sweetness and contributes to the tender crumb. The acidity also activates the baking soda, ensuring a uniform rise. If you’re out of buttermilk, mix one tablespoon of lemon juice or white vinegar into a cup of milk and let it sit for five minutes — the same magical reaction will occur.
The egg acts as a binder, giving the scones structure without making them rubbery. A large egg is ideal; if you’re using a smaller one, add a splash of milk to make up the volume.
The Final Flourish
Light brown sugar adds a subtle molasses undertone that pairs perfectly with the warm spices, while the powdered sugar glaze provides a glossy finish that looks as good as it tastes. The glaze’s secret is a touch of cinnamon, which ties the whole flavor loop together. If you prefer a less sweet glaze, reduce the powdered sugar by a quarter and add a splash of maple syrup for a caramel twist.
Everything’s prepped? Good. Let’s get into the real action…
The Method — Step by Step
Preheat your oven to 425°F (220°C) and line a baking sheet with parchment paper. While the oven warms, whisk together the flour, baking powder, baking soda, fine sea salt, and all the ground spices in a large bowl. This dry mix should look uniformly speckled, like a mini autumn landscape. Power transition: Okay, ready for the game‑changer?
Add the cold, cubed butter to the dry ingredients. Using a pastry cutter or your fingertips, rub the butter into the flour until the mixture resembles coarse crumbs with a few pea‑sized butter pieces.
Kitchen Hack: If the butter starts melting, chill the bowl for a few minutes to keep those buttery nuggets intact.In a separate bowl, whisk together the pumpkin puree, light brown sugar, buttermilk (or heavy cream), and the egg until smooth. The mixture should be a deep orange, glossy and slightly thick. Give it a quick taste; you’ll notice a gentle sweetness that will later be amplified by the glaze.
Create a well in the center of the flour‑butter mixture and pour in the pumpkin‑wet blend. Using a rubber spatula, fold the wet and dry components together just until they combine; you’ll see a few streaks of butter, and that’s exactly what you want. Over‑mixing will develop gluten and make the scones tough.
- Turn the dough out onto a lightly floured surface and pat it into a 1‑inch thick rectangle. The surface should be just moist enough that the dough doesn’t stick, but not wet.Watch Out: If the dough feels too sticky, sprinkle a tablespoon of flour and continue folding; too much flour will make the scones dense.
Using a sharp floured cutter (or a large glass), cut out rounds about 2‑2.5 inches in diameter. Place them on the prepared baking sheet, leaving a little space between each. For an extra touch, brush the tops lightly with a bit of melted butter; this encourages a golden‑brown crust.
Bake for 12‑15 minutes, or until the tops are a deep golden hue and the edges start to pull away from the parchment. The aroma at this point is pure comfort – think pumpkin spice latte meets fresh‑baked bakery. When you tap the side of a scone, it should sound hollow, indicating a fully cooked interior.
While the scones cool for about five minutes, whisk together the powdered sugar, milk, and cinnamon to create the glaze. The glaze should be pourable but thick enough to coat the tops without running off the sides. If it’s too thick, add a splash more milk; if too thin, sprinkle in a bit more powdered sugar.
Drizzle the glaze over the warm scones using a spoon or a small ladle. The glaze will melt slightly, creating a glossy river that seeps into every crevice. Let the scones sit for another two minutes so the glaze sets just enough to give a beautiful sheen without hardening. That sizzle when it hits the pan? Absolute perfection.
That's it — you did it. But hold on, I've got a few more tricks that'll take this to another level…
Insider Tricks for Flawless Results
The Temperature Rule Nobody Follows
Never bake scones at a low temperature; the high heat creates steam that lifts the dough and gives that coveted crackly top. I once tried a gentle 350°F bake and ended up with a soggy mess that resembled a pancake more than a scone. Keep your oven pre‑heated and resist the urge to open the door early — the first ten minutes are crucial for that perfect rise.
Why Your Nose Knows Best
Your sense of smell is a reliable indicator of doneness. When the kitchen fills with a sweet, caramel‑spice aroma, it’s a signal that the interior is cooked through. If you’re unsure, gently lift a scone; the underside should be a deep, buttery brown, not pale.
The 5‑Minute Rest That Changes Everything
After removing the scones from the oven, let them rest on a wire rack for five minutes before glazing. This short pause allows the interior to set, preventing the glaze from soaking in too quickly and making the scones soggy. A friend once skipped this step and ended up with a gummy top — lesson learned.
Butter Brush Magic
Brushing the tops with melted butter before baking isn’t just for color; it also creates a thin barrier that locks moisture inside, ensuring every bite stays soft. Use a pastry brush and a thin coat; too much butter will cause the scones to spread.
Glaze Timing Trick
Apply the glaze while the scones are still warm, but not piping hot. The residual heat helps the glaze spread evenly, while the scones stay soft enough to absorb a little of the sweetness. If you wait until they’re completely cool, the glaze will sit on top like a hard shell.
Creative Twists and Variations
This recipe is a playground. Here are some of my favorite ways to switch things up:
Maple‑Pecan Crunch
Add a quarter cup of chopped toasted pecans to the dough and substitute half the brown sugar with pure maple syrup. The nuts give a satisfying crunch, while the maple deepens the autumnal sweetness. Perfect for a brunch that needs a little extra wow factor.
Chocolate Chip Surprise
Stir in half a cup of dark chocolate chips just before shaping the scones. The molten chocolate pockets melt into the pumpkin base, creating pockets of rich indulgence that contrast beautifully with the spice.
Citrus‑Zest Lift
Add the zest of one orange (or lemon) to the wet mixture and a splash of orange juice to the glaze. The bright citrus cuts through the richness, offering a fresh twist that’s ideal for spring brunches.
Savory Herb Version
Swap the sweet brown sugar for an equal amount of grated Parmesan and fold in 1 tablespoon of fresh rosemary, finely chopped. The result is a savory scone that pairs wonderfully with a poached egg or smoked salmon.
Gluten‑Free Adaptation
Replace the all‑purpose flour with a 1‑to‑1 gluten‑free blend, add 1 teaspoon of xanthan gum, and follow the same method. The texture stays tender, and the flavor remains true to the original.
Storing and Bringing It Back to Life
Fridge Storage
Place cooled scones in an airtight container and store them in the refrigerator for up to three days. A thin parchment paper layer between each prevents them from sticking together.
Freezer Friendly
Lay the scones on a baking sheet, freeze until solid, then transfer to a zip‑top freezer bag. They’ll keep for three months. When you’re ready to enjoy, pop them in a preheated 350°F oven for 8‑10 minutes; a tiny splash of water before reheating revives that melt‑in‑your‑mouth softness.
Best Reheating Method
For a quick microwave revival, wrap a scone in a damp paper towel and heat for 15‑20 seconds. For a crispier exterior, reheat in a toaster oven for 5 minutes; the glaze will regain its glossy sheen.