I was standing in my kitchen, the smoke alarm screaming like an over‑enthusiastic referee, because I’d accidentally set the oven to broil instead of bake while trying to rescue a batch of soggy chicken wings. The whole neighborhood could smell the charred disaster, and I swore I’d never touch a wing again. Then, a friend dared me: “Make them so crispy they could double as a drumstick for a percussionist.” I laughed, rolled up my sleeves, and decided to prove her wrong with a dry rub that would turn those humble poultry pieces into a crunchy, flavor‑packed masterpiece.
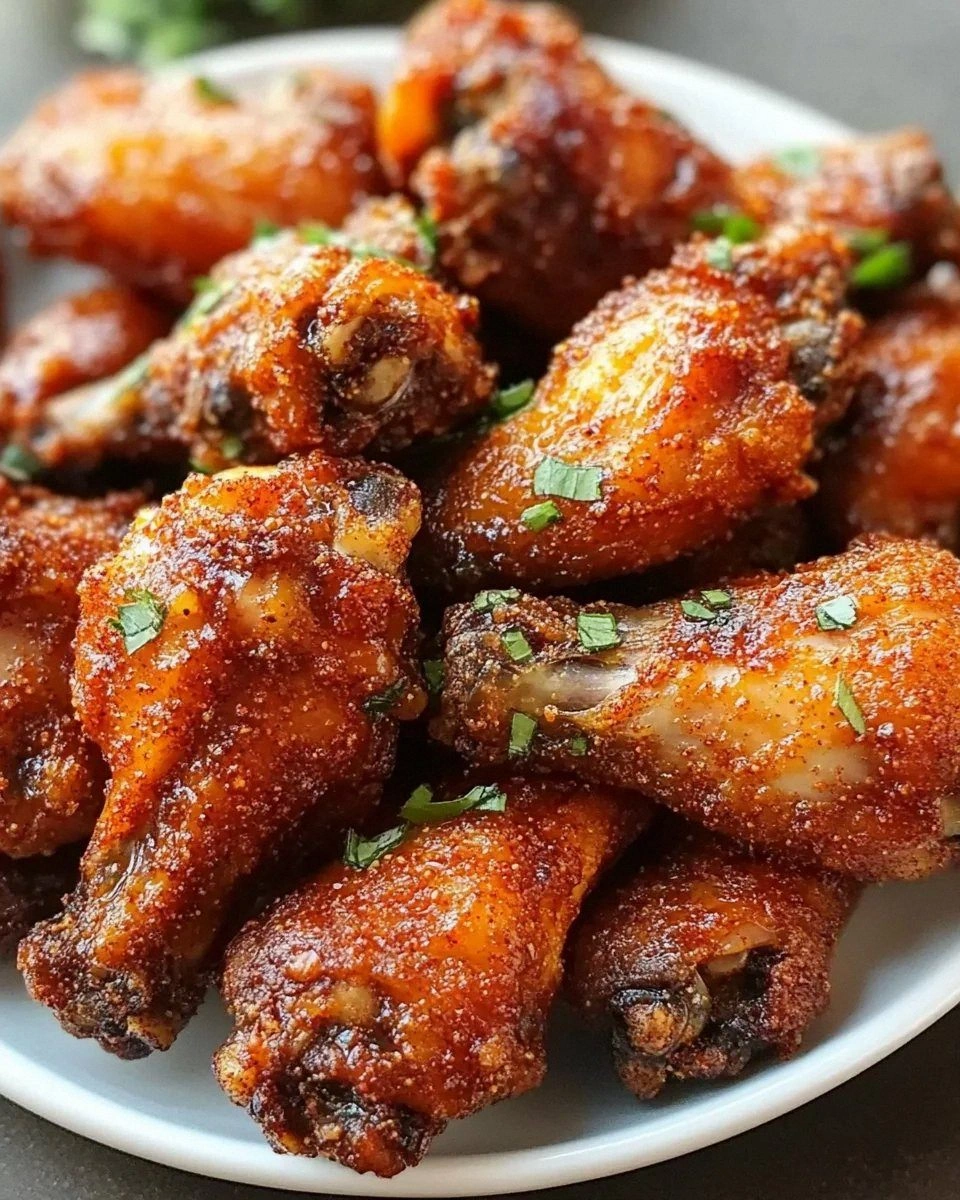
Picture this: the moment the wings hit the hot baking sheet, you hear a sizzle that sounds like tiny fireworks exploding in a tin pan. The aroma of smoked paprika, garlic, and a whisper of cayenne rushes through the kitchen, making your nose do a happy dance. The skin turns a deep, golden‑brown that shatters like thin ice when you bite into it, while the meat underneath stays juicy, tender, and surprisingly buttery. Every bite is a contrast of textures—crackle on the outside, melt‑in‑your‑mouth on the inside—like a perfectly choreographed duet between crunch and succulence.
Most recipes get this completely wrong. They either drown the wings in sauce, leaving you with soggy skin, or they rely on a mystery “secret ingredient” that you can’t find in any grocery aisle. Here’s what actually works: a dry rub that incorporates a pinch of baking powder to raise the pH and create that coveted crackle, a balanced blend of spices that hits every taste bud, and a high‑heat oven that mimics the intensity of a deep‑fat fryer without the mess. I’ll be honest — I ate half the batch before anyone else got to try it, and that’s because this version is hands down the best you’ll ever make at home.
Okay, ready for the game‑changer? I’m about to spill the beans on the one ingredient most people overlook—a splash of olive oil that helps the rub cling like a second skin, and a final dusting of sea salt that pops right before you serve. Let me walk you through every single step — by the end, you’ll wonder how you ever made it any other way.
What Makes This Version Stand Out
- Flavor Explosion: The rub is a symphony of smoked paprika, garlic, and a whisper of cayenne that delivers a smoky‑spicy punch without overwhelming the natural chicken taste.
- Ultimate Crunch: Baking powder raises the skin’s pH, creating micro‑bubbles that fry the exterior in the oven, giving you that addictive crackle that shatters like thin ice.
- Simplicity: Only pantry staples are required; no exotic spices or hard‑to‑find sauces, so you can whip this up on a Tuesday night with confidence.
- Ingredient Quality: Fresh, un‑frozen wings retain more moisture, and a drizzle of high‑quality olive oil helps the rub stick like glue.
- Crowd Reaction: I dare you to taste this and not go back for seconds; even the pickiest eaters beg for the secret recipe.
- Make‑Ahead Potential: The wings can be seasoned hours in advance, allowing the flavors to deepen while you prep other dishes.
- Cooking Method: Baking at 425°F creates a dry‑heat environment that mimics deep‑frying without the oil bath, keeping your kitchen cleaner.
- Versatility: The base rub is adaptable for spicy, sweet, or herb‑infused variations, making it a go‑to for any occasion.
Inside the Ingredient List
The Flavor Base
Smoked paprika is the heart of the rub, delivering a deep, wood‑smoked aroma that makes the wings smell like they’ve been slow‑cooked over a campfire. If you can’t find smoked paprika, regular sweet paprika plus a dash of liquid smoke will do the trick, though the flavor won’t be quite as layered. Garlic powder adds that unmistakable savory bite, and it’s essential because fresh garlic would burn at the high oven temperature, turning bitter.
The Texture Crew
Baking powder is the unsung hero here. It raises the skin’s pH, encouraging the formation of tiny bubbles that turn into crispy pockets when the heat hits. Without it, you end up with a soft, rubbery crust that no one wants. Olive oil is the glue that binds the dry rub to the wing, ensuring an even coating that doesn’t slide off during the bake.
The Unexpected Star
A pinch of brown sugar may sound odd in a dry rub, but it caramelizes just enough to add a subtle sweetness that balances the heat from cayenne. This tiny amount also contributes to a glossy finish that makes the wings look as good as they taste. If you’re watching sugar, swap it for a drizzle of maple syrup right before the final five minutes of baking.
The Final Flourish
Sea salt sprinkled at the end provides that final pop, brightening every other flavor. Freshly cracked black pepper adds a gentle heat that lingers without overpowering. Dried thyme brings an earthy note that rounds out the spice profile, making the rub feel more complex than the sum of its parts.
Everything's prepped? Good. Let's get into the real action...
The Method — Step by Step
Start by preheating your oven to 425°F (220°C). This high temperature is crucial; it creates the initial burst of steam that helps the skin puff up before it crisps. While the oven warms, line a large baking sheet with parchment paper and set a wire rack on top. The rack allows hot air to circulate all around the wings, preventing them from sitting in their own juices.
Kitchen Hack: Place the baking sheet on the middle rack and a second rack on the top third; this creates a convection‑like effect even in a conventional oven.Pat the chicken wings dry with paper towels, then let them sit uncovered in the fridge for 15‑20 minutes. This extra air‑dry step removes surface moisture, which is the enemy of crispiness. If you’re short on time, a quick 5‑minute air‑dry on the counter works, but the fridge method yields a more reliable crunch.
In a large bowl, whisk together the baking powder, smoked paprika, garlic powder, onion powder, cayenne, black pepper, salt, dried thyme, and brown sugar. The dry rub should look uniformly speckled, with the brown sugar giving a faint caramel hue. This is the moment of truth for flavor balance; taste a pinch—if it’s too salty, add a dash more sugar; if it’s too sweet, a little extra cayenne will bring it back.
Drizzle the olive oil over the wings and toss until each piece is lightly coated. The oil acts like a glue, ensuring the rub adheres without sliding off during the bake. Once coated, sprinkle the dry rub over the wings, using your hands to massage it into every crevice. The rub should cling like a second skin, not a powdery dust.
Arrange the wings on the wire rack, leaving at least a half‑inch gap between each piece. This spacing is vital; crowding the rack traps steam, which softens the skin instead of crisping it. As you place them, listen for a faint “sizzle” as the oil meets the hot metal—an audible promise of crunch.
Watch Out: If you use a non‑stick rack, the wings may slide; a stainless steel rack provides better grip.Slide the sheet into the oven and bake for 20 minutes. At this point, the skin should start turning a light amber and the edges will begin pulling away from the meat. Open the oven briefly to check—if the wings are releasing a toasty scent, you’re on the right track. Rotate the sheet halfway through to ensure even browning, especially if your oven has hot spots.
After the initial 20 minutes, increase the oven temperature to 450°F (230°C) and continue baking for another 10‑12 minutes. This final blast of heat is what creates the ultimate crackle; the skin will blister and pop like popcorn kernels. Keep a close eye—once the edges start to curl and the color deepens to a rich mahogany, they’re done.
Remove the wings from the oven and let them rest on the rack for 5 minutes. Resting allows the juices to redistribute, keeping the meat moist while the skin stays crisp. While they rest, sprinkle a final pinch of flaky sea salt for that bright pop you’ll taste on the first bite.
Serve immediately with your favorite dipping sauce—blue cheese, ranch, or a simple squeeze of fresh lemon. The contrast between the salty, smoky crunch and the bright citrus will make your taste buds do a happy jig. And remember, this is the kind of dish that disappears faster than you can say “second round.”
That's it — you did it. But hold on, I've got a few more tricks that'll take this to another level...
Insider Tricks for Flawless Results
The Temperature Rule Nobody Follows
Never settle for a pre‑heated oven that’s below 425°F. Even a 10‑degree dip can cause the skin to steam instead of crisp, resulting in a soggy texture. I once tried 400°F because my oven’s dial seemed “safe,” and the wings turned out limp—lesson learned. Use an oven thermometer for precision; the extra few minutes of heat are worth the crunchy payoff.
Why Your Nose Knows Best
Your sense of smell is a better indicator than a timer when it comes to dry‑rub wings. When the kitchen fills with that smoky, slightly sweet perfume, you’re within two minutes of perfection. If the scent turns overly burnt, pull the wings out immediately; they can go from perfect to charred in seconds.
The 5‑Minute Rest That Changes Everything
Resist the urge to dive in right after the timer dings. Letting the wings rest for five minutes lets the interior juices settle, preventing a dry bite. This short pause also allows the crust to firm up a bit more, making each bite louder and more satisfying.
Baking Powder Balance
Too much baking powder can give a metallic aftertaste; too little and you lose the crackle. The sweet spot for a standard 2‑lb batch is two teaspoons. If you’re scaling up, keep the ratio at 1 teaspoon per pound of wings.
Season Early, Bake Late
If you have time, season the wings and let them sit uncovered in the fridge for an hour or two. This dry‑aging process intensifies the flavor and further dries the skin, giving you that ultra‑crisp finish. I tried this once for a game day party, and the feedback was unanimous: “Best wings ever.”
Creative Twists and Variations
This recipe is a playground. Here are some of my favorite ways to switch things up:
Honey‑Glazed Heat
Add a tablespoon of honey to the olive oil before tossing the wings. The honey caramelizes during the final high‑heat blast, creating a sweet‑spicy glaze that pairs perfectly with the smoky rub. Great for kids who need a little sugar on the side.
Herb‑Infused Delight
Swap the dried thyme for rosemary and add a teaspoon of dried oregano. The herbaceous notes lift the flavor profile, making the wings feel more Mediterranean. Serve with a lemon‑yogurt dip for a fresh contrast.
Asian‑Style Kick
Replace the smoked paprika with five‑spice powder and add a teaspoon of ground ginger. Finish with a drizzle of soy sauce and a sprinkle of toasted sesame seeds after baking. The result is a savory‑sweet wing that pairs well with pickled cucumbers.
Maple‑Bourbon BBQ
Mix two tablespoons of maple syrup and a splash of bourbon into the olive oil before coating the wings. The bourbon adds depth, while the maple gives a caramelized crust that’s perfect for a backyard barbecue.
Citrus‑Zest Zing
Add the zest of one lemon and a pinch of dried dill to the rub. The citrus brightens the smoky base, and the dill adds an unexpected freshness. These are the wings you’d serve at a brunch gathering.
Storing and Bringing It Back to Life
Fridge Storage
Place cooled wings in an airtight container or a zip‑top bag. They’ll stay fresh for up to three days. When you’re ready to eat, spread them on a baking sheet and reheat at 375°F for 10‑12 minutes, adding a splash of water to the pan to create steam that revives the crispness.
Freezer Friendly
Freeze the wings raw, after they’ve been coated in the dry rub but before baking. Lay them on a parchment‑lined tray, freeze solid, then transfer to a freezer bag. They’ll keep for up to two months. When you’re ready, bake from frozen at 425°F for 25‑30 minutes, then finish at 450°F for that final crunch.
Best Reheating Method
For the ultimate reheated wing, use a preheated cast‑iron skillet over medium‑high heat. Add a teaspoon of oil, then toss the wings in, covering the pan for the first two minutes to steam the interior, then uncover to let the skin crisp up. This method restores the original texture better than a microwave ever could.