I was halfway through a chaotic Sunday brunch when the kitchen exploded in a way that made me think, “I need a snack that can save the day.” The stove was overworked, the fridge was a maze of leftovers, and the only thing that could bring a smile to everyone was a quick, flavorful bite that wouldn’t require a second meal. I stared at the pot of boiled potatoes on the counter and realized that the humble aloo tikki was about to get a serious upgrade. The idea was simple: take the classic Indian potato patty, give it a crispier coat, and add a burst of fresh veggies that would make the whole house smell like a summer market. If you’re like me and have a pantry full of “just in case” ingredients, you’re about to discover the best version of a snack you’ll ever make at home.
Picture this: the steam rising from the pot, the aroma of cumin and ginger swirling through the air, and the faint sizzling of onions that promise a savory crunch. I could hear the clatter of the spoon against the pot, the hiss of a hot pan, and the muffled chatter of my friends as they waited for something delicious to appear. The sight of golden-brown tikkis on a plate, their edges crisp and slightly charred, would make any foodie’s heart skip a beat. The sound of the first bite—crack, then a satisfying snap—would echo in your ears like a small celebration. And the taste? A perfect balance of earthy potato, sweet peas, and a subtle heat from the chili that lingers just enough to keep you reaching for more.
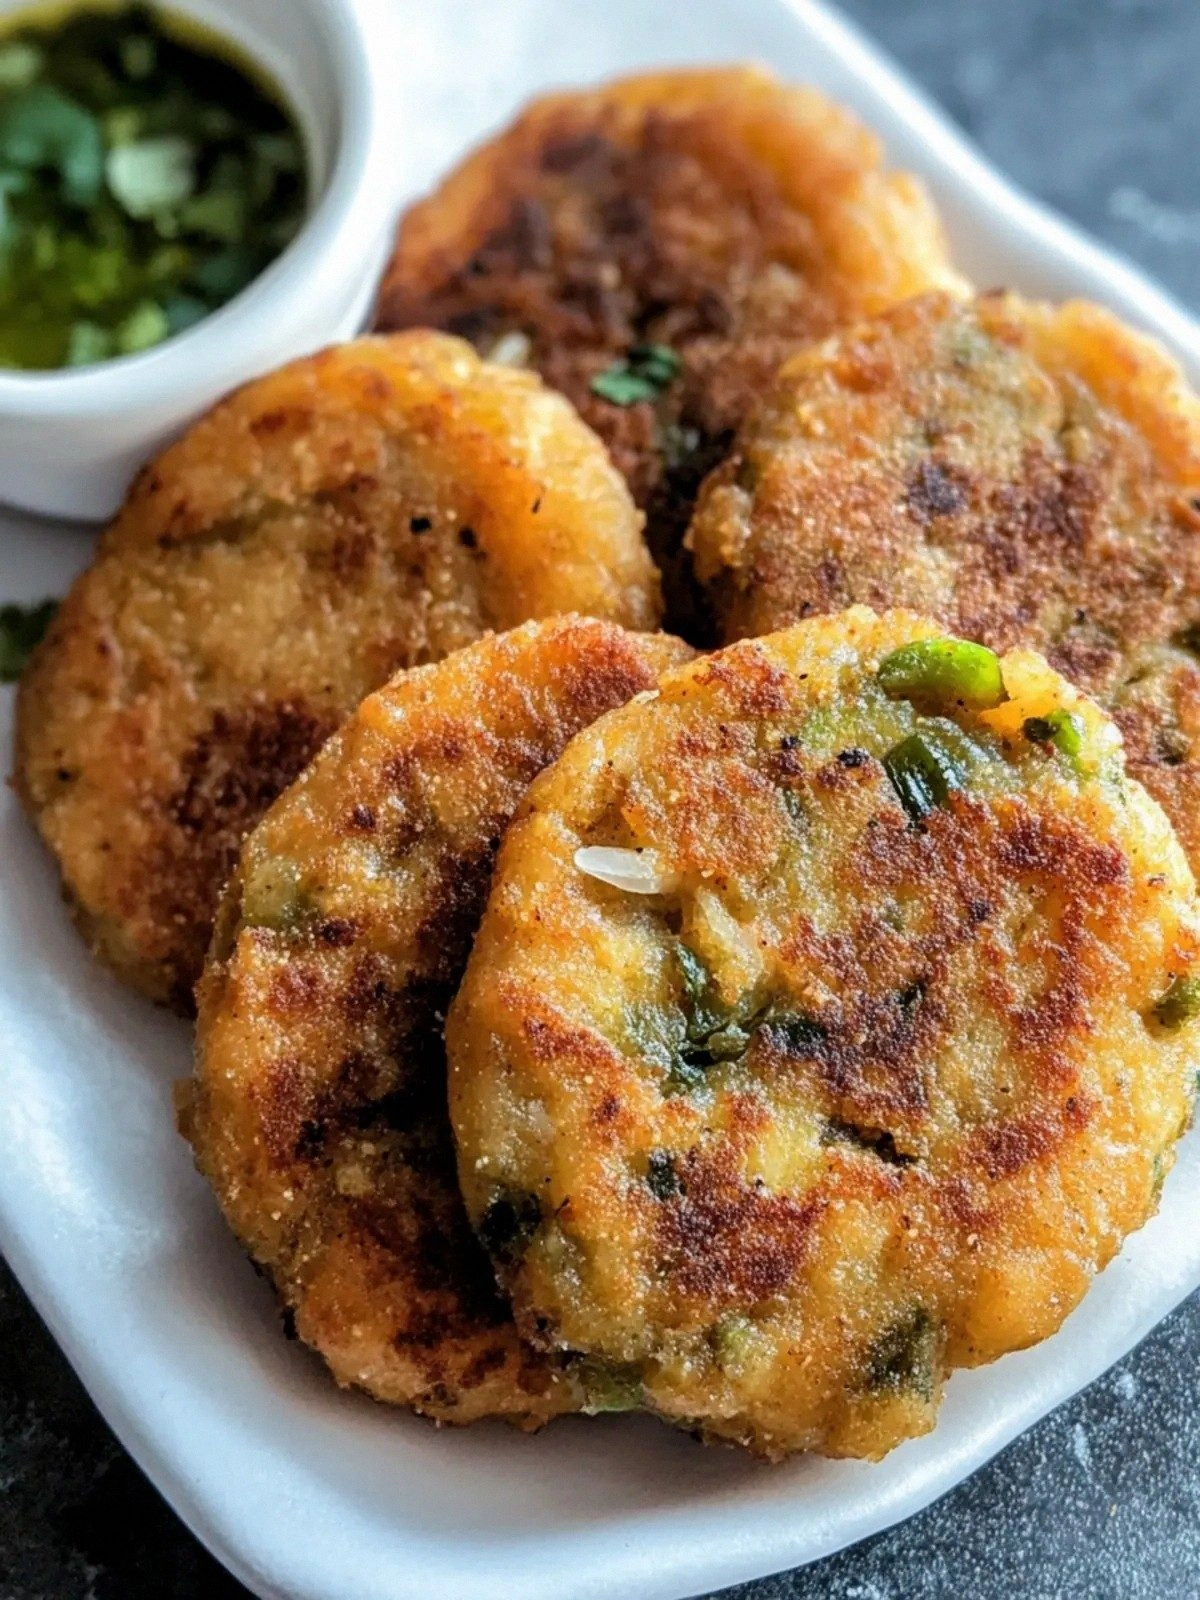
What makes this version stand out is not just the texture or the flavor, but the way each component is orchestrated to create a symphony of sensations. I dare you to taste this and not go back for seconds. The potatoes are mashed to a silky smoothness that traps the peas and bell pepper inside, creating pockets of color and crunch. The batter, made with just a touch of flour and a sprinkle of spices, forms a protective shell that crisps up to a golden perfection while keeping the inside tender. And the sauce—yogurt mixed with chutney—acts like a cool velvet that wraps each tikki, balancing the heat and adding a refreshing finish. Most recipes get this completely wrong. Here's what actually works, and why this dish will become your new favorite homemade snack.
I’ll be honest—after making the first batch, I ate half before anyone else got a chance. The combination of the crispy exterior, the soft interior, and the tangy dip made it impossible to stop. The next time I prepared it, I was ready for the inevitable crowd reaction: “Where did you learn this?” and “Can you share the secret?” I’m here to walk you through every single step—by the end, you’ll wonder how you ever made it any other way. Picture yourself pulling this out of the pan, the whole kitchen smelling incredible, and the anticipation of that first bite building up like a drumroll. This is hands down the best version you'll ever make at home, and I’m going to show you why.
What Makes This Version Stand Out
- Taste: The blend of cumin, ginger, and chili powder creates a flavor profile that is simultaneously earthy, spicy, and aromatic. The subtle sweetness from the peas and bell pepper balances the heat, leaving a lingering warmth that invites a second bite.
- Texture: The crisp exterior is achieved with a light flour coating that turns golden and crunchy, while the interior remains silky and moist. This contrast makes each bite a delightful experience.
- Ingredient Quality: Using fresh, medium russet potatoes and crisp green bell pepper ensures that the base is both flavorful and tender. The quality of the spices and yogurt also elevates the dish to a restaurant‑level standard.
- Simplicity: Despite its complex flavor, the recipe requires only a handful of ingredients and a few straightforward steps. It’s perfect for busy evenings or last‑minute gatherings.
- Make‑ahead Potential: The tikkis can be assembled a day ahead and stored in the fridge, then fried just before serving. This flexibility makes it a great option for parties or game nights.
- Crowd Appeal: Whether you’re serving family, friends, or colleagues, the combination of crispness, spice, and a cooling dip makes this dish universally loved.
- Versatility: The recipe can be tweaked with different vegetables or spice blends, allowing you to customize it to your taste or seasonal availability.
Alright, let’s break down exactly what goes into this masterpiece…
Inside the Ingredient List
The Flavor Base
The foundation of this recipe starts with the potatoes. Russet potatoes, known for their high starch content, become the perfect canvas for absorbing spices and forming a smooth mash. When boiled to just the right tenderness, they release a subtle sweetness that pairs beautifully with the savory spices. If you skip the potatoes, the whole structure of the tikki collapses; they are the heart and the glue that holds everything together.
Onions add a caramelized depth once sautéed. Their natural sugars bloom under heat, creating a sweet undertone that balances the earthy potatoes and bright peas. If you’re looking for a milder flavor, opt for red onion; it will bring a slightly sweeter profile. Remember, the onion’s texture should be finely chopped so it blends seamlessly into the mash.
The Texture Crew
Peas contribute not only a pop of color but also a subtle crunch that breaks the monotony of a plain potato mash. Their natural sweetness is a delightful contrast to the heat from chili powder and cumin. If you’re out of peas, frozen green beans or corn kernels can serve as an excellent substitute, offering a similar bite.
Green bell pepper offers a crisp, fresh bite that brightens the dish. It also brings a mild sweetness that cuts through the richness of the potatoes. For a slightly different flavor, try red or orange bell pepper; they’ll add a sweeter, fruitier note.
Flour acts as the binding agent that transforms the mash into a pliable dough. It’s essential for achieving that crisp, golden crust when fried. If you’re gluten‑free, a blend of chickpea flour and rice flour can replicate the same texture and binding properties.
The Unexpected Star
Ground ginger and garlic powder provide a punch of warmth and depth that elevates the dish beyond a typical potato patty. Their aromatic qualities mingle with cumin to create a complex flavor profile that feels both familiar and adventurous. If you prefer a fresher ginger note, grate fresh ginger; it will give the tikkis an extra zing.
Chili powder and a pinch of red chili pepper introduce a subtle heat that lingers on the palate. The heat should be balanced—not overwhelming—so you can savor the other flavors. If you’re a heat enthusiast, add an extra pinch or a dash of cayenne pepper for an extra kick.
The Final Flourish
Yogurt and chutney form the cooling, tangy accompaniment that balances the spiciness of the tikkis. Yogurt’s creamy texture smooths the bite, while chutney adds a layer of freshness and a hint of sweetness. If you’re looking for a dairy-free alternative, use coconut yogurt and a fruit‑based chutney for a tropical twist.
Oil is the secret to achieving that coveted crunch. A neutral oil like sunflower or canola works best, but you can also use peanut oil for an added nutty flavor. The amount of oil matters; too much can make the tikkis soggy, while too little can cause them to stick to the pan. Aim for a thin, even coating that allows the heat to circulate around each tikki.
Everything’s prepped? Good. Let’s get into the real action…
The Method — Step by Step
- Start by peeling and cubing four medium russet potatoes. Boil them in salted water until they’re fork‑tender, about 15 minutes. Drain and let them steam for a few minutes to dry out the surface; this step is crucial for a smooth mash. Once cooled, mash them with a potato masher until silky. The texture should be free of lumps, as they’ll help the tikkis hold together.
- While the potatoes are boiling, dice one medium onion and one medium green bell pepper finely. In a small bowl, whisk together one cup of peas, the diced onion, and the bell pepper. Set aside; this mixture will provide bursts of color and crunch inside each tikki.
- In a separate bowl, combine two tablespoons of flour, one teaspoon of chili powder, one teaspoon of ground cumin, one teaspoon of ground ginger, one teaspoon of garlic powder, one teaspoon of salt, and a pinch of red chili pepper. Mix until the spices are evenly distributed. This dry blend will coat the mash, creating a protective shell that crisps beautifully.
- Add the dry spice mixture to the mashed potatoes and fold in the vegetable mixture. The mixture should be moist but not watery; if it feels too dry, add a tablespoon of yogurt to bring it together. Taste and adjust seasoning if needed. The goal is a balanced flavor that’s neither too salty nor too bland.
- Take a handful of the mixture and shape it into a flat patty, about 1½ inches thick. Repeat until all the mixture is used. The patties should be firm enough to hold their shape during frying but not too dense. A quick test: place one patty in a hot pan; if it doesn’t collapse, you’re good.
- Heat two tablespoons of oil in a non‑stick skillet over medium‑high heat. Once the oil shimmers, add the patties in a single layer, making sure not to overcrowd the pan. Fry each side for about 3–4 minutes until a golden crust forms. The sizzle is the cue that the outside is crisping up beautifully.
- Once golden on both sides, remove the tikkis and place them on paper towels to drain excess oil. This step keeps them from becoming greasy. The aroma at this point is simply irresistible; you’ll want to taste before the plate is even served.
- Serve the tikkis hot with a side of cooling yogurt mixed with one cup of chutney. The yogurt should be chilled, and the chutney can be a ready‑made mint or tamarind variety. The combination of spicy, tangy, and creamy flavors will create a harmonious bite that satisfies every palate.
That’s it—you did it. But hold on, I’ve got a few more tricks that will take this to another level. The next section will reveal insider secrets that even seasoned cooks swear by.
Insider Tricks for Flawless Results
The Temperature Rule Nobody Follows
The key to a perfectly crisp tikki is the oil temperature. If the oil is too cool, the coating will absorb oil and become soggy; if it’s too hot, the exterior will burn before the interior cooks. Aim for a temperature of 350°F (175°C). A simple test: drop a small piece of the mixture into the oil; if it sizzles immediately and rises to the surface, you’re at the right heat.
Why Your Nose Knows Best
As soon as the first tikki hits the pan, the aroma will tell you if everything is on track. A faint, nutty smell indicates that the coating is crisping without burning. If you notice a sharp, acrid odor, the oil is too hot. Trust your nose; it’s the most reliable indicator of cooking success.
The 5-Minute Rest That Changes Everything
After frying, let the tikkis rest on a wire rack for five minutes before serving. This rest period allows the steam to escape, preventing the tikkis from becoming soggy. It also lets the flavors settle, giving you that “just‑done” taste that’s hard to beat.
The Secret Ingredient Swap
If you’re craving a different flavor profile, swap the green bell pepper for roasted red pepper. The smoky sweetness will add depth and pair wonderfully with the cumin. This variation is especially good for winter evenings when you want something comforting yet vibrant.
The Quick Cooling Trick
To keep the yogurt from melting too quickly, chill it in the fridge for at least an hour before serving. If you’re in a hurry, place the yogurt in a shallow bowl and put it in an ice bath for 10 minutes. The result is a cool, thick dip that stays firm even on a hot day.
The Perfect Plate Arrangement
Arrange the tikkis in a circular pattern on a platter, with a small mound of yogurt in the center. Drizzle a little extra chutney over the top, then sprinkle chopped cilantro for a pop of color. This presentation not only looks stunning but also makes it easy for guests to grab a tikki and dip.
Creative Twists and Variations
This recipe is a playground. Here are some of my favorite ways to switch things up:
Spicy Paneer Tikki
Replace the potatoes with crumbled paneer for a protein‑rich version. Add a splash of lemon juice to brighten the flavor. This variation is perfect for vegetarian guests who want a heartier bite.
Sweet Potato & Chickpea Fusion
Swap the russet potatoes for roasted sweet potatoes and add a cup of cooked chickpeas. The natural sweetness of the sweet potato pairs wonderfully with the earthy chickpeas, creating a dessert‑like snack that still maintains a savory edge.
Crispy Cauliflower Tikki
Use steamed cauliflower florets instead of potatoes for a low‑carb option. Mix in a tablespoon of chickpea flour for binding. The cauliflower’s mild flavor makes it an excellent backdrop for the spices.
Mediterranean Twist
Add chopped olives, feta cheese, and oregano to the mixture. Use a drizzle of olive oil instead of neutral oil for frying. This version brings a distinctly Mediterranean flavor profile that’s unexpected yet delightful.
Salsa Verde Tikki
Fold in a handful of fresh cilantro, a squeeze of lime, and a pinch of sea salt. Serve with a side of pico de gallo instead of chutney. The bright, zesty salsa verde pairs perfectly with the crunchy tikkis.
Cheesy Jalapeño Tikki
Add diced jalapeños and shredded cheddar cheese to the mixture before shaping. The heat from the jalapeños and the melt of the cheese create a bold, indulgent snack that’s sure to impress.
Storing and Bringing It Back to Life
Fridge Storage
Store cooked tikkis in an airtight container in the refrigerator for up to 3 days. Place a paper towel under the tikkis to absorb excess moisture and keep them crisp. When ready to serve, reheat in a skillet over medium heat until hot.
Freezer Friendly
For longer storage, place the tikkis on a parchment‑lined tray and freeze until solid. Once frozen, transfer them to a freezer bag. They’ll stay fresh for up to 2 months. Reheat in a preheated oven at 350°F for 10 minutes.
Best Reheating Method
The secret to reviving frozen or refrigerated tikkis is to add a splash of water before reheating. The steam will restore the crispness without drying out the interior. Whether you use the oven or a skillet, the tikkis will come out golden and delicious.