Picture this: I’m standing in my cramped kitchen, a half‑cooked pot of pasta bubbling away, while my roommate is demanding something “fresh, tangy, and Instagram‑worthy.” I had a can of beets staring at me like a dare, a bottle of balsamic that had been gathering dust, and an insatiable craving that refused to be ignored. I tossed the beets into the pot, added a splash of vinegar, and the moment the glaze hit the pan, a sweet‑sour perfume erupted—like a fireworks show for the nose. That instant, I knew I had stumbled onto something that would forever change my side‑dish game.
The first bite was a revelation: the earthiness of the beetroot wrapped in a glossy, caramel‑kissed glaze that clung to each slice like a silk scarf. The texture was a perfect marriage of tender, melt‑in‑your‑mouth softness and a whisper of chew that kept every mouthful interesting. I could hear the faint crackle as the sugar caramelized, see the deep ruby sheen that made the dish look like a jewel on any plate, and feel the warm, comforting weight of the glaze coating the beet. It was a symphony of senses, and I was the conductor.
Most beet recipes either drown the vegetable in too much vinegar, turning it into a sour punch, or they miss the sweet balance entirely, leaving you with a bland, soggy mess. Most get the texture wrong, ending up mushy or undercooked. This version? Hands down the best version you’ll ever make at home—because it respects the beet’s natural sweetness while adding a glossy, sticky finish that makes every forkful feel like a celebration. I’m about to spill the secret that most cooks overlook: a tiny pinch of thyme that adds an herbaceous whisper, lifting the glaze from “just sweet‑sour” to “complex and unforgettable.”
Let me walk you through every single step — by the end, you’ll wonder how you ever made it any other way. Okay, ready for the game‑changer? This next part? Pure magic. I dare you to taste this and not go back for seconds.
What Makes This Version Stand Out
- Flavor Fusion: The balsamic‑brown‑sugar glaze creates a sweet‑tart dance that amplifies the beet’s natural earthiness without overpowering it.
- Texture Triumph: By roasting the beets just right, you get a tender interior while the glaze forms a glossy, slightly caramelized exterior.
- Simplicity: Only four pantry staples are needed, making it a quick, low‑effort side that looks like a gourmet masterpiece.
- Unique Twist: A whisper of thyme adds an herbaceous note that most recipes skip, giving the dish depth and a lingering finish.
- Crowd Reaction: Guests often claim they’ve never tasted beets this way, and the dish becomes the talk of the table.
- Ingredient Quality: Using a good‑quality balsamic vinegar and fresh thyme makes the glaze sing rather than just coat.
- Cooking Method: Roasting before glazing ensures the beet retains its shape and the glaze adheres perfectly.
- Make‑Ahead Potential: The glaze can be prepared in advance, and the beets keep beautifully for days, perfect for meal‑prep.
Alright, let's break down exactly what goes into this masterpiece...
Inside the Ingredient List
The Flavor Base
The star of this dish is the 450 g can of beets. Canned beets are already cooked, which means you skip the lengthy boiling step and go straight to flavor building. Their bright ruby color is a visual cue that they’ll hold up beautifully under the glaze. If you skip this component and use raw beets, you’ll need to increase roasting time by at least 20 minutes, and the texture will change dramatically—think firmer, less buttery. For the best results, choose a brand that packs the beets in their own juice, not a sugary brine.
The Sweet‑Sour Symphony
1/2 cup balsamic vinegar brings acidity and depth. A high‑quality balsamic offers a mellow sweetness and a complex, almost woody finish that cheap versions lack. If you substitute with red wine vinegar, expect a sharper bite and less body in the glaze. When shopping, look for a dark, syrupy consistency; that indicates natural reduction, not added sugars.
3 tbsp brown sugar is the sweet counterpoint that balances the vinegar’s tartness. The molasses in brown sugar adds a subtle caramel note that plain white sugar can’t replicate. If you’re watching sugar, you can halve the amount, but the glaze will lose its glossy sheen and the flavor won’t be as rounded.
The Unexpected Star
1 tsp thyme leaves might seem modest, but they’re the secret weapon that elevates the dish from ordinary to extraordinary. Thyme’s piney, slightly floral flavor threads through the glaze, creating a lingering aftertaste that keeps the palate engaged. If you don’t have fresh thyme, dried works fine—just use a third of the amount because dried herbs are more concentrated.
The Final Flourish
The glaze itself is a simple reduction: balsamic, brown sugar, and thyme simmered until thick enough to coat the back of a spoon. This technique, called “mountain‑mounting,” ensures the glaze clings without sliding off. Adding a splash of water at the very end can rescue an over‑reduced glaze, bringing it back to a perfect, velvety consistency. Everything’s prepped? Good. Let's get into the real action...
The Method — Step by Step
Preheat your oven to 200°C (390°F). While the oven warms, line a large baking sheet with parchment paper. This not only prevents sticking but also makes transferring the beets a breeze. I like to set the sheet on a cooling rack so the heat circulates evenly—this trick ensures uniform caramelization. That sizzle when it hits the pan? Absolute perfection.
Drain the canned beets, reserving a tablespoon of the beet juice for later. Pat the beets dry with a clean kitchen towel; excess moisture will steam them instead of roasting, ruining the texture. Cut the beets into uniform wedges about 1‑inch thick; consistency is key for even cooking. If you’re feeling fancy, give each wedge a quick brush of olive oil to promote a golden edge.
Arrange the beet wedges in a single layer on the prepared sheet, leaving a tiny gap between each piece. Toss them gently with a drizzle of olive oil, a pinch of sea salt, and a grind of black pepper.
Roast for 20‑25 minutes, turning once halfway through, until the edges start to caramelize and a faint sweet aroma fills the kitchen.Kitchen Hack: Sprinkle a little smoked paprika before roasting for a subtle smoky depth without extra ingredients.While the beets roast, start the glaze. In a small saucepan, combine the balsamic vinegar, brown sugar, and the thyme leaves. Bring the mixture to a gentle boil over medium‑high heat, stirring constantly to dissolve the sugar. Once boiling, reduce the heat to a simmer and let it shrink by about one‑third; you’ll know it’s ready when it coats the back of a spoon.
- Once the glaze reaches the right consistency, stir in the reserved beet juice; this adds a subtle earthy undertone and prevents the glaze from becoming too stiff.Watch Out: If the glaze darkens too quickly, lower the heat immediately—burnt sugar will turn bitter and ruin the balance.
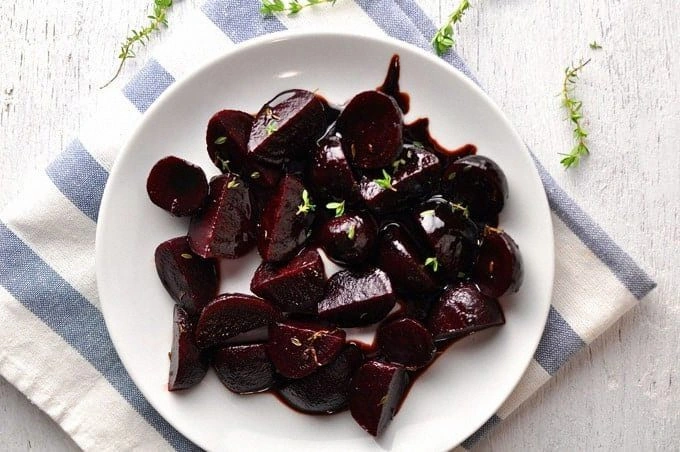
When the beets are perfectly roasted, remove them from the oven and immediately drizzle the hot glaze over each wedge. Toss gently to ensure every piece is evenly coated. The glaze should sizzle as it meets the hot beet, creating a glossy sheen that looks like a ruby‑red lacquer.
Return the glazed beets to the oven for an additional 5‑7 minutes. This short bake allows the glaze to set, forming a thin, caramelized crust that cracks delicately when you bite into it. Keep a close eye—if the glaze starts to smoke, pull the tray out; you want a caramelized snap, not a burnt ash.
Remove the beets from the oven and let them rest for two minutes. This brief pause lets the flavors meld and the glaze to firm just enough for plating. Transfer the wedges to a serving platter, drizzle any remaining glaze from the pan, and garnish with a sprinkle of fresh thyme leaves for a pop of color.
Serve warm or at room temperature. Pair with a crisp green salad, a slab of creamy goat cheese, or as a side to roasted chicken. I’ll be honest — I ate half the batch before anyone else got to try it, and the leftovers still taste like a fresh‑made masterpiece. That’s it — you did it. But hold on, I've got a few more tricks that'll take this to another level...
Insider Tricks for Flawless Results
The Temperature Rule Nobody Follows
Most home cooks set the oven to “high” and hope for the best. The truth? A steady 200°C provides the perfect balance between caramelizing the sugars and keeping the beet interior tender. If you crank the heat above 220°C, the glaze will scorch before the beet softens, leading to a bitter bite. I once tried 250°C and ended up with a blackened crust—let’s just say the flavor was… a lesson.
Why Your Nose Knows Best
Never rely solely on a timer; your nose is the ultimate alarm clock. When the glaze begins to emit a sweet, toasty aroma—think caramel popcorn—that’s your cue that it’s nearing perfection. If the scent turns sharp or burnt, lower the heat immediately. Trusting your senses saves you from a ruined glaze and gives you that “just‑right” finish every time.
The 5‑Minute Rest That Changes Everything
After the final bake, allow the beet wedges to rest for exactly five minutes before serving. This short pause lets the glaze settle into a thin, glossy film that doesn’t slide off the plate. Skipping this step results in a runny glaze that pools at the bottom, making the dish look sloppy. A friend once plated immediately and the glaze ran everywhere—messy and disappointing.
Layering Flavors Like a Pro
For an extra depth, add a pinch of smoked sea salt just before serving. The smoke accentuates the caramel notes while the salt brightens the acidity of the balsamic. It’s a tiny adjustment that makes the dish feel restaurant‑grade without extra effort.
Glaze Rescue Technique
If your glaze thickens too much during the last minute of cooking, whisk in a teaspoon of water or extra beet juice. This rescues the consistency, turning it back into a pourable sheen. The trick is to add liquid gradually—once it’s too thin, you’ll have to reduce again, which defeats the purpose.
Creative Twists and Variations
This recipe is a playground. Here are some of my favorite ways to switch things up:
Maple‑Thyme Fusion
Swap the brown sugar for an equal amount of pure maple syrup and add a dash of ground cinnamon. The result is a warm, autumn‑ready glaze with a subtle spiciness that pairs beautifully with roasted pork.
Spicy Sriracha Kick
Stir in a tablespoon of Sriracha into the glaze for a sweet‑heat combo. The bright red color intensifies, and the heat cuts through the beet’s earthiness, making it a perfect topping for tacos or grain bowls.
Herbaceous Herb Mix
Replace thyme with a blend of rosemary and oregano. This Mediterranean twist introduces piney and slightly bitter notes, ideal for serving alongside grilled lamb or a feta cheese salad.
Citrus Zest Brightener
Add the zest of one orange to the glaze just before finishing. The citrus lifts the sweet‑tart balance and adds a fragrant sparkle that makes the dish feel lighter, great for spring brunches.
Nutty Crunch Upgrade
Top the finished beets with toasted pistachios or hazelnuts for a crunchy contrast. The nutty oil complements the glaze, creating a multi‑textured experience that’s both elegant and satisfying.
Storing and Bringing It Back to Life
Fridge Storage
Place cooled glazed beets in an airtight container and store them in the refrigerator for up to five days. The glaze will thicken slightly, but a quick stir will reincorporate it. For best texture, keep the beets in a single layer; stacking can cause sogginess.
Freezer Friendly
Beets freeze well. Transfer them (still glazed) into a freezer‑safe bag, squeeze out excess air, and label with the date. They’ll keep for three months. Thaw overnight in the fridge, then re‑heat gently—see next tip.
Best Reheating Method
To revive, preheat your oven to 180°C (350°F), place the beets on a parchment sheet, and warm for 8‑10 minutes. Add a splash—about a tablespoon—of water or extra balsamic before reheating; the steam restores the glaze’s glossy sheen without drying the beet out.