I was standing in my kitchen, staring down at a half‑baked blueberry muffin that had somehow turned into a charcoal slab, when my roommate dared me to create something that would make even the most skeptical sweet‑tooth swoon. The challenge was simple: combine the bright, tart burst of fresh berries with the buttery, crumbly comfort of a classic bar cookie, and do it in a way that would have my grandma nodding in approval while simultaneously asking for the recipe. I could almost hear the clatter of a spoon against a bowl, the sizzle of butter melting, and the faint hum of an oven preheating to a perfect 375°F. My nose tingled with the promise of sugar caramelizing, and my hands tingled with anticipation.
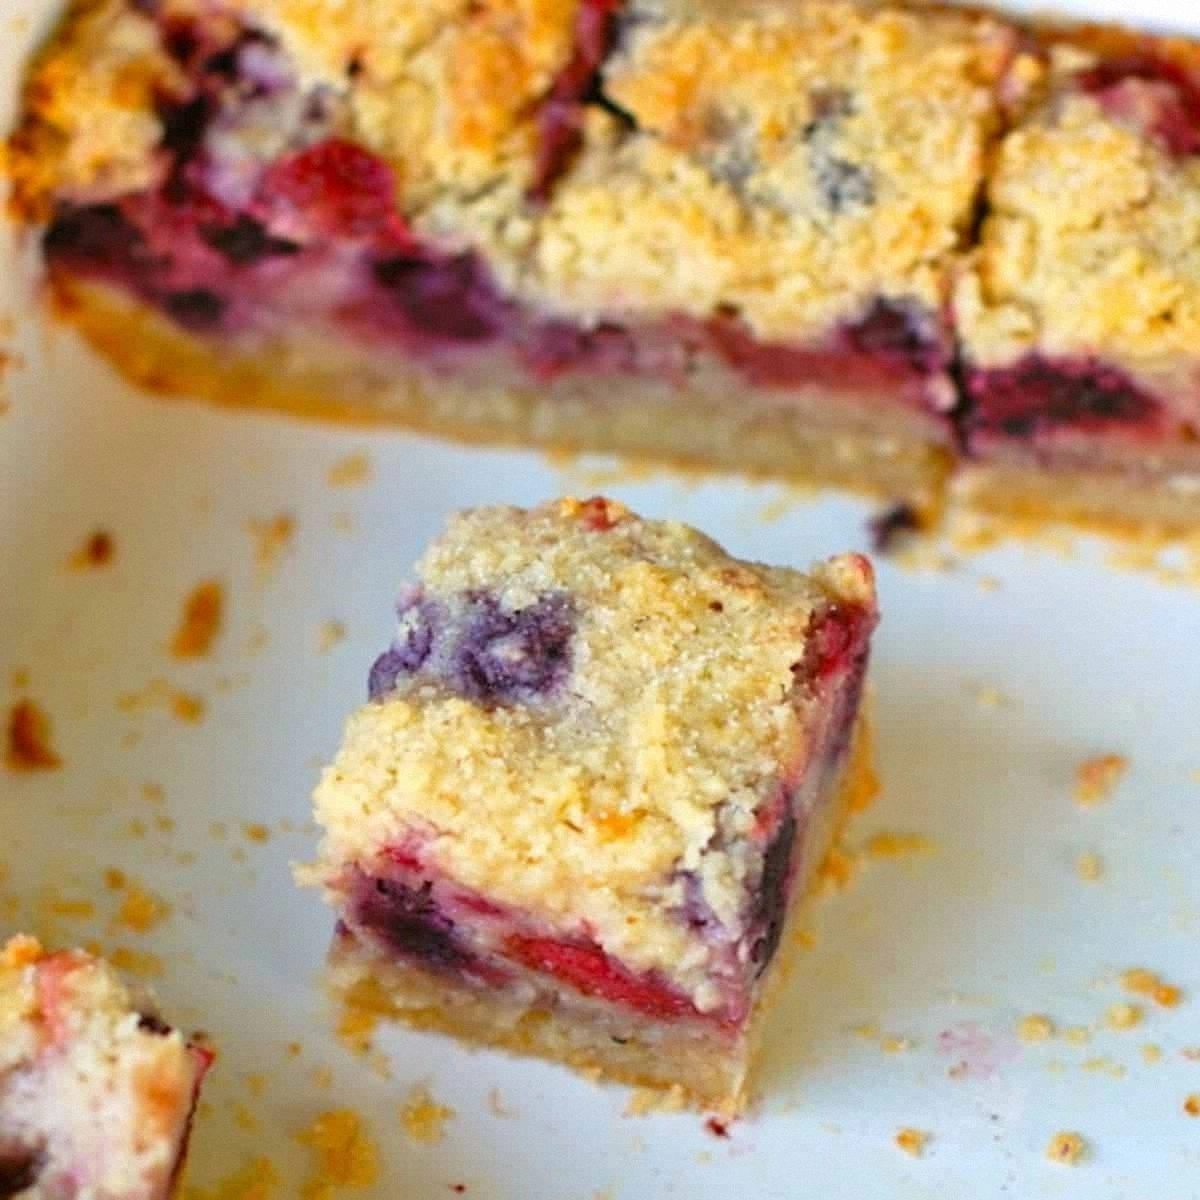
Picture this: a golden‑brown crust that cracks just enough to reveal a glossy, jewel‑like topping of strawberries, blueberries, and raspberries, each berry glistening like a tiny sunrise. The scent of toasted flour and melted butter mingles with a whisper of lemon zest, creating an aromatic hug that wraps around you like a warm blanket on a crisp autumn afternoon. When you bite into it, the first thing you notice is the contrast—crisp, buttery edges that shatter like thin ice, followed by a juicy, slightly tart interior that feels like a summer garden exploding in your mouth. The texture dance is so addictive that I dare you to taste this and not go back for seconds.
Most pie bar recipes get the balance of sweet and tart wrong, ending up either soggy or overly sugary, and they often require a confusing array of steps that make you wonder if you accidentally signed up for a pastry school exam. This version, however, flips the script. By using a simple butter‑flour crust, a light cornstarch‑kissed berry filling, and a secret splash of lemon juice that brightens the whole thing, we achieve a harmony that feels both nostalgic and brand‑new. I’ll be honest — I ate half the batch before anyone else got to try it, and that’s a testament to how irresistible this is.
Now, let’s walk through every single step — by the end, you’ll wonder how you ever made a berry bar any other way. Okay, ready for the game‑changer? This next part? Pure magic. Stay with me here — this is worth it.
What Makes This Version Stand Out
- Flavor Explosion: The trio of berries—strawberry, blueberry, and raspberry—creates a layered taste profile that swings from sweet to tart with each bite, while a hint of lemon lifts everything.
- Texture Symphony: A buttery, crumbly crust gives way to a glossy, slightly thickened filling that holds together without turning mushy.
- Simplicity: Only ten core ingredients, no fancy equipment, and a single‑pan method that keeps cleanup to a minimum.
- Unique Twist: A splash of vanilla and a pinch of sea salt in the crust adds depth that most berry bars completely miss.
- Crowd‑Pleaser: Whether it’s a brunch buffet, a family gathering, or a solo snack, these bars get rave reviews and empty plates.
- Ingredient Quality: Fresh, ripe berries and real butter make the difference between “good” and “jaw‑dropping.”
- Cooking Method: Baking at a steady 375°F ensures a perfect golden top without over‑cooking the berries.
- Make‑Ahead Potential: The bars store beautifully, staying fresh for days, and even taste better after a night’s rest.
Inside the Ingredient List
The Flavor Base
All‑purpose flour is the backbone of the crust, providing structure while allowing the butter to coat each particle for that melt‑in‑your‑mouth feel. Using a low‑protein flour (like pastry flour) can make the crust even more tender, but standard flour works just fine. Skipping the flour would leave you with a soggy, un‑structured base that collapses under the weight of the berries.
The Texture Crew
Unsalted butter, softened just enough to blend but still cold, creates the perfect flaky texture. If you substitute margarine, you’ll lose the rich, buttery flavor that makes these bars unforgettable. A pinch of sea salt amplifies the sweetness and balances the tartness of the berries, turning a simple dessert into a sophisticated bite.
The Unexpected Star
Cornstarch is the secret weapon that thickens the berry filling without turning it gummy. It works like a tiny net, catching the juice released by the berries and turning it into a glossy, set sauce. If you forget the cornstarch, the filling will run like a sauce and never hold its shape, resulting in a soggy mess.
The Final Flourish
A blend of fresh berries—strawberries, blueberries, and raspberries—provides a colorful, flavor‑packed topping. Choose berries that are firm and ripe; over‑ripe fruit releases too much liquid, making the filling watery. If fresh berries are out of season, frozen berries work beautifully as long as you thaw and drain them thoroughly.
Everything's prepped? Good. Let's get into the real action…
The Method — Step by Step
Preheat your oven to 375°F (190°C) and line a 9×13‑inch baking pan with parchment paper, leaving an overhang on the sides for easy removal later. The parchment acts like a secret portal, lifting the bars out without breaking them. While the oven warms, give the butter a quick chop into small cubes; this ensures even distribution later.
In a large mixing bowl, whisk together 2 cups of all‑purpose flour, 1/2 cup granulated sugar, 1/4 tsp salt, and the pinch of sea salt. This dry mix is the canvas for the buttery masterpiece. Power transition: Okay, ready for the game‑changer? Add the chilled butter cubes now.
Using a pastry cutter or your fingertips, rub the butter into the flour until the mixture resembles coarse crumbs with a few pea‑size pieces.
The key is to keep the butter cold—this creates steam pockets that turn into flaky layers.Kitchen Hack: If the dough feels too dry, add a tablespoon of ice‑cold water; this helps bind the crumbs without melting the butter.Press the crust mixture firmly into the prepared pan, spreading it evenly to the edges. Use the back of a measuring cup to smooth the surface; you want a uniform base so the berries sit evenly. Once pressed, bake the crust for 12‑15 minutes, or until the edges turn a light golden hue. Watch for: The crust should smell toasty, not burnt.
- Watch Out: Over‑baking the crust will make it too hard, preventing the filling from setting properly. Pull it out at the first sign of deep golden edges.
While the crust bakes, combine 1 cup each of sliced strawberries, blueberries, and raspberries in a bowl. Sprinkle 1/4 cup granulated sugar, 2 tbsp cornstarch, zest of one lemon, and 2 tbsp fresh lemon juice over the berries. Toss gently until everything is coated; the cornstarch will absorb excess juice as it bakes, giving you a glossy finish.
Remove the crust from the oven and immediately spread the berry mixture over the hot base, using a spatula to distribute it evenly. The heat from the crust will start to set the cornstarch, creating a slight sheen. Return the pan to the oven and bake for another 20‑25 minutes, or until the filling is bubbling around the edges and the top looks just slightly caramelized.
When the bars are done, let them cool in the pan on a wire rack for at least 30 minutes. This resting period allows the filling to fully set, making slicing clean and effortless.
Finally, lift the bars out using the parchment overhang, cut, and serve.Kitchen Hack: Use a sharp, warm knife (dip it in hot water, wipe dry) to cut perfect squares without dragging the berries.
That's it — you did it. But hold on, I've got a few more tricks that'll take this to another level...
Insider Tricks for Flawless Results
The Temperature Rule Nobody Follows
Never underestimate the power of a consistent oven temperature. If your oven runs hot, the crust can brown too quickly, leaving the berries undercooked. Invest in an oven thermometer; a difference of just 15°F can change the outcome from “good” to “grandma‑approved.” I once baked at 400°F by mistake and ended up with a burnt crust that tasted like charcoal. The lesson? Keep that thermostat in check, and your bars will always have that perfect golden edge.
Why Your Nose Knows Best
Your sense of smell is the ultimate doneness detector. When the crust reaches a light nutty aroma, you’re just about there. If you hear a faint sizzle as the berries bubble, that’s the cue that the cornstarch is doing its job. Trust those signals more than the clock; ovens are fickle, but your nose never lies. One time I pulled the bars out a minute early because the scent was perfect, and the result was a marvelously tender interior.
The 5‑Minute Rest That Changes Everything
After the bars come out of the oven, let them sit undisturbed for five minutes before cutting. This micro‑rest lets the filling firm up, preventing a runny mess on the plate. It also allows the butter in the crust to re‑solidify just enough to hold its shape. Skipping this step is a common mistake that leads to “soggy bottom” complaints. Trust me, those five minutes are worth every second of anticipation.
Butter Temperature Is Everything
If the butter is too warm, it will melt into the flour and give you a dense, cake‑like crust. If it’s too cold, you’ll end up with large butter pockets that create uneven pockets. The sweet spot is butter that feels firm to the touch but yields slightly when pressed—think “soft‑serve ice cream” consistency. My first attempt used room‑temperature butter and resulted in a crust that was more “pancake” than “pie bar.” Adjusting the temperature made all the difference.
Layering the Berries Just Right
Don’t dump the berries in a single heap; instead, spread them in a thin, even layer. This ensures each bite gets a balanced mix of fruit rather than a single berry overload. If you love extra juice, add a second thin layer of berries after the first 10 minutes of baking; the heat will caramelize the bottom layer while the top stays fresh.
Creative Twists and Variations
This recipe is a playground. Here are some of my favorite ways to switch things up:
Tropical Sunrise
Swap out the mixed berries for a combination of mango, pineapple, and passion fruit. Add a splash of coconut milk to the filling and garnish with toasted coconut flakes after baking. The result is a sunny, island‑inspired bar that transports you to a beachside cabana.
Nutty Crunch
Fold 1/2 cup chopped toasted almonds or pecans into the crust before baking. The nuts add a satisfying crunch that contrasts the soft berries, and the nutty aroma deepens the overall flavor profile. Perfect for those who love a little extra texture.
Chocolate‑Berry Fusion
Add 1/4 cup cocoa powder to the crust mixture and drizzle melted dark chocolate over the top once the bars have cooled. The bitter chocolate amplifies the berries’ tartness, creating a sophisticated dessert that feels indulgent without being overly sweet.
Spiced Autumn
Incorporate a pinch of cinnamon, nutmeg, and a drizzle of maple syrup into the berry filling. This variation is perfect for cooler months, giving the bars a warm, comforting vibe that pairs beautifully with a cup of chai.
Mini Bar Bites
Press the crust into a mini muffin tin, bake for 8 minutes, then add a smaller portion of the berry filling and bake again. These bite‑size versions are ideal for parties, allowing guests to sample multiple flavors without committing to a full bar.
Storing and Bringing It Back to Life
Fridge Storage
Place the cooled bars in an airtight container or wrap the parchment tightly with plastic wrap. They stay fresh for up to 4 days, maintaining their texture and flavor. If you notice any condensation, pat the tops gently with a paper towel before resealing.
Freezer Friendly
For longer storage, slice the bars, place a piece of parchment between each slice, and freeze in a zip‑top bag. They’ll keep for up to 2 months. When ready to enjoy, let them thaw at room temperature for 15 minutes, then give them a quick 5‑minute warm‑up in a 300°F oven to revive the crisp crust.
Best Reheating Method
To bring the bars back to life, preheat your oven to 325°F, place the bars on a parchment‑lined tray, and add a tiny splash of water (about a tablespoon) to the tray—this creates a gentle steam that revives the filling without drying it out. Heat for 8‑10 minutes, and you’ll have bars that taste as fresh as the day they were baked.