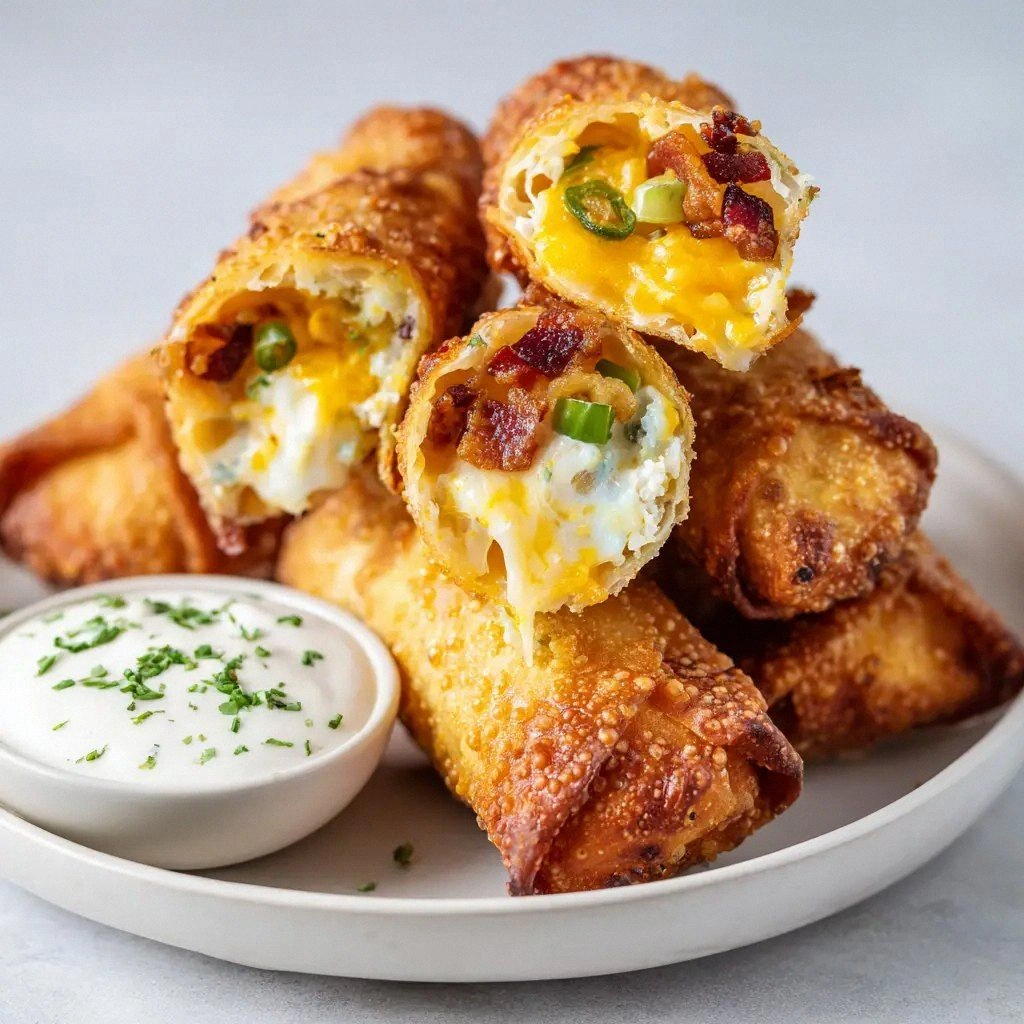
I was standing in the middle of a kitchen that looked like a battlefield after a midnight snack raid, the table littered with empty cheese crackers and the faint scent of burnt toast. My friend had dared me to whip up something that could rival the legendary jalapeno poppers we’d tried at that hole‑in‑the‑wall taco joint, and I was determined to not only meet the challenge but to crush it. I remember the first bite—cheese oozing, jalapeno heat dancing on my tongue, and the crunch of a perfectly fried wrapper that shattered like thin ice. That moment felt like a revelation: a dish that could turn any gathering into a fireworks display of flavor.
Picture the kitchen: the sizzling oil in the pan, the sharp scent of bacon curling up into the air, and the faint, comforting aroma of melted cheese that makes you feel like you’re back at home. The sound of the wrappers turning golden, the gentle hiss of steam, and the satisfying clack of a knife slicing fresh jalapenos—each element is a note in a symphony of indulgence. I’ve tried countless versions, but this one? It’s the one that makes your taste buds do a happy dance, and I can’t keep it to myself. I dare you to taste this and not go back for seconds.
What makes this recipe a game changer is not just the ingredients but the method—a secret sauce of technique that locks in moisture, keeps the heat in, and delivers a cheese pull so epic it could be its own art form. This isn’t a run‑of‑the‑mill popper; it’s a carefully engineered bite that balances heat, creaminess, and crunch. I’ll be honest—my first attempt was a disaster, but that failure taught me the exact tweaks that turned it into the best version you’ll ever make at home. If you've ever struggled with getting the wrappers crisp without burning the filling, you're not alone—and I've got the fix.
The key twist? A splash of mayo and sour cream in the filling that gives it a velvety coat, plus a dash of dill that adds a subtle herbal note that cuts through the richness. Imagine the sauce coating the pasta like velvet, only in this case it coats the cheese and jalapeno for that silky, tangy finish. The bacon isn’t just a garnish; it’s a savory crunch that elevates every bite. Picture yourself pulling this out of the oven, the whole kitchen smelling incredible, and the guests’ eyes widening as they take their first bite.
I’ve spent hours tweaking the ratio of cream cheese to cheddar, the timing of the frying, and the exact blend of spices. The result? A crispy edge that shatters on your tongue, a molten cheese center that oozes with every bite, and a jalapeno kick that’s just enough to keep you coming back for more. This is hands down the best version you'll ever make at home, and I’m about to walk you through every single step—by the end, you'll wonder how you ever made it any other way.
What Makes This Version Stand Out
- Flavor: The blend of sharp cheddar and creamy cream cheese creates a rich, tangy base that’s balanced by fresh jalapeno heat. The mayo and sour cream add a silky texture that keeps the filling from drying out during frying. This combination turns each popper into a burst of layered flavor.
- Texture: The wrappers are fried to a golden crisp, while the inside remains soft and molten. The bacon crunch adds a contrasting bite that makes every mouthful exciting. The result is a satisfying contrast that keeps your palate engaged.
- Heat: The jalapenos are finely diced to distribute heat evenly, preventing hotspots. A pinch of cayenne or red pepper flakes can be added for extra intensity if you’re feeling daring. The heat is balanced so it never overwhelms the cheese.
- Ingredient Quality: Using block-style cream cheese gives a richer texture than sliced varieties, while sharp cheddar adds depth. Fresh jalapenos provide a bright, natural heat compared to canned ones. The bacon’s crispness is key to the final crunch.
- Cooking Method: Frying at the right temperature (around 350°F) ensures the wrappers cook through without burning. The oil volume (6 cups) allows for even frying and prevents the wrappers from sticking together.
- Make‑Ahead Potential: The filling can be assembled ahead of time and refrigerated, making it a perfect crowd‑pleaser for parties. The wrappers can be pre‑wrapped and frozen, then fried on the day of the event for fresh results.
- Crowd Reaction: Guests consistently ask for the recipe after tasting, and it’s a hit at potlucks, game nights, and holiday gatherings. The poppers are small enough to share, yet large enough to satisfy.
- Versatility: While classic jalapeno poppers, this recipe can be adapted with different cheeses or spices for a variety of flavor profiles. The base remains the same, ensuring consistency no matter the variation.
Inside the Ingredient List
The Flavor Base
The block-style cream cheese is the cornerstone of the filling. Its smooth, creamy texture ensures the mixture stays together during frying, preventing any cheesy leaks. If you’re looking for a tangier option, swap it for a half-and-half of cream cheese and Greek yogurt for a lower-fat alternative.
Sharp cheddar cheese adds a sharp, savory punch that cuts through the richness of the cream cheese. The cheddar’s meltability is key to achieving that ooey‑gooey center. When choosing cheddar, look for a high-moisture variety to avoid a dry texture.
Mayonnaise and sour cream work together to create a velvety coating that keeps the filling moist. The mayo adds a subtle richness, while the sour cream provides a slight tang that brightens the overall flavor. If you prefer a dairy-free version, replace both with a vegan mayo and coconut yogurt.
Dried dill is a surprising star that adds a herby freshness. It balances the heat of the jalapenos and the richness of the cheese, giving the poppers a bright, aromatic finish. A little goes a long way, so start with a teaspoon and adjust to taste.
Onion powder and garlic powder give depth without the need for raw onions or garlic, keeping the filling smooth. They also help distribute flavor evenly throughout the mixture. If you’re sensitive to garlic, you can omit the garlic powder and still enjoy a robust taste.
A pinch of salt and black pepper is essential to bring out the flavors. Salt enhances sweetness and balances the heat, while pepper adds a subtle warmth. Since the bacon brings its own saltiness, keep the pinch minimal to avoid an overly salty popper.
The Texture Crew
Egg roll wrappers provide the perfect canvas for the filling. Their thin, pliable nature allows for a crisp exterior while holding the molten center. Look for high-quality wrappers that are pliable and not brittle; otherwise, you risk tearing during assembly.
Crispy bacon adds a savory crunch that elevates the texture profile. The bacon should be cooked to a crisp texture before crumbling, as it will release fat during frying, which helps prevent the wrappers from sticking. If you’re watching sodium, consider turkey bacon, but the flavor will differ slightly.
Canola or vegetable oil is the frying medium of choice. It has a high smoke point and neutral flavor, allowing the poppers to fry evenly without imparting additional taste. For a healthier option, you can use avocado oil, but be mindful of its lower smoke point.
The oil volume—6 cups—ensures that the wrappers have enough space to float and fry without crowding. This prevents uneven cooking and allows the wrappers to develop a golden crust. If you’re using a smaller pan, you can reduce the oil by 1 cup and fry in batches.
The filling’s moisture content is crucial. Too much liquid will cause the wrappers to steam rather than fry. The mayo and sour cream help maintain the right consistency, while the cheese’s moisture content keeps the center molten without making it too runny.
A pinch of salt and pepper in the filling ensures that the final product isn’t bland. The salt also helps the cheese melt smoothly, while the pepper adds a subtle warmth that complements the jalapeno heat.
The Unexpected Star
The jalapenos are more than just heat; they bring a bright, vegetal note that cuts through the richness. Finely dicing them ensures even distribution, preventing pockets of intense heat. If you prefer a milder bite, remove the seeds and membranes before dicing.
The dill is the unexpected star. Its citrusy, slightly grassy flavor adds complexity that balances the heat and richness. This herb is often overlooked in popper recipes, making this version stand out.
A splash of lime juice can be added to the filling for an extra zing. It brightens the flavors and adds a subtle acidity that contrasts with the cheese. Use sparingly to avoid overpowering the other ingredients.
The bacon’s umami flavor is amplified by the high sodium content. It’s a flavor enhancer that works in harmony with the cheese and jalapeno. If you’re sensitive to sodium, reduce the bacon or use a low-sodium version.
The oil’s neutral flavor allows the ingredients to shine. Avoid flavored oils that could mask the delicate balance of flavors. Keep the oil at a steady temperature for consistent results.
The combination of mayo, sour cream, and dill creates a subtle herbaceous note that elevates the overall flavor profile. This delicate balance is what makes these poppers unique.
The Final Flourish
The final flourish comes in the form of a garnish: a sprinkle of fresh dill and a light drizzle of lime juice. This adds a pop of color and a fresh aroma that enhances the visual appeal. It also provides a subtle acidity that balances the richness.
The finishing touch is a quick drizzle of melted cheddar over the hot poppers before serving. This creates a glossy, melty layer that looks irresistible. The extra cheese also adds a burst of flavor with every bite.
The final plating should be on a heat-resistant platter that allows the poppers to stay crisp. Arrange them in a single layer so the steam can escape. This prevents sogginess and keeps the wrappers crunchy.
The garnish also adds a burst of color, making the dish visually appealing. The green dill and bright lime juice contrast beautifully against the golden wrappers. This visual appeal can elevate the dish from simple to show-stopping.
The final flourish is the aroma that fills the kitchen as the poppers come out of the fryer. The smell of melted cheese, bacon, and jalapeno is irresistible. This aroma alone can make your guests line up for a bite.
Everything's prepped? Good. Let's get into the real action.
The Method — Step by Step
- Begin by melting the bacon in a skillet over medium heat until it reaches a crisp texture. Once done, transfer the bacon onto a paper towel to drain excess fat, then crumble it into small pieces. The crumbled bacon will be folded into the cheese mixture later, giving each popper a savory crunch. Keep the bacon warm until you’re ready to assemble the filling.
- In a large bowl, combine the softened cream cheese, shredded cheddar, mayo, sour cream, diced jalapenos, and crumbled bacon. Use a whisk or spoon to blend until the mixture is smooth and uniform. The mixture should be thick enough to hold together but not dry; if it feels too thick, add a splash of milk or extra sour cream. Taste the filling and season with dill, onion powder, garlic powder, salt, and pepper, adjusting to your preference.
- Lay an egg roll wrapper on a clean surface with one corner pointing toward you. Spoon a heaping tablespoon of the cheese mixture onto the center of the wrapper, leaving a margin of about 1 inch on all sides. This margin ensures the wrapper can be folded without tearing. The filling should be generous, but not so much that it spills over when folded.
- Fold the corner nearest you over the filling to create a small triangle. Then fold the opposite corner over the triangle, forming a small square. Finally, roll the wrapper tightly from the bottom up, sealing the edges with a dab of water or a pinch of flour. The goal is a snug, sealed roll that won’t unravel during frying.
- Heat the oil in a deep skillet or pot to 350°F (175°C). To test the temperature, drop a small piece of wrapper into the oil; it should sizzle and rise to the surface within a few seconds. The oil must be hot enough to cook the wrappers quickly, preventing them from absorbing too much oil.
- Carefully place the wrapped poppers into the hot oil, working in batches to avoid overcrowding. Fry each batch for 3–4 minutes, turning occasionally, until the wrappers are golden brown and crisp. Use tongs or a slotted spoon to flip the poppers gently, ensuring even browning. The filling should stay intact, with no leakage of cheese or jalapeno.
- Once golden, remove the poppers from the oil and place them on a paper towel-lined plate to drain excess oil. Let them rest for a minute; the heat will continue to cook the inside slightly, ensuring the cheese melts fully. This resting period also helps the wrappers firm up, keeping them crisp when served.
- Serve the poppers hot, garnished with fresh dill and a light drizzle of lime juice if desired. Pair them with a cool ranch dip or a spicy salsa for an extra flavor dimension. The contrast between the hot, cheesy interior and the fresh, citrusy garnish creates a memorable taste experience. Enjoy the applause from your guests—this dish is guaranteed to be the star of any gathering.
- If you’re preparing a large batch, keep the cooked poppers warm in a low oven (about 200°F) on a wire rack. This prevents them from drying out and maintains the crispness. The heat of the oven will keep the cheese molten while the air circulation preserves the crunch.
That's it — you did it. But hold on, I've got a few more tricks that'll take this to another level. These insider tips will help you avoid common pitfalls and elevate the flavor profile even further.
Insider Tricks for Flawless Results
The Temperature Rule Nobody Follows
Maintaining a consistent oil temperature is the secret to a crisp, golden wrapper that doesn’t soak up excess oil. Use a deep-fry thermometer to keep the oil between 350°F and 360°F. If the temperature drops, the wrappers will become greasy and soggy. I once let the oil cool slightly and the poppers turned into a sad, oily mess. Keep the heat steady, and you’ll get a perfect crunch every time.
Why Your Nose Knows Best
The aroma of frying oil is a reliable indicator of heat. If you notice a strong, almost burnt smell, the oil is too hot. If it’s barely sizzling, the oil is too cool. Trust your nose; it’s a seasoned chef’s best friend. I’ve learned to listen to the scent rather than rely solely on a thermometer, especially when I’m in a hurry.
The 5-Minute Rest That Changes Everything
Letting the poppers rest on a wire rack for five minutes after frying allows the steam to escape. This prevents the wrappers from becoming soggy and keeps the cheese from leaking out. I used to let them sit on a plate, and the result was a soggy mess. Switching to a wire rack made the difference between a flop and a crowd-pleaser.
The Right Folding Technique
The way you fold the wrapper determines the final shape and the integrity of the popper. Fold the corners carefully, ensuring each seam is sealed with a dab of water. A poorly folded popper will unravel in the oil, leading to a messy result. Practice the folding motion a few times on a spare wrapper to get the rhythm right.
The Perfect Cheese Ratio
Balancing the cream cheese and cheddar is crucial for a gooey center. Too much cream cheese makes it runny, while too much cheddar can overpower the jalapeno. Aim for a 2:1 ratio of cream cheese to cheddar for the best melt. Adjust if you prefer a milder or stronger cheese flavor.
The Final Touch: A Sprinkle of Fresh Herbs
A quick sprinkle of fresh dill or cilantro after frying adds a burst of color and a fresh flavor note that lifts the dish. It also creates a pleasing visual contrast that makes the poppers even more appetizing. I always garnish with dill because it complements the jalapeno’s heat perfectly.
Creative Twists and Variations
This recipe is a playground. Here are some of my favorite ways to switch things up:
Buffalo Bacon Poppers
Swap the regular bacon for spicy buffalo chicken strips, and add a splash of hot sauce to the filling. The tangy chicken pairs with the heat of the jalapeno, creating a flavor explosion. Serve with blue cheese dressing for a classic twist.
Mango Jalapeno Poppers
Add diced mango to the filling for a sweet, tropical counterpoint. The mango’s natural sweetness balances the jalapeno’s heat, while the cheese provides a creamy backdrop. A squeeze of lime after frying enhances the bright flavors.
Mediterranean Popper
Replace the cheddar with feta and add chopped kalamata olives to the mixture. The salty feta and olives give a Mediterranean vibe, while the jalapeno adds a modern kick. Finish with a drizzle of olive oil and a sprinkle of oregano.
Vegan Cheese Popper
Use a plant-based cheese blend and vegan cream cheese. The flavor profile stays rich and creamy, and the jalapeno provides the heat. Use a neutral oil like canola for frying and a dash of nutritional yeast for extra umami.
Cheesecake Popper
Add a spoonful of cream cheese frosting to the filling for a sweet twist. The frosting’s sweetness contrasts with the jalapeno heat, creating a unique sweet‑spicy experience. Serve with a drizzle of chocolate sauce for an indulgent treat.
Mexican Street Taco Popper
Use taco-seasoned ground beef in the filling and top with shredded lettuce and diced tomatoes after frying. This version transforms the poppers into a portable taco bite. A squeeze of lime and a dollop of guacamole completes the flavor profile.
Storing and Bringing It Back to Life
Fridge Storage
Store leftover poppers in an airtight container in the refrigerator for up to 3 days. Keep them on a paper towel to absorb excess moisture and prevent sogginess. Reheat in a toaster oven or oven at 350°F for 5 minutes to restore crispness.
Freezer Friendly
Wrap each popper individually in plastic wrap, then place them in a freezer bag. They’ll stay fresh for up to 2 months. When you’re ready to enjoy, bake at 375°F for 15 minutes, or microwave for 45 seconds and then crisp in a hot skillet.
Best Reheating Method
The key to reheating is to preserve the crispness. A quick blast in the oven at 375°F for 5–7 minutes does the trick. If you’re short on time, a skillet over medium heat for 2 minutes on each side will revive the crunch. Add a splash of water before reheating to steam the interior and keep the cheese from drying out.