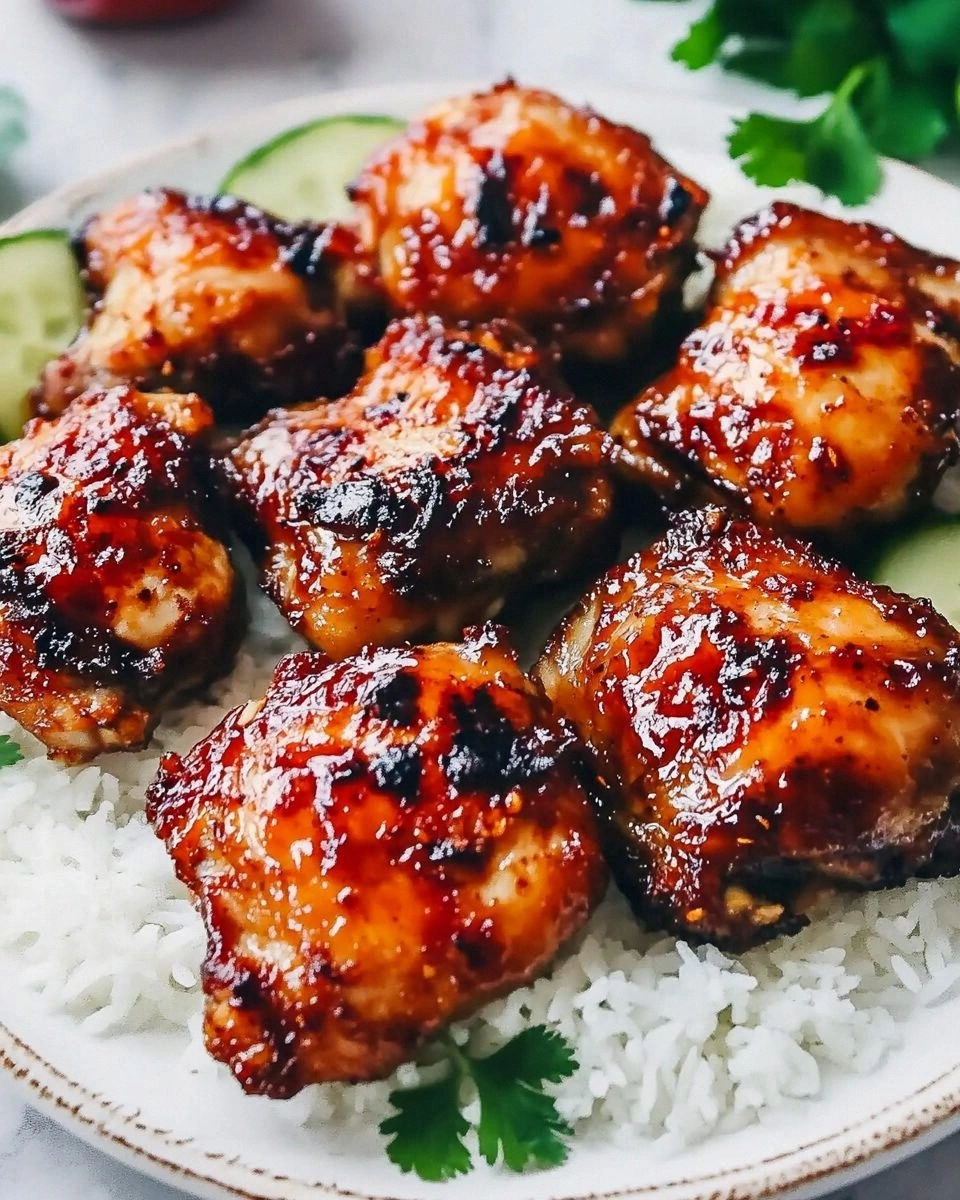
When I first opened my fridge last night, I found a lone chicken thigh that looked like a culinary mystery waiting to be solved. I stared at it, the pale skin glistening like a secret, and wondered what could turn a simple piece of meat into something that would make my taste buds dance. I was about to toss it into the trash when a stray packet of sweet chili sauce slipped out of the pantry, its bright red hue promising adventure. That moment sparked a daring culinary experiment: a sticky, sweet, and slightly fiery chicken thigh that would become the highlight of my dinner table.
The kitchen filled with the aroma of sizzling garlic and the faint, comforting scent of soy sauce as the chicken hit the hot skillet. My ears caught the rhythmic sizzle, a soundtrack that promised transformation. I could taste the potential sweetness of honey and the subtle heat of chili flakes already swirling in my imagination. The texture felt promising—skin crisping, meat tenderizing, sauce thickening into a glossy glaze. This was more than a meal; it was a promise of flavor fireworks that I was eager to share.
What makes this version of Sticky Sweet Chili Chicken Thighs stand out is not just the blend of sauces but the meticulous layering of textures and the intentional use of simple, accessible ingredients. I dared you to taste this and not go back for seconds—because the glaze will cling to each bite, delivering a burst of heat that melts into caramelized sweetness. This dish is hands down the best version you'll ever make at home, a recipe that turns ordinary thighs into a crowd‑pleasing star. I’ll be honest—I ate half the batch before anyone else got to try it. Most recipes get this completely wrong by overcooking the meat or using a sauce that's too thin, but here we lock in moisture and flavor with precision.
Picture yourself pulling this out of the oven, the whole kitchen smelling incredible, the glossy sauce glistening like a jewel on a black canvas of crispy skin. The moment the chicken rests, steam curls around the plate, and the aroma lingers like a promise of comfort. That sizzle when it hits the pan? Absolute perfection. I’m about to walk you through every single step—by the end, you’ll wonder how you ever made it any other way. Let the adventure begin.
What Makes This Version Stand Out
- Flavor Depth: The sauce balances sweet, salty, and spicy notes, creating a complex profile that lingers on the palate. Each bite reveals a new layer, from the initial snap of garlic to the lingering warmth of chili.
- Texture Contrast: The skin crisps to a golden crunch while the meat stays juicy, thanks to a brief sear before simmering. This contrast keeps every mouthful exciting.
- Ingredient Simplicity: With under ten ingredients, you can whip up this dish in under an hour, making it perfect for busy weeknights. No exotic pantry items required.
- Time Efficiency: Prep time is 15 minutes, cooking 30—total 45. It’s quick, yet feels like a gourmet experience.
- Make‑Ahead Friendly: The dish can be prepared ahead, refrigerated, and reheated without losing its sheen. Ideal for meal prep or entertaining.
- Visual Appeal: The glossy glaze and pop of scallions give the dish a vibrant look that makes it Instagram‑worthy. It’s as pleasing to the eye as it is to the taste buds.
- Versatility: Works wonderfully over rice, noodles, or a simple side of steamed greens. The sauce adapts to your mood.
- Crowd‑Pleaser: Even the most skeptical eaters will be hooked by the sweet‑heat dance. It’s a dish that earns compliments at every table.
Inside the Ingredient List
The Flavor Base
The foundation of this dish is the sweet chili sauce, which provides the primary sweetness and heat. Its bright red hue signals a kick that’s both aromatic and comforting. Pairing it with soy sauce adds depth and a subtle umami undertone that balances the honey’s brightness. Skipping the soy sauce would leave the sauce too sweet and lacking the savory backbone that makes the glaze cling to the thighs.
The Texture Crew
Chicken thighs are chosen for their natural fat content, which keeps the meat juicy during the long simmer. Skin‑on thighs add a crispy exterior that contrasts beautifully with the silky glaze. If you prefer boneless, simply adjust the cooking time to avoid drying out the meat. The cornstarch slurry thickens the sauce into a glossy coat that adheres to each bite.
The Unexpected Star
Fresh ginger brings a bright, peppery note that cuts through the richness of the sauce. Its aroma is a subtle reminder that the dish is not just sweet and spicy but also aromatic. If you’re not a fan of ginger, try a pinch of ground cardamom for a floral twist. However, the ginger’s freshness is key to achieving the signature zing.
The Final Flourish
Sesame oil and sesame seeds add a nutty aroma and a crunchy finish that elevate the dish’s complexity. Scallions provide a fresh, slightly sharp contrast to the sweetness. A splash of rice vinegar brightens the sauce, preventing it from feeling too heavy. Salt and pepper finish the seasoning, allowing each component to shine.
Everything's prepped? Good. Let's get into the real action.
The Method — Step by Step
- First, pat the chicken thighs dry with paper towels to ensure a crisp skin. Season both sides generously with salt and pepper, letting the flavors penetrate the meat. Heat a large skillet over medium-high heat and add a splash of sesame oil, watching for a shimmering sheen. When the oil is hot, lay the thighs skin‑side down, allowing them to sear without moving for about 4 minutes. This creates a golden crust that locks in moisture and sets the stage for the glaze.
- Flip the thighs and add minced garlic, grated ginger, and a pinch of chili flakes to the pan. Sauté for 30 seconds until fragrant, ensuring the aromatics don’t burn. The aroma at this point should be unmistakably inviting, a prelude to the sweet‑spicy symphony that follows. This step is crucial for building the sauce’s depth; skip it, and the dish feels flat.
- Pour in the sweet chili sauce, soy sauce, honey, and rice vinegar, stirring to combine. Bring the mixture to a gentle simmer, watching for bubbles that signal the sauce is melding. The liquid should thicken slightly, coating the back of a spoon. This is the moment of truth—if the sauce is too thin, the glaze will be watery, so adjust the heat or add a cornstarch slurry later.
- Add the cornstarch slurry (cornstarch mixed with a little water) to the pan, whisking continuously. The sauce should instantly thicken, turning glossy and ready to cling to the thighs. Keep the heat low to avoid scorching the glaze. This step ensures the sauce’s texture is velvety, not syrupy.
- Reduce the heat to low, cover the skillet, and let the thighs simmer for 15 minutes. The sauce will continue to thicken, and the chicken will become tender. Check the internal temperature with a meat thermometer; it should read 165°F (74°C). This gentle cooking method ensures the meat stays juicy while the glaze deepens.
- Uncover the skillet and increase the heat to medium to reduce the sauce further, creating a richer glaze. Stir frequently to prevent sticking, and watch for the sauce to caramelize slightly. The aroma will intensify, signaling that the glaze is ready to shine. This step is where the dish transforms from simple to spectacular.
- Finish by sprinkling sliced scallions and sesame seeds over the thighs. Toss gently to coat the meat in the final burst of freshness and crunch. Plate the thighs over steamed rice or noodles, allowing the sauce to mingle with the grains. Serve immediately, letting the glaze drip onto the side for an extra burst of flavor. The dish is now ready to impress.
That’s it— you did it. But hold on, I've got a few more tricks that'll take this to another level, ensuring every bite is as memorable as the first. Let’s dive into the insider tips that elevate this dish from great to unforgettable.
Insider Tricks for Flawless Results
The Temperature Rule Nobody Follows
Many cooks over‑cook their thighs, but the secret is to start with high heat for the sear and then drop to low for the simmer. This temperature swing locks in juices while preventing the meat from drying out. I once tried a single‑heat method and ended up with a rubbery texture that felt like a culinary betrayal. Keep the heat low during the simmer, and the thighs will stay tender and juicy.
Why Your Nose Knows Best
Trust your nose when the sauce starts to bubble and thicken. The scent of caramelizing sugar signals that the glaze is ready. If you’re in doubt, take a small taste; it should be sweet, salty, and just a hint of heat. Relying on aroma is faster and often more accurate than timing alone.
The 5-Minute Rest That Changes Everything
After removing the skillet from heat, let the thighs rest for five minutes. This allows the juices to redistribute, making the meat more succulent. During this brief pause, the glaze continues to thicken slightly, creating a richer coating. Skipping this step can leave the meat slightly dry and the sauce thin.
Watch Out for Over‑Simmering
When reducing the sauce, keep a close eye on the flame. A quick, vigorous boil can scorch the sugar, turning the glaze bitter. A gentle reduction preserves the sweet‑spicy balance and keeps the sauce glossy. If the sauce starts to look thickened too early, add a splash of water to keep it silky.
Serve With a Fresh Side
Pair the thighs with a simple cucumber salad or lightly sautéed greens to cut through the richness. The crispness of fresh vegetables balances the sauce’s sweetness. A squeeze of lime over the greens adds a bright counterpoint that refreshes the palate. This combination keeps the dish light and satisfying.
Make‑Ahead and Reheat Like a Pro
To keep the glaze from drying out, store the dish in an airtight container and refrigerate. When reheating, add a splash of water or broth to restore moisture. Reheat gently over low heat, stirring to re‑glaze the thighs. This method ensures the dish tastes as good on the second day as it did fresh.
Those are the tricks that turn a good dish into a legendary one. If you follow these tips, you’ll never have to settle for anything less than perfection.
Creative Twists and Variations
This recipe is a playground. Here are some of my favorite ways to switch things up:
Spicy Pineapple Fusion
Add diced pineapple to the sauce for a tropical twist. The fruit’s natural sweetness balances the heat, creating a bright, caramelized glaze. Pair it with coconut rice for a beach‑inspired meal. This version is perfect for summer gatherings.
Herb‑Infused Delight
Stir in fresh basil or cilantro at the end for a burst of herbal freshness. The greens cut through the richness and add a peppery note. Serve over jasmine rice to keep the flavors harmonious. This variation is ideal for herb lovers.
Glazed Garlic Parmesan
Replace sesame oil with butter and sprinkle grated Parmesan over the thighs before serving. The nutty cheese adds depth and a savory crunch. Drizzle a little extra sauce on top for extra flavor. This version is a crowd‑pleaser at family dinners.
Low‑Calorie Kick
Swap the honey for a sugar substitute like erythritol or use a sugar‑free sweet chili sauce. Reduce the sesame oil to a tablespoon of olive oil. The dish remains flavorful but lighter on calories. Great for those watching their intake.
Asian Noodle Bowl
Serve the thighs over ramen or soba noodles, tossing them with a splash of the sauce. Top with sliced scallions, sesame seeds, and a drizzle of sriracha. The noodles soak up the glaze, creating a comforting bowl. This is a quick, satisfying dinner.
Roasted Veggie Medley
Roast bell peppers, carrots, and zucchini alongside the thighs. The veggies absorb the sauce’s sweetness and add color. Drizzle the remaining glaze over the roasted vegetables for a cohesive flavor profile. This version is a one‑pan wonder.
Feel free to experiment; the base is so versatile that it adapts to almost any flavor profile you’re craving.
Storing and Bringing It Back to Life
Fridge Storage
Store leftovers in a sealed container for up to three days. Keep the sauce and chicken separate if possible to maintain texture. When ready to eat, reheat gently over medium heat, stirring to combine the glaze. The dish will taste fresh and slightly caramelized.
Freezer Friendly
Freeze the thighs with the glaze in an airtight container for up to two months. Thaw overnight in the fridge before reheating. Add a splash of water or broth to restore moisture. The sauce will remain glossy after reheating.
Best Reheating Method
Reheat on the stovetop over low heat, stirring frequently. Add a small amount of water to keep the glaze from drying. Finish with a quick splash of lime for brightness. Serve immediately for the best flavor.
Now that you’ve mastered the basics, you’re ready to create a dish that’s as impressive on the plate as it is in your kitchen. Enjoy the process, savor the flavors, and let every bite remind you why cooking is the best kind of adventure.