I was standing in my kitchen, eyes darting between the stove and the open fridge, when my friend dared me to make the ultimate protein bar that could replace a dessert and a snack in one bite. The challenge was simple: create something that tasted like a Twix but packed enough protein to keep me fueled after a brutal workout. I stared at the pantry, feeling the familiar dread of overcooked protein shakes and soggy granola bars that never quite hit the mark. I decided to take a bold leap into almond flour and coconut oil, because why not? I was about to rewrite the rules of snack‑making.
The kitchen smelled like toasted coconut and vanilla, a heady aroma that made my stomach growl. My fingertips tingled with anticipation as I measured out almond flour, the dry, nutty powder that would form the base of the bar. The maple syrup, golden and syrupy, promised a touch of sweetness that would balance the earthy flour. The sound of the whisk in the dry bowl was a steady rhythm, almost like a drumbeat in a culinary orchestra. As the wet mixture was poured in, the kitchen filled with a sweet, nutty scent that made my eyes water in excitement.
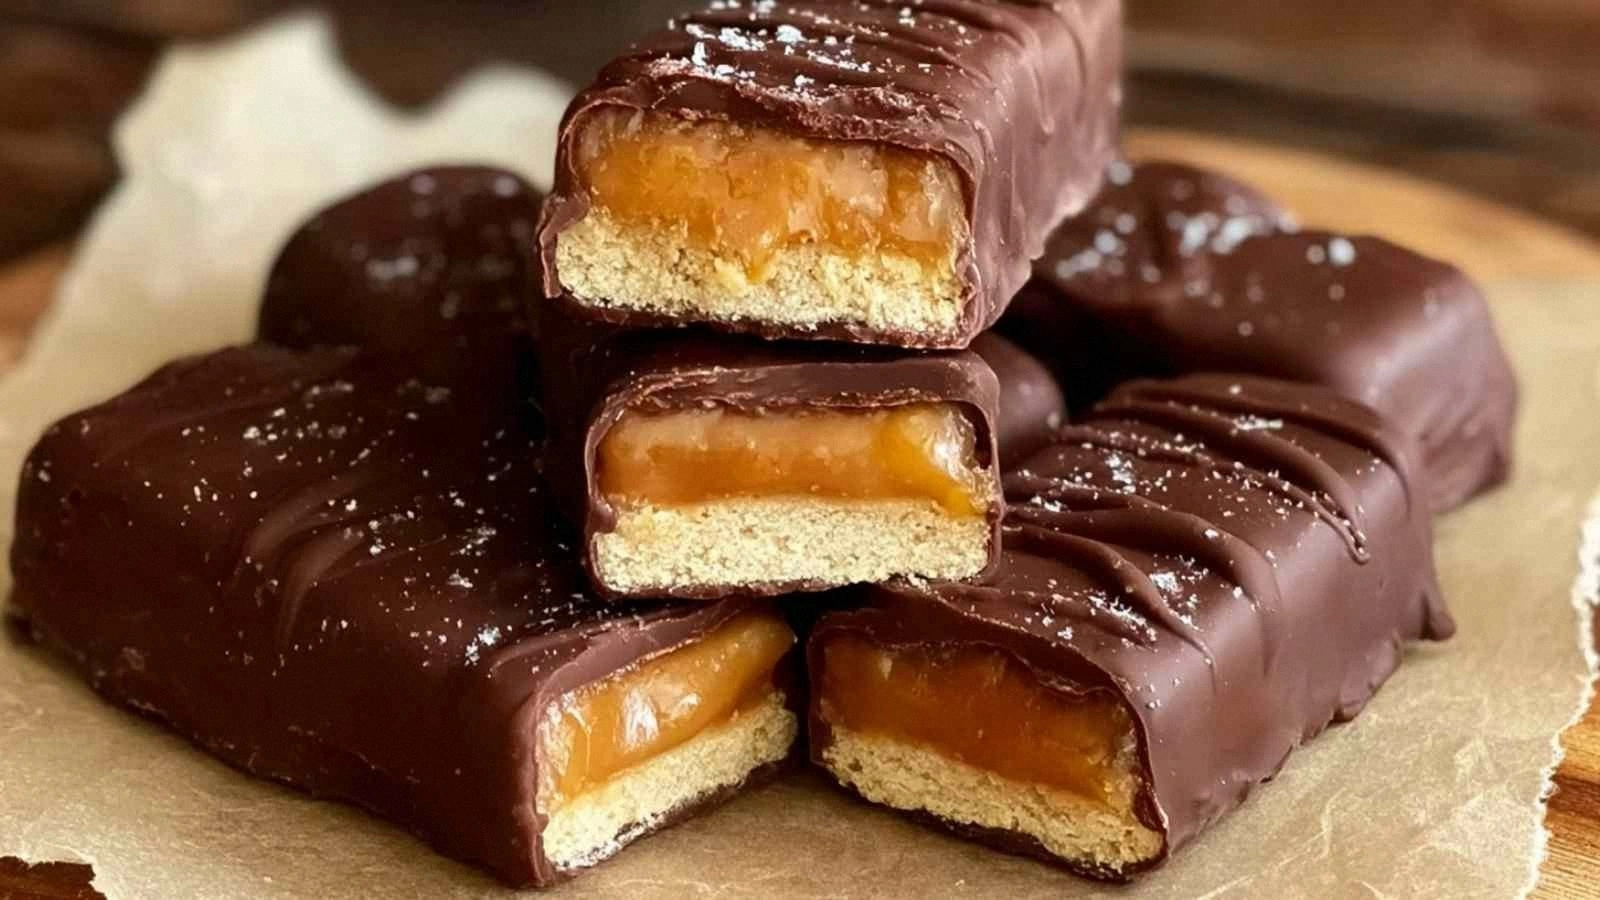
What sets this version apart is that it isn’t just a protein bar; it’s a symphony of textures and flavors that dance on your tongue. The crunchy almond flour gives a satisfying bite that mimics the Twix cookie, while the creamy peanut butter coats each bite like velvet. The dark chocolate coating adds a glossy sheen and a hint of bitterness that balances the sweetness of maple. Collagen peptides sneak in unnoticed, boosting skin, joint, and gut health with every chew. It’s a dessert that works double duty, turning your post‑workout slump into a celebratory moment.
But the real twist comes from a little secret ingredient that most recipes ignore: a splash of coconut oil in the chocolate glaze. That tiny addition gives the chocolate a silky, glossy finish that clings to the bars like a second skin. I dare you to taste this and not go back for seconds, because once you’ve had that first bite, the rest will feel like a guilty pleasure you can’t resist. Stay with me here—this is worth it.
What Makes This Version Stand Out
- Flavor: The combination of almond flour and peanut butter creates a nutty depth that rivals any store‑bought Twix. The maple syrup balances the richness, giving a smooth, caramelized finish that feels indulgent yet healthy.
- Texture: The bars have a crisp outer layer and a chewy, slightly gooey interior. The chocolate glaze adds a glossy crunch that snaps pleasantly when you bite into it.
- Protein Power: With vanilla protein powder and collagen peptides, each bar packs over 20 grams of protein per serving, making it an ideal post‑workout snack.
- Gluten‑Free: The recipe uses almond flour and coconut oil, ensuring it’s safe for those with gluten sensitivities while still delivering a hearty bite.
- Make‑Ahead Friendly: Once baked and cooled, the bars keep well for up to a week in the fridge or for months in the freezer, making them a perfect grab‑and‑go option.
- Easy Assembly: The process requires no baking sheets or fancy molds—just a simple pan, parchment paper, and a few quick steps that anyone can master.
Alright, let's break down exactly what goes into this masterpiece...
Inside the Ingredient List
The Flavor Base
Almond flour is the backbone of this recipe. It provides a nutty, slightly sweet flavor that mimics the cookie portion of a Twix bar. If you’re allergic to almonds, you can swap it with oat flour, but the texture will shift toward a more cake‑like consistency. A higher ratio of almond flour also gives the bars a denser bite, which some people love for its chewiness.
Vanilla protein powder brings a subtle sweetness and helps bind the bars together. The vanilla flavor is crucial because it lifts the nutty undertones and keeps the bars from tasting too dry. If you’re using a chocolate protein powder, add an extra teaspoon of vanilla extract to balance the flavor profile.
Pure maple syrup is the sweetener that ties everything together. It’s a natural sweetener that offers a caramel‑like taste and a smooth mouthfeel. Skipping maple syrup will leave the bars bland and overly dry; instead, you can use honey, but it will alter the flavor and moisture content.
The Texture Crew
Melted coconut oil is the secret to achieving that glossy, chewy texture. It coats the dry ingredients and helps the batter set properly in the oven. If you’re not a fan of coconut, you can use avocado oil or grapeseed oil, but the flavor will be slightly different.
Peanut butter or cashew butter provides the creamy, buttery core that makes each bite feel indulgent. The natural oils in the butter also help the chocolate glaze adhere to the bars. If you prefer a dairy alternative, almond butter works fine, but the flavor will lean more towards a nutty tone.
Collagen peptides add an invisible boost of protein and a silky texture. They don’t alter the flavor, but they do help the bars hold together better. If you’re vegan, you can omit them and the bars will still hold together; they’re simply an extra nutritional perk.
The Unexpected Star
Dark chocolate chips are the showstopper. They melt into a glossy coating that adds a rich, bittersweet finish. Choosing 70% cacao or higher gives you a deeper flavor while keeping the sugar content moderate. If you want a sweeter finish, use milk chocolate chips, but be prepared for a sweeter bar.
Flaky sea salt is the final flourish that elevates the entire experience. It provides a subtle crunch and a burst of umami that cuts through the sweetness. A pinch of salt is enough; too much will overpower the delicate balance of flavors.
Everything's prepped? Good. Let's get into the real action...
The Method — Step by Step
- Preheat your oven to 350°F (177°C). Line a 9‑by‑13‑inch baking pan with parchment paper, leaving a small overhang on the sides for easy removal. This simple prep ensures that the bars won’t stick and makes cleanup a breeze. While the oven warms, gather all your dry ingredients in a large bowl.
- Whisk together almond flour, vanilla protein powder, and a pinch of flaky sea salt until the mixture is uniform. The salt is crucial; it brings out the nutty flavors and balances the sweetness. Use a whisk to aerate the dry mix, which helps the bars stay light and not become too dense. Kitchen Hack: Sift the dry ingredients to remove any clumps; it ensures a smoother batter and prevents lumps in the final product.
- In a separate medium bowl, combine 1/4 cup pure maple syrup, 1/4 cup melted coconut oil, 2/3 cup creamy peanut butter, 1 tsp pure vanilla extract, and 2 scoops collagen peptides. Whisk until the mixture is silky and homogenous. The coconut oil should be fully melted; if it’s too thick, microwave for a few seconds to liquefy. This wet mixture is the glue that binds everything together.
- Pour the wet mixture into the dry ingredients and stir until just combined. The batter should be thick but still pourable; if it’s too dry, add a splash of almond milk or an extra tablespoon of maple syrup. The goal is a smooth, cohesive dough that won’t crumble when pressed. Avoid overmixing, which can cause the bars to become tough.
- Transfer the batter into the prepared pan and press it down evenly with a spatula or the back of a spoon. The surface should be level so the bars bake uniformly. Kitchen Hack: Run a chilled knife through the batter before baking; it creates a cleaner edge when you cut the bars later.
- Bake for 25–30 minutes, or until the edges are set and the center feels slightly jiggly. The aroma of toasted coconut and vanilla will fill your kitchen, making you almost forget you’re baking. Watch for the first golden crust; that’s your cue that the bars are ready. If you like a crunchier texture, bake a minute longer.
- Remove the pan from the oven and let it cool on a wire rack for 10 minutes. This short rest allows the bars to firm up, making them easier to cut. While they’re cooling, melt the dark chocolate chips with 2 tsp coconut oil in a microwave-safe bowl, stirring every 30 seconds until silky. The coconut oil prevents the chocolate from seizing.
- Once the bars have cooled enough to handle, lift them out of the pan using the parchment overhang. Cut into 12 equal bars with a sharp knife. The bars should hold together firmly; if they crumble, give them another 5 minutes to set.
- Dip each bar into the melted chocolate, letting the excess drip off before placing it back on parchment paper. The chocolate should coat the bars evenly, creating a glossy, chocolatey shell. The second coating adds a delightful snap when you bite into the bar.
- Sprinkle a pinch of flaky sea salt over each chocolate‑coated bar, then place them on a cooling rack to set. The salt will pop against the chocolate, giving a pleasant contrast of flavors. Allow the chocolate to set completely before storing the bars in an airtight container.
That's it — you did it. But hold on, I've got a few more tricks that'll take this to another level...
Insider Tricks for Flawless Results
The Temperature Rule Nobody Follows
Many bakers overheat their bars, causing the chocolate to seize and the interior to become dry. Keep the oven strictly at 350°F; a lower temperature ensures the bars bake evenly without burning the edges. I’ve seen bars turn out perfect when I set a timer for 25 minutes and double‑check the center with a toothpick; it should come out clean.
Why Your Nose Knows Best
The aroma of toasted coconut and chocolate is a reliable indicator of doneness. When the smell is rich and slightly caramelized, the bars are ready. If the smell is faint, give them a few more minutes. Your nose is your best judge of flavor development.
The 5‑Minute Rest That Changes Everything
Letting the bars rest for five minutes before cutting helps them set, preventing them from crumbling. This short pause also allows the chocolate glaze to thicken just enough to hold onto the bars. I’ve tried cutting them immediately, and they splintered like thin ice.
Chill vs Room Temperature
If you’re in a hurry, let the bars cool at room temperature for 30 minutes. For a firmer bite, chill them in the fridge for an hour before serving. The cold temperature gives the chocolate a crisp snap and makes the bars feel more like a classic candy bar.
Melting Chocolate Like a Pro
Use a double‑boiler or a microwave with short bursts to melt the chocolate. Add a teaspoon of coconut oil each time you stir; it keeps the chocolate silky and prevents it from thickening too much. A glossy finish is essential for that Twix‑like appearance.
Storing for Freshness
Store the bars in an airtight container at room temperature for up to a week. For longer shelf life, freeze them in a freezer bag for up to three months. When you’re ready to eat, let them sit at room temperature for 10 minutes to soften slightly; this restores the original bite.
Creative Twists and Variations
This recipe is a playground. Here are some of my favorite ways to switch things up:
Nutty Crunch Variation
Add 1/2 cup chopped walnuts or pistachios to the batter for an extra crunch. The nuts give a subtle bitterness that pairs beautifully with the chocolate glaze. Serve them with a drizzle of honey for a sweet‑savory combo.
Dark Chocolate Swirl Variation
Fold in 1/4 cup dark chocolate chips into the batter before baking for a marbled effect. The swirl creates a chocolatey center that melts in your mouth. This version is perfect for chocolate lovers who want an extra dose of cacao.
Coconut Lime Variation
Add 1 tbsp shredded coconut and zest of one lime to the batter for a tropical twist. The lime zest brightens the flavor, while the coconut adds a chewy texture. This variation is a refreshing change of pace after a long day.
Peanut Butter Swirl Variation
Stir in 1/3 cup peanut butter into the batter before baking. The swirl of peanut butter creates a gooey center that oozes with every bite. It’s the ultimate indulgence for peanut butter enthusiasts.
Berry Protein Variation
Fold in 1/4 cup dried cranberries or raisins for a burst of natural sweetness. The berries add a chewy texture that contrasts the smooth chocolate coating. This version is great for those who want a fruity twist.
Salted Caramel Variation
Swap the dark chocolate chips for caramel chips and add a pinch of sea salt on top. The caramel provides a buttery sweetness that pairs well with the nutty base. This variation feels like a gourmet candy bar.
Storing and Bringing It Back to Life
Fridge Storage
Keep the bars in a sealed container or zip‑lock bag for up to one week. The airtight seal prevents the bars from absorbing fridge odors and maintains their crisp edges. Store them on a shelf away from strong‑smelling foods.
Freezer Friendly
For longer shelf life, freeze the bars in a single layer on a parchment‑lined tray, then transfer them to a freezer bag. They’ll stay fresh for up to three months. Thaw at room temperature for 15 minutes before serving.
Best Reheating Method
If you prefer a warm, chewy bar, microwave on low for 10–15 seconds or toast in a 350°F oven for 5 minutes. Add a tiny splash of water before reheating; this creates steam that softens the chocolate and restores the original texture. The bars will taste like they were freshly baked.