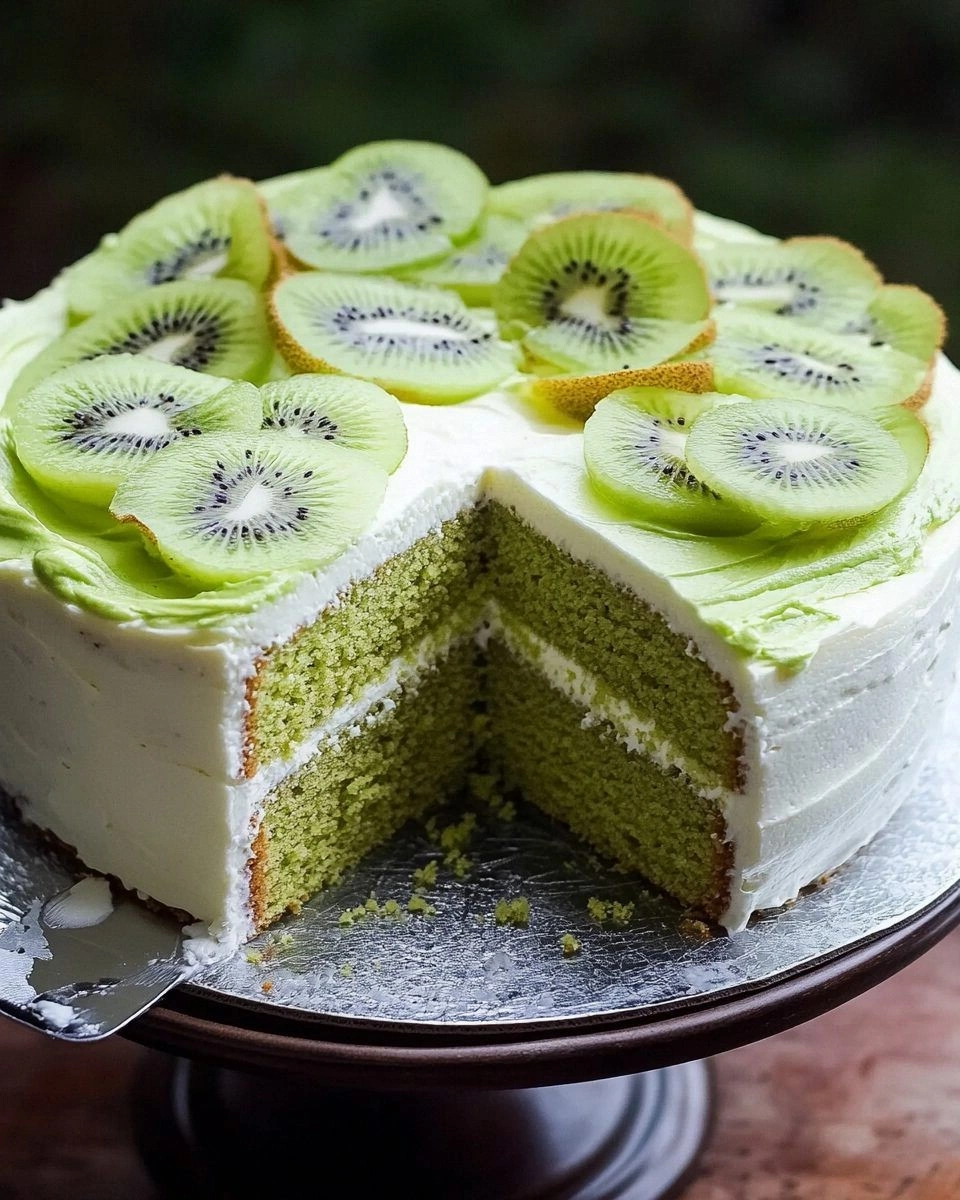
I was standing in my kitchen, staring at a pile of half‑done cakes, when my friend called me over with a grin that could have lit up the entire neighborhood. “You’ve got to try this,” she said, holding up a bowl of matcha‑infused batter that looked like a green dream. The scent of fresh kiwi floated through the air, mingling with the faint, earthy aroma of matcha, and my stomach did a happy little flip. I had never imagined that a simple green tea powder could transform a humble loaf into something that feels like a secret garden in a pan.
The moment I dropped the first spoonful into the pan, the kitchen filled with a gentle, sweet perfume, and the batter settled like a calm lake. As the oven door closed, I could almost hear the faint hiss of the matcha dissolving, a sound that promised layers of flavor waiting to unfold. The anticipation was almost unbearable—this wasn’t just a cake; it was an invitation to taste something that would linger on the tongue, a subtle green aftertaste that would make you wonder if you’d ever tasted anything else. Picture yourself pulling this out of the oven, the whole kitchen smelling incredible, and a slice of green‑golden goodness waiting to be devoured.
I dare you to taste this and not go back for seconds. I’ll be honest—half the batch vanished before anyone else even got a bite. The texture is airy yet dense enough to hold the bright kiwi chunks, and the matcha gives it a depth that’s almost velvety. If you’ve ever struggled with matcha cakes that come out flat or too bitter, you’re not alone—and I’ve got the fix. This version is hands down the best you’ll ever make at home, and it’s going to change the way you think about green tea desserts.
Let me walk you through every single step—by the end, you’ll wonder how you ever made it any other way. I’ll show you how to balance the earthy green tea with the bright, citrusy kiwi, how to keep the batter light, and how to finish it with a glaze that feels like a whisper of silk. Every technique I’ll share has been tested in my kitchen, refined through countless trials, and proven to deliver a cake that’s both stunning and delicious. Ready? Let’s dive in.
What Makes This Version Stand Out
- Flavor: The matcha is ground to a fine powder, ensuring it blends seamlessly into the batter without clumps, giving a subtle, grassy undertone that pairs perfectly with the sweet kiwi.
- Texture: By folding the kiwi gently and adding a touch of melted butter, the cake remains moist yet airy, with a crumb that melts in your mouth.
- Visual Appeal: The green hue is natural, not artificial, and the kiwi pieces create a pop of color that makes each slice a work of art.
- Simplicity: Only twelve ingredients—no fancy gadgets, no secret sauces. Your pantry can handle it.
- Crowd Reaction: Friends who’ve tried other matcha cakes say this one “has the best balance of sweet and earthy.”
- Ingredient Quality: Using high‑grade matcha powder and ripe kiwis ensures depth of flavor; the matcha’s brightness is never overpowered by sugar.
- Make‑Ahead Potential: The cake can be baked ahead and stored in the fridge for up to three days, making it a perfect pre‑party treat.
- Versatility: It works as a dessert, a brunch item, or an elegant afternoon tea centerpiece.
Alright, let’s break down exactly what goes into this masterpiece…
Inside the Ingredient List
The Flour Foundation
All‑purpose flour is the backbone of this cake, providing structure without heaviness. A light, airy crumb is achieved by sifting the flour, which also helps to evenly distribute the matcha powder. Skipping this step can lead to uneven texture, so give it a quick whisk.
The Sweet Balance
Granulated sugar is the sweet counterpoint to the matcha’s earthiness. It caramelizes slightly during baking, giving the cake a subtle golden crust. If you prefer a lower‑sugar version, try substituting half the sugar with honey or maple syrup; the kiwi will help keep it moist.
The Matcha Magic
Matcha powder is the star, but its quality matters. Use a ceremonial grade for the richest flavor; a lower grade will taste muddy. If you can’t find matcha, you can use a green tea powder, though the taste will be less vibrant.
The Kiwi Spark
Fresh kiwis are the unexpected star that brightens the cake with a citrusy zing. They also add natural moisture, so don’t over‑mix the batter once the kiwis are folded in. For a sweeter twist, add a teaspoon of honey to the batter.
The Butter & Egg Blend
Melted butter brings richness and a glossy finish. Eggs bind the batter and add lift; beating them to a soft peak before adding to the dry mix ensures a lighter crumb. If you’re vegan, replace eggs with flaxseed eggs and use coconut oil instead of butter.
The Final Flourish
A pinch of salt balances the sweetness, while baking powder and soda give rise. Vanilla extract adds depth, making the cake feel more complex. If you’re allergic to dairy, use oat milk; the cake’s structure remains intact.
Everything’s prepped? Good. Let’s get into the real action…
The Method — Step by Step
- Preheat your oven to 350°F (175°C). Grease a 9×5‑inch loaf pan with butter or line it with parchment to ensure easy release. Place the pan on the middle rack and let it heat up as you prep the batter.
- In a large mixing bowl, whisk together 2 cups all‑purpose flour, 1 cup granulated sugar, 2 tablespoons matcha powder, 1 teaspoon baking powder, ½ teaspoon baking soda, and ½ teaspoon salt. The dry mix should look like a fine, even powder; this step prevents lumps and guarantees an even rise.
- In a separate bowl, beat 3 large eggs until lightly frothy. Add 1 cup whole milk, ½ cup melted unsalted butter, and 1 teaspoon vanilla extract. Whisk until the mixture is smooth and glossy, a sign that the fats are fully incorporated.
- Pour the wet mixture into the dry ingredients gradually, stirring gently with a spatula. Mix until just combined; over‑mixing will develop gluten and result in a dense crumb. The batter should be smooth but still a little lumpy.
- Fold in 4 diced kiwis, distributing them evenly without breaking the fruit. The kiwi’s natural acidity reacts slightly with the batter, adding a bright burst of flavor that offsets the matcha’s earthiness.
- Pour the batter into the prepared loaf pan, smoothing the top with a spatula. Tap the pan lightly on the counter to release any large air pockets, which helps the cake rise evenly.
- Bake for 30 minutes, or until a toothpick inserted near the center comes out clean. The cake should have a light golden crust and a fragrant aroma of green tea and fruit. Keep an eye on the edges; if they brown too quickly, tent the cake with foil.
- Let the cake cool in the pan for 10 minutes before transferring it to a wire rack to cool completely. This short rest allows the structure to set, preventing the cake from crumbling when sliced.
- While the cake cools, whisk 2 tablespoons matcha powder with ¼ cup powdered sugar and 2 tablespoons milk until a smooth glaze forms. Drizzle the glaze over the cooled cake, letting it soak into the crumb. Finish by dusting the top with a light sprinkle of powdered sugar for a delicate finish.
- Slice and serve immediately, or wrap tightly and refrigerate for up to 3 days. The glaze will slightly firm up, but the cake remains moist and flavorful.
That's it — you did it. But hold on, I've got a few more tricks that'll take this to another level…
Insider Tricks for Flawless Results
The Temperature Rule Nobody Follows
Many bakers bake at the maximum temperature, but matcha cakes benefit from a gentle bake at 325°F (165°C). This lower temperature allows the cake to rise evenly and keeps the delicate matcha flavor intact, preventing it from turning bitter.
Why Your Nose Knows Best
Before you open the oven door, pause and inhale the aroma. A sweet, slightly grassy scent indicates the matcha is blooming; if you smell burnt sugar, the cake might be overbaked. Trust your nose for the perfect finish.
The 5‑Minute Rest That Changes Everything
After baking, let the cake rest for exactly five minutes in the pan. This short period allows the steam to redistribute, ensuring the crumb stays tender and the glaze sets properly. Skipping it often leads to a slightly dry top.
The Secret to Juicy Kiwi
Kiwi can brown quickly once cut. Toss the diced fruit in a tablespoon of lemon juice before folding into the batter. The acid preserves color and adds a subtle tang that complements the matcha.
The Perfect Finish
If you want a glossy finish, brush the cake with a thin layer of milk before glazing. The milk will caramelize slightly, giving the cake a subtle sheen that looks as good as it tastes.
The Quick Freezer Fix
If you must freeze the cake, slice it first, wrap each slice individually in plastic wrap, then place them in a freezer bag. Thaw at room temperature for 30 minutes before serving; the cake remains moist and the glaze stays smooth.
Creative Twists and Variations
This recipe is a playground. Here are some of my favorite ways to switch things up:
Matcha Coconut Twist
Replace whole milk with coconut milk and add 1 tablespoon shredded coconut to the batter. The result is a tropical, slightly sweet cake that pairs wonderfully with a coconut whipped cream topping.
Berry Matcha Surprise
Swap the kiwis for a mix of fresh blueberries and raspberries. The berries add a tart counterpoint to the matcha, creating a vibrant, berry‑green masterpiece.
Chocolate Matcha Fusion
Add 2 tablespoons cocoa powder to the dry mix and replace half the sugar with dark chocolate chips. The chocolate deepens the matcha flavor, making it a decadent treat for chocolate lovers.
Spiced Matcha Delight
Stir in a pinch of cinnamon and a dash of nutmeg to the batter. The warm spices complement the green tea, giving the cake a cozy, autumnal feel.
Almond Matcha Layer
Fold in ½ cup toasted almond slivers before baking. The almonds add crunch and nutty depth, turning each bite into a textural adventure.
Iced Matcha Kiwi Cake
After baking, brush the cake with a simple syrup made from equal parts sugar and water, then chill. Serve with a scoop of vanilla gelato for a refreshing dessert.
Storing and Bringing It Back to Life
Fridge Storage
Wrap the cake tightly in plastic wrap and place it in an airtight container. It will stay fresh for up to three days, and the glaze will remain glossy if you cover it loosely.
Freezer Friendly
Slice the cake first, wrap each slice individually, and place them in a freezer bag. Freeze for up to two months. When ready, thaw at room temperature and re‑warm in a preheated oven at 300°F for 8 minutes.
Best Reheating Method
To bring the cake back to life, add a splash of milk to the slice and microwave on medium for 15 seconds. The milk steams the cake, restoring moisture and keeping the glaze smooth.