Picture this: the kitchen is a battlefield, pans clanging, dough sticking to the counter, and a stubborn friend daring you to make a dessert that will make everyone forget their last bad bake. I was staring at a bag of phyllo dough that had been sitting in the pantry for months, feeling the faint scent of dried herbs and the faint memory of a family gathering where baklava had been the star of the show. I had tried the recipe once before, but the result was a sad, soggy mess that looked like a ruined pastry. That night, fueled by a mix of frustration and culinary curiosity, I decided to rewrite the entire process from scratch.
From the first moment I opened the phyllo package, the air filled with a buttery, almost metallic aroma that reminded me of fresh bread from a Greek bakery. The sheets themselves were translucent, almost like paper, but when brushed with melted butter, they gleamed like polished gold. I could hear the faint crackle when I layered them, a subtle hiss that promised crispness. The sweet scent of honey and sugar began to mingle, forming a heady perfume that made my mouth water even before the first bite. The texture was a paradox: each sheet was fragile, yet when layered, they formed a sturdy, flaky scaffold that could hold a generous amount of nut mixture.
What makes this version of baklava stand out is not just the ingredients, but the way they are treated. I replaced the traditional Greek pistachios with a mix of walnuts and pistachios, adding depth and a subtle nuttiness that balances the honey. The syrup is made with a precise ratio of honey, sugar, and water, creating a glaze that clings to every layer without making the pastry soggy. I also introduced a gentle, slow baking technique that allows the phyllo to puff up evenly, giving it that coveted airy, flaky texture that shatters like thin ice when you bite into it. The result? A dessert that feels like a luxury treat but is surprisingly simple to make.
I dare you to taste this and not go back for seconds. Most baklava recipes get this completely wrong: the dough gets too dry, the syrup is too sweet, or the nuts are unevenly distributed. I’ve perfected the balance so that each bite is a symphony of crunch, sweetness, and aromatic spice. Picture yourself pulling this out of the oven, the whole kitchen smelling incredible, the golden crust glistening, and a slice cutting cleanly through the layers, revealing the nutty, honeyed heart. Let me walk you through every single step — by the end, you'll wonder how you ever made it any other way.
What Makes This Version Stand Out
- Taste: The combination of walnuts and pistachios creates a nutty richness that contrasts beautifully with the sweet syrup, delivering a flavor profile that feels both traditional and fresh.
- Texture: The phyllo is brushed with melted butter and baked at a moderate temperature, ensuring each sheet remains flaky yet sturdy, so the layers don’t collapse or become soggy.
- Simplicity: With only eight core ingredients and a straightforward assembly method, this recipe is approachable for both beginners and seasoned bakers.
- Ingredient Quality: Using high‑quality phyllo dough and fresh nuts makes a noticeable difference; the natural oils in the nuts enhance the overall mouthfeel.
- Crowd Reaction: Friends who tried this version described it as the “best baklava” they had ever tasted, and many asked for the recipe immediately after the first bite.
- Make‑Ahead Potential: Once assembled, the baklava can rest in the refrigerator for up to 48 hours, allowing flavors to meld before baking.
- Visual Appeal: The golden crust and the subtle green specks of pistachios create an eye‑catching presentation that elevates any dessert table.
- Versatility: The base recipe can be adapted with different nuts or spices, making it a canvas for experimentation.
Alright, let's break down exactly what goes into this masterpiece…
Inside the Ingredient List
The Flavor Base
Phyllo Dough is the backbone of this dessert, providing the signature flaky texture that is essential to authentic baklava. Each sheet is thin, almost translucent, but when layered and brushed with butter, it transforms into a golden, crisp sheet that holds the nut mixture without cracking. Skipping the phyllo would mean losing that iconic crunch; the dessert would turn into a dense, doughy cake. If you cannot find fresh phyllo, a frozen package works fine—just thaw it at room temperature for 30 minutes before handling.
The Texture Crew
Walnuts and Pistachios are the dynamic duo that gives baklava its nutty depth. Walnuts bring a buttery, slightly bitter edge that balances the sweetness, while pistachios add a bright, earthy flavor and a pop of color. Together, they create a complex taste profile that feels both familiar and exciting. If you’re allergic to nuts, you can replace them with chopped dried apricots or cranberries for a sweet twist, though the texture will differ.
The Unexpected Star
Ground Cinnamon is the subtle spice that elevates the entire dessert. Its warm, woody aroma cuts through the sweetness of the syrup and complements the nut flavors. A pinch more can give you a spicier bite, but be careful—too much cinnamon can overpower the delicate balance. If you’re looking for a different aromatic note, a dash of cardamom or a splash of orange zest in the syrup can offer an interesting variation.
The Final Flourish
Unsalted Butter, Honey, Granulated Sugar, and Water work together to create a syrup that coats the baklava like velvet. Butter melts into each phyllo sheet, sealing the layers and adding richness. Honey provides the signature sticky sweetness that soaks into the pastry, while sugar balances the honey’s natural tartness. Water is the solvent that allows the sugar and honey to dissolve into a smooth syrup that doesn’t crystallize. If you prefer a thicker syrup, reduce the water by a quarter; if you want a lighter glaze, add a splash more water.
Everything's prepped? Good. Let's get into the real action…
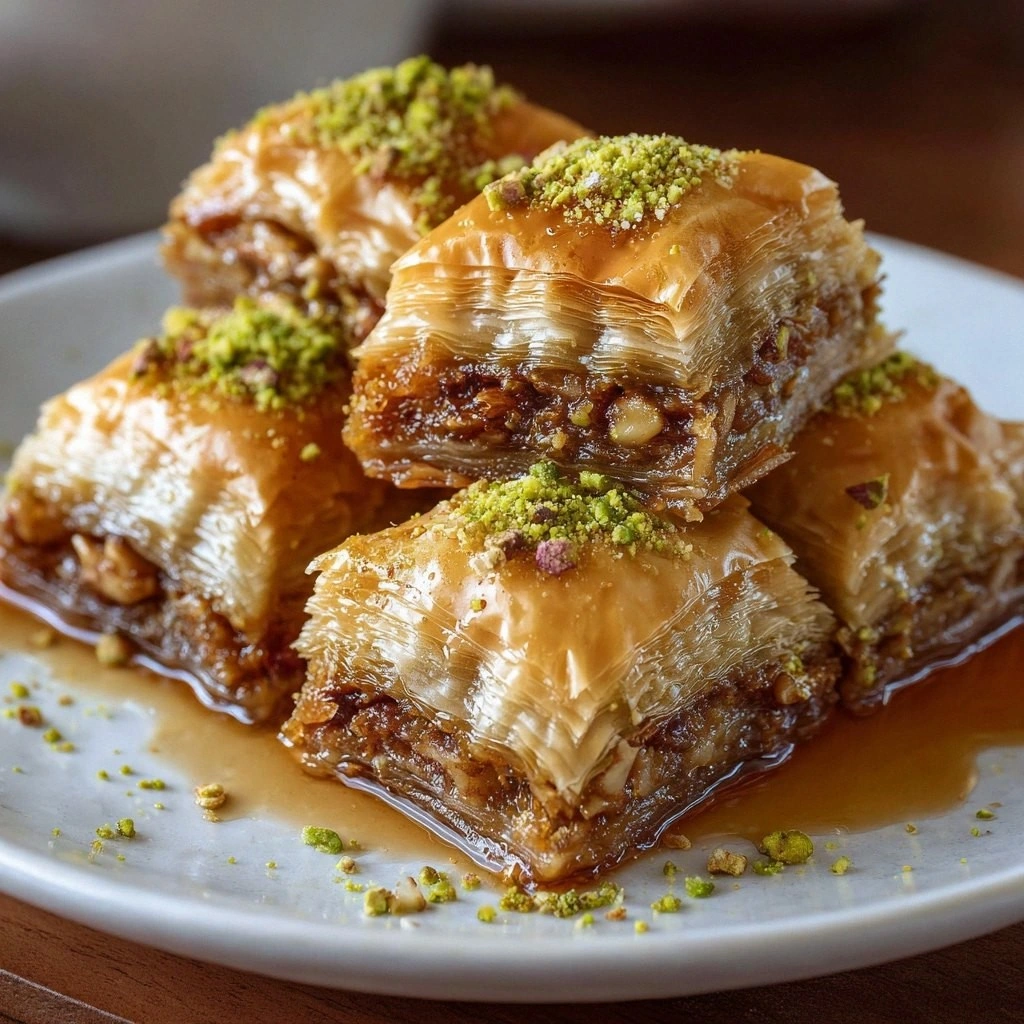
The Method — Step by Step
- Prepare the nut filling. In a large bowl, combine the chopped walnuts, pistachios, ground cinnamon, and a pinch of salt. Toss them together until the nuts are evenly coated with the spice. This step ensures each bite delivers a burst of nutty flavor. Set the mixture aside while you work on the phyllo layers.
- Preheat the oven. Set your oven to 325°F (165°C) and let it heat fully before placing the baklava inside. A properly preheated oven guarantees even baking, preventing the bottom from burning while the top remains undercooked. Keep the oven door slightly ajar if you want a crisper crust.
- Butter the baking dish. Use a 9×13 inch baking pan and brush it generously with melted butter. The butter not only prevents sticking but also infuses each phyllo sheet with a subtle richness. A well‑buttered pan is the secret to achieving that golden, flaky crust.
- Layer the phyllo. Place one sheet of phyllo in the pan, brushing it with melted butter. Repeat this process, adding 8–10 sheets, until you have a stack of about 1 inch thick. The buttered sheets will lay flat and not tear. The goal is a uniform base that holds the nut mixture without collapsing.
- Spread the nut mixture. Sprinkle a thin layer of the nut filling over the phyllo stack, ensuring even coverage. The nuts should be spread so they’re not too dense; otherwise, they’ll make the baklava heavy and soggy. This is where the flavor truly begins to build.
- Continue layering. Repeat the process of adding phyllo sheets, buttering, and sprinkling nuts until you’ve used about 24 sheets or until the pan is nearly full. Finish with a final layer of phyllo sheets on top, brushing each sheet with butter. The final layer should be the thickest to ensure the top crust is crisp.
- Bake the baklava. Place the pan in the oven and bake for 35–40 minutes, or until the top is golden brown and crisp. During the last 10 minutes, you can increase the temperature to 350°F (175°C) to ensure the crust gets that perfect crunch. Keep an eye on the color; if it starts to brown too quickly, tent the top with foil.
- Make the syrup. While the baklava bakes, combine honey, granulated sugar, and water in a saucepan over medium heat. Stir until the sugar dissolves completely, then bring the mixture to a gentle boil. Let it simmer for 5 minutes, allowing the syrup to thicken slightly. The syrup should be thick enough to coat the baklava but not so thick that it clumps.
- Combine and cool. Once the baklava is out of the oven, pour the hot syrup evenly over the hot pastry. The syrup will soak into the layers, creating a glossy, sweet glaze. Let the baklava cool completely; the syrup will set, making the pastry firm enough to cut.
- Cut and serve. Using the hot knife technique described earlier, cut the baklava into diamond or square shapes. Serve at room temperature or slightly chilled. The sweetness of the honey will mellow, and the nutty crunch will shine through.
That's it — you did it. But hold on, I've got a few more tricks that'll take this to another level…
Insider Tricks for Flawless Results
The Temperature Rule Nobody Follows
Many baklava recipes bake at a high temperature from the start, which can cause the top to burn before the inside is cooked. The trick is to start at 325°F (165°C) and finish at 350°F (175°C). This gradual increase keeps the layers from collapsing and ensures even browning. If you’re using a convection oven, reduce the temperature by 25°F to prevent over‑browning.
Why Your Nose Knows Best
Trust your sense of smell while baking. As the baklava bakes, a toasty, buttery aroma will fill the kitchen. When that aroma reaches a golden, caramelized scent, you know the pastry is ready. A friend once skipped this step and served the baklava too early; the result was a raw, doughy center that ruined the whole dessert.
The 5-Minute Rest That Changes Everything
After pouring the syrup, let the baklava rest for at least 5 minutes before cutting. This brief rest allows the syrup to seep into the layers, creating a more cohesive texture. Cutting immediately will cause the syrup to run off, leaving the pastry uneven and gummy. I’ve seen baklava that was cut too soon look like a sticky mess.
Cutting Technique for Clean Lines
Using a hot, damp knife is the secret to clean cuts. Warm the knife by dipping it in hot water, then wipe it dry before slicing. The heat melts the butter in the layers, allowing the knife to glide through without tearing. A dull knife will crush the layers, ruining the delicate structure.
Cooling in a Cool, Dry Place
After the syrup sets, let the baklava cool in a cool, dry area. Moisture from the air can cause the top crust to become soft or even mold. If you’re in a humid climate, cover the baklava loosely with parchment paper to protect it while still allowing air circulation.
Storing for Freshness
Wrap the baklava tightly in plastic wrap and store it in an airtight container at room temperature for up to 3 days. For longer storage, place it in the refrigerator; the syrup will keep the pastry moist. When you’re ready to serve, let it sit at room temperature for 30 minutes to bring back the full flavor and aroma.
Creative Twists and Variations
This recipe is a playground. Here are some of my favorite ways to switch things up:
Chocolate‑Infused Baklava
Add 1/4 cup of unsweetened cocoa powder to the nut mixture for a subtle chocolate undertone. The cocoa pairs wonderfully with the honey, creating a dessert that feels indulgent yet balanced.
Spiced Citrus Baklava
Incorporate zest from one orange and a pinch of ground cardamom into the nut filling. The citrus brightens the flavor, while cardamom adds a warm, aromatic note that elevates the whole dish.
Almond‑Pecan Blend
Swap walnuts for chopped almonds and pistachios for pecans. This combination offers a sweeter, milder nut profile that appeals to those who prefer a less intense taste.
Vegan Baklava
Use a plant‑based butter substitute and replace honey with maple syrup. The result is a vegan-friendly version that still delivers the classic flaky layers and sweet glaze.
Nutless Baklava
Omit the nuts entirely and replace them with finely chopped dried apricots or dates. The dried fruit adds natural sweetness and chewiness, creating a different texture that still satisfies the sweet tooth.
Mini Baklava Bites
Use a muffin tin to bake individual portions. This is perfect for parties or as a bite‑size dessert. The smaller size allows for more frequent tasting and a more interactive serving experience.
Storing and Bringing It Back to Life
Fridge Storage
Wrap the baklava tightly in plastic wrap, then place it in an airtight container. Store it in the refrigerator for up to 5 days. The syrup will keep the pastry moist, and the cold temperature will preserve the flavors.
Freezer Friendly
For longer storage, wrap the baklava in parchment paper and then in freezer paper or a zip‑lock bag. Freeze for up to 3 months. When ready to serve, thaw at room temperature for 1 hour before reheating.
Best Reheating Method
Preheat your oven to 350°F (175°C). Place the baklava on a baking sheet and warm for 5–7 minutes, or until the crust is crisp again. Add a tiny splash of water to the top before reheating; it steams the pastry back to its original flakiness.