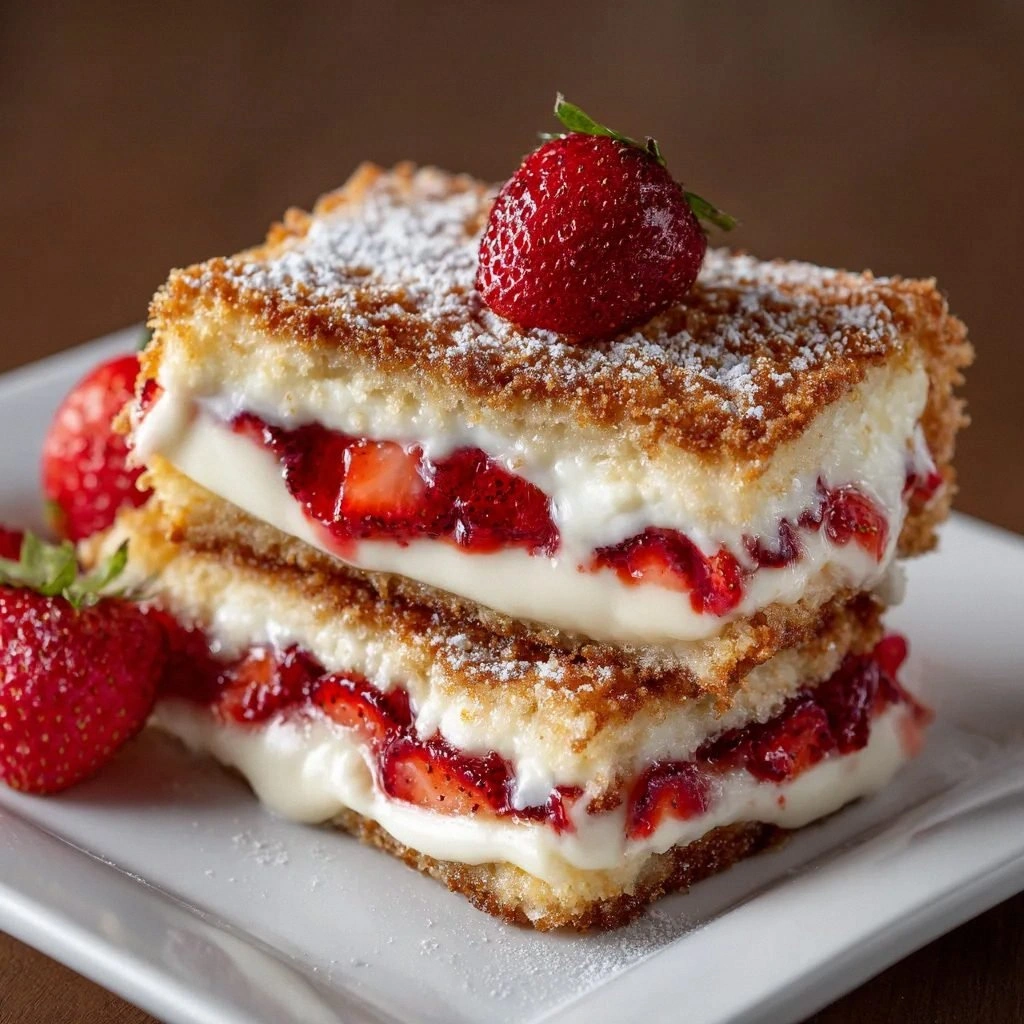
I remember the night I tried to recreate that viral Instagram post about fried strawberry cheesecake sandwiches. I had the ingredients in front of me, the kitchen humming with the scent of vanilla and fresh fruit, but the final result was a soggy, flavorless mess that left me questioning my culinary destiny. That disaster was the catalyst for a culinary revolution—a recipe that turns ordinary bread into a crispy, creamy carnival of flavors. I was determined to get it right, to make a sandwich that would make people say, “I dare you to taste this and not go back for seconds.”
Picture this: you slide a slice of warm, gooey cheesecake between two slices of bread, each studded with bright, juicy strawberries, then coat the whole thing in a light, airy batter before frying it to a golden, crackling perfection. The moment the sandwich hits the hot oil, the batter sizzles like a summer concert, and the steam rises, carrying the scent of vanilla and fresh fruit into the air. The first bite is a harmonious blend of crunchy exterior, creamy interior, and the burst of sweet, tart strawberries, all balanced by a subtle tang of cream cheese. It’s like a party in your mouth where every bite is a new discovery.
What makes this version stand out from every other recipe out there is that it’s not just a fried sandwich; it’s a carefully engineered flavor architecture. The batter is light enough to hold the sandwich together yet crisp enough to deliver that satisfying crunch. The cheesecake filling is silky but not too runny, thanks to the precise balance of powdered sugar and cream cheese. The strawberries add a pop of freshness that cuts through the richness, while the breadcrumb coating provides a textural contrast that even the most seasoned dessert lovers will appreciate. I’ve tested it, tweaked it, and perfected it until even the most skeptical foodie in my circle was begging for seconds.
And there’s a twist you won’t expect—an unexpected ingredient that elevates the entire experience: a splash of milk in the batter that keeps it moist and fluffy, and a pinch of salt that brings out the sweetness without overpowering it. I’ve also experimented with different breads, from whole grain to brioche, and found that each brings its own character to the sandwich. By the end of this post, you’ll know exactly how to recreate this culinary masterpiece, and I guarantee you’ll wonder how you ever made it any other way.
What Makes This Version Stand Out
- Taste: The creamy cheesecake filling, sweetened just enough with powdered sugar, balances the tang of cream cheese and the freshness of strawberries. The vanilla extract adds a warm, aromatic layer that ties everything together, creating a flavor profile that feels indulgent yet balanced.
- Texture: The batter is airy and light, thanks to the leavening power of baking powder, while the breadcrumb coating delivers a satisfying crunch that cracks like thin ice when you bite. Inside, the cheesecake filling stays silky without becoming overly runny, providing a perfect contrast to the crispy exterior.
- Simplicity: With only eleven core ingredients, this recipe is approachable for anyone with basic kitchen skills. Each component has a clear purpose, so you won’t feel lost or overwhelmed.
- Uniqueness: Combining a classic cheesecake filling with a fried sandwich format is a bold culinary move that sets this dish apart from standard desserts.
- Crowd Reaction: Friends and family who’ve tried this version say it’s “hands down the best version you'll ever make at home.” The combination of textures and flavors keeps people coming back for more.
- Ingredient Quality: The recipe relies on fresh, high‑quality ingredients—cream cheese, fresh strawberries, and fresh bread—to deliver the best possible taste. Using the best ingredients makes all the difference.
- Cooking Method: Frying the sandwich at the right temperature ensures a golden, crisp crust without absorbing too much oil. The method is simple yet effective, and it yields a consistent result every time.
- Make‑Ahead Potential: The sandwiches can be assembled ahead of time and kept in the fridge, then fried just before serving. This flexibility makes it ideal for parties or last‑minute gatherings.
Inside the Ingredient List
The Flavor Base
At the heart of this sandwich is the cheesecake filling, a luxurious blend of cream cheese, powdered sugar, and vanilla extract. Cream cheese is the star, providing that rich, velvety texture that melts in your mouth. Powdered sugar dissolves quickly, giving the filling a smooth finish without a grainy texture. Vanilla extract adds a warm, aromatic depth that elevates the overall flavor profile. If you skip the powdered sugar, the filling will taste too sharp and tangy; if you skip the vanilla, the filling will feel flat. For the best results, use full‑fat cream cheese and a high‑quality vanilla extract—think Madagascar vanilla for that extra punch.
The Texture Crew
The batter that coats the sandwich is a marriage of all‑purpose flour, baking powder, salt, milk, and breadcrumbs. The flour provides structure, while the baking powder creates lift, ensuring the batter stays light and airy. Salt, though a small amount, balances the sweetness and brings out the flavor of each ingredient. Milk keeps the batter moist and helps it adhere to the bread without becoming soggy. Breadcrumbs add that coveted crunch, turning each bite into a delightful crackle that shatters like thin ice. If you omit the breadcrumbs, the sandwich will be chewy but not crisp, and the batter will feel too soft.
The Unexpected Star
Fresh strawberries are the bright, juicy counterpoint to the creamy filling and crispy batter. Their natural tartness cuts through the richness, while their vibrant color adds an eye‑catching appeal. Slice them thinly and arrange them on top of the cheesecake before sandwiching; this ensures every bite has a strawberry bite. If you’re in a pinch, frozen strawberries work too, but thaw them and pat dry to avoid excess moisture. Swapping strawberries for blueberries or raspberries will give a different flavor profile, but the texture will stay the same.
The Final Flourish
Oil for frying is the unsung hero that gives the sandwich its golden crust. Choose a neutral oil with a high smoke point—vegetable, canola, or peanut oil are great options. The amount of oil matters; you want enough to submerge the sandwich but not so much that it becomes greasy. A quick test: drop a small piece of batter into the oil; if it rises to the surface in 30 seconds, you’ve got the right temperature (around 350°F). The oil also helps carry the aroma of vanilla and strawberries throughout the kitchen, creating an irresistible scent that makes you crave more.
Everything's prepped? Good. Let's get into the real action...
The Method — Step by Step
- First, combine the cream cheese, powdered sugar, and vanilla extract in a medium bowl. Use a hand mixer or whisk to blend until the mixture is smooth and free of lumps. This is the moment of truth; the filling should feel silky, not gritty. If you notice any lumps, pulse the mixture a few more times to break them up. Once smooth, cover the bowl and chill in the fridge for at least 30 minutes to allow the flavors to meld.
- While the filling chills, slice your strawberries thinly and arrange them in a shallow bowl. Add a splash of lemon juice to prevent browning and stir gently to coat. This step keeps the strawberries bright and juicy. If you’re using frozen strawberries, thaw them and pat dry to avoid excess moisture that could make the batter soggy.
- Prepare the batter by whisking together the flour, baking powder, and salt in a separate bowl. Gradually pour in the milk, whisking until a smooth, thick batter forms. Stir in the breadcrumbs until fully incorporated, then fold in the chilled cheesecake filling. The batter should be thick enough to coat the sandwich but not runny. If it’s too thick, add a teaspoon of milk to loosen it.
- Lay out your bread slices on a clean surface. Spread a generous layer of the batter on one slice, then top with sliced strawberries and a dollop of cheesecake filling. Cover with a second slice of bread, pressing gently to seal the edges. Repeat for the remaining sandwiches. This assembly step is where the magic starts; each sandwich should feel balanced with a good amount of filling and a crisp crust.
- Heat oil in a deep skillet or pot to 350°F (175°C). To test the temperature, drop a small spoonful of batter into the oil; it should sizzle and rise to the surface in about 30 seconds. If the oil is too hot, the outside will burn before the inside cooks; if it’s too cool, the sandwiches will absorb excess oil and become greasy.
- Gently slide each sandwich into the hot oil, one at a time. Do not overcrowd the pan; the oil should remain at a steady temperature. Fry each side for about 2–3 minutes, or until a golden‑brown crust forms and the sandwich feels firm to the touch. Use tongs to flip carefully, ensuring the filling stays intact. When the sandwich is done, it should emit a toasty aroma that makes your mouth water.
- Transfer the fried sandwiches to a paper towel‑lined plate to drain excess oil. Let them rest for a minute; the heat inside will continue to cook the cheesecake filling slightly, giving it a silky, melty texture. While they’re resting, you can prepare a simple dusting of powdered sugar or a drizzle of honey if you like a touch of extra sweetness.
- Serve immediately while the crust is still crisp and the filling is warm. Pair them with a cup of hot coffee or a glass of chilled milk for a comforting brunch, or serve them as a party appetizer for an unexpected twist on dessert.
- Enjoy the symphony of flavors: the crunch of the breadcrumb coating, the creamy cheesecake, the sweet strawberries, and the subtle hint of vanilla. This dish is a crowd‑pleaser that will have guests asking for the recipe. Remember, the key to perfection is patience—do not rush the frying process, and always keep an eye on the oil temperature.
That's it — you did it. But hold on, I've got a few more tricks that'll take this to another level...
Insider Tricks for Flawless Results
The Temperature Rule Nobody Follows
Oil temperature is the secret weapon in achieving that perfect golden crust. Many people fry at 375°F, but that can cause the outside to burn before the inside cooks. I recommend 350°F, which gives you a steady, even heat. Use a thermometer to keep the oil at a consistent temperature. If the oil starts to smoke, reduce the heat slightly. This trick ensures every sandwich is uniformly crisp.
Why Your Nose Knows Best
Trust your nose when the batter starts to sizzle. The scent of vanilla and toasted breadcrumbs is a cue that the sandwich is halfway done. If you’re unsure, give it an extra minute; the aroma will intensify, signaling that the inside is warm and the outside is crisp. I’ve had friends swear by the aroma as the ultimate timer.
The 5-Minute Rest That Changes Everything
After frying, let the sandwiches rest on a wire rack for five minutes. This allows the steam to escape, preventing the bread from becoming soggy. The rest also lets the cheesecake filling set slightly, making it easier to slice without it spilling out. I’ve seen people skip this step and end up with a mess; it’s a game changer.
The Quick Dip for Extra Crunch
If you’re short on time, you can skip the bread coating and dip the sandwich in the batter just before frying. This creates a thin, crisp crust that still delivers the crunch. It’s a great shortcut for last‑minute guests or a quick snack. Just remember to keep the batter thick enough to stick.
The Secret to a Moist Interior
Add a splash of milk to the batter if it feels too thick. The milk hydrates the flour and helps the batter spread evenly around the sandwich. It also keeps the interior moist, preventing a dry, crumbly texture. I’ve experimented with half‑milk and half‑water; the milk version always feels richer.
Creative Twists and Variations
This recipe is a playground. Here are some of my favorite ways to switch things up:
Chocolate‑Covered Delight
Dip the fried sandwich in melted dark chocolate after it’s cooled slightly. The chocolate adds richness and a glossy finish. Sprinkle a pinch of sea salt on top for a sweet‑savory contrast.
Nutty Crunch Edition
Add chopped toasted almonds or pecans to the breadcrumb coating. The nuts give a delightful crunch and a nutty aroma that pairs wonderfully with the creamy filling.
Berry Fusion
Swap strawberries for blueberries or raspberries for a different flavor profile. Use a mix of berries for a colorful, fruity experience that looks as good as it tastes.
Savory Twist
Replace the cheesecake filling with a savory cream cheese and herb mixture. Add roasted cherry tomatoes and basil to the sandwich for a lunch‑ready version that still feels indulgent.
Gluten‑Free Version
Use a gluten‑free all‑purpose flour blend in the batter and gluten‑free breadcrumbs. The texture remains crisp, and the sandwich stays allergy‑friendly without compromising flavor.
Storing and Bringing It Back to Life
Fridge Storage
Store leftover sandwiches in an airtight container in the refrigerator for up to 2 days. The crust will soften slightly, but the filling will remain creamy. Reheat in a toaster oven at 350°F for 5 minutes to revive the crunch.
Freezer Friendly
Wrap each sandwich individually in parchment paper, then place them in a freezer bag. Freeze for up to 3 months. When ready to serve, thaw overnight in the fridge, then reheat in a skillet over medium heat until crispy.
Best Reheating Method
To restore the original texture, heat a non‑stick skillet over medium heat. Add a splash of water to the pan, then place the sandwich. Cover for 1 minute to steam the filling, then remove the cover and let the bread crisp up. This method keeps the filling warm without over‑cooking the bread.