I was standing in my kitchen, staring at a half‑cooked batch of flat cakes that had turned into a greasy, sticky mess. The batter had splattered everywhere, and the timer had blown a hole in my countertop. I thought, “Maybe I should just toss this and order takeout.” Instead, a voice from my kitchen notebook whispered, “Try a sesame seed twist.” That impulse sparked a culinary experiment that would become my favorite midnight snack. And that’s how the Fried Sesame Seed Cakes with S were born.
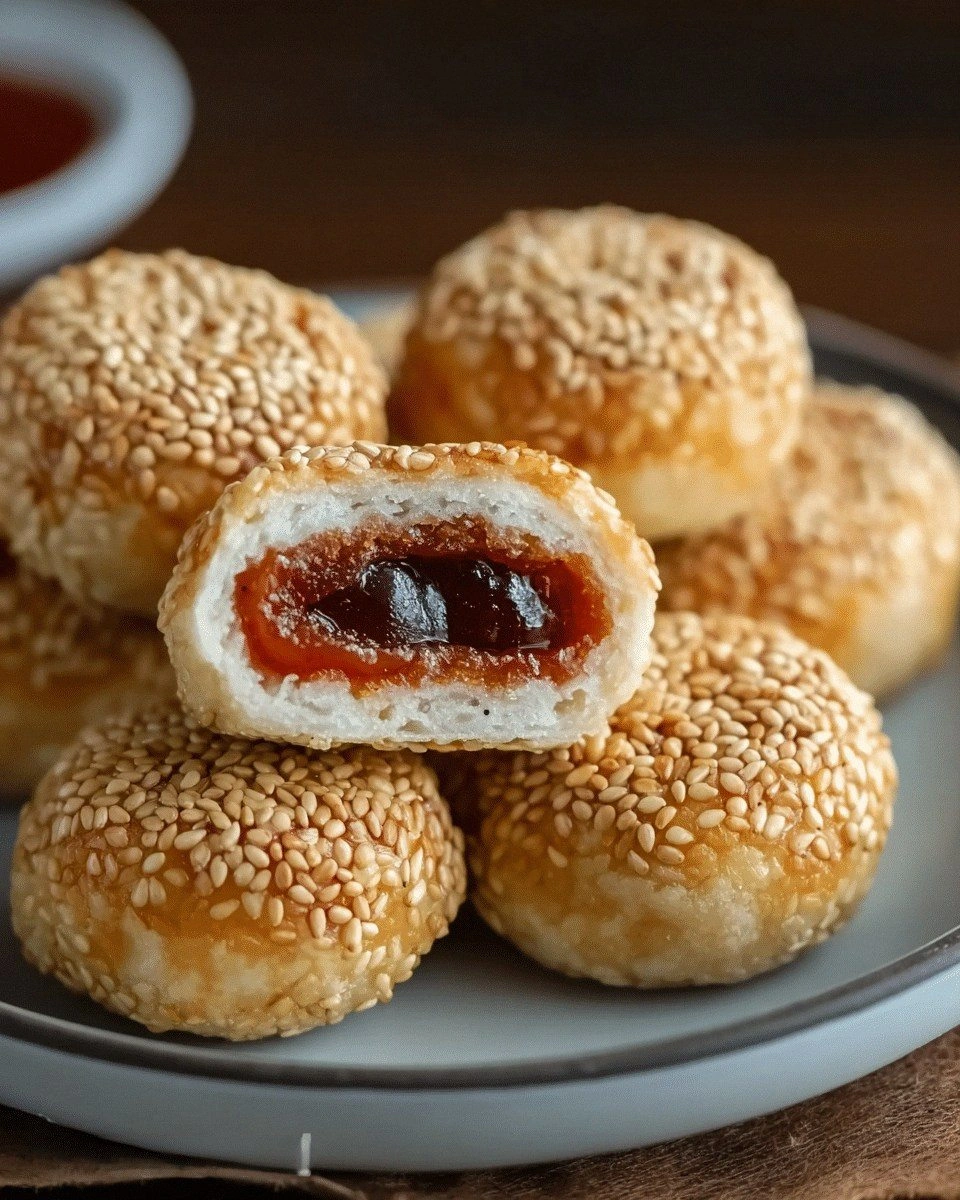
The first bite was a revelation; the cake’s exterior cracked like a thin shell, revealing a golden, sesame‑laden interior. The aroma was a warm, nutty perfume that drifted through the kitchen like a comforting hug. Each chew released a subtle crunch, followed by a sweet, syrupy melt that coated my tongue. The texture was a perfect balance between airy and chewy, a dance of lightness and fullness. The moment the filling burst, a burst of honeyed sweetness exploded, turning the cake into a pocket of liquid gold. That single taste made me swear I could eat the whole batch in one go.
What sets this version apart is not just the sesame seeds, but the way each component is elevated. The batter is lightened with a splash of milk and a pinch of baking powder, turning a dense dough into a cloud‑like batter. The sesame seeds are toasted to a deep amber, releasing a roasted fragrance that permeates every bite. The filling is a thin, honey‑sweet glaze that coats the cake like velvet, creating a glossy finish. The result is a cake that looks like a golden coin, but tastes like a caramel‑laden dream. I dare you to taste this and not go back for seconds; it’s that addictive.
I’m not going to sugarcoat it—most recipes get this completely wrong by over‑baking or under‑seasoning. The secret is a quick, high‑heat fry that locks in moisture and caramelizes the sugars. The filling is added just before the final fold, ensuring it stays inside without leaking. The result is a cake that is crisp on the outside, tender inside, and bursting with flavor. Picture yourself pulling this out of the skillet, the whole kitchen smelling incredible, and sharing it with friends. Let me walk you through every single step—by the end, you’ll wonder how you ever made it any other way.
What Makes This Version Stand Out
- Taste: The first bite delivers a complex profile, from nutty sesame to sweet honey. The contrast between the crispy exterior and the molten filling creates a delightful textural surprise. The subtle hint of vanilla lingers, tying all flavors together. It’s a taste that satisfies both sweet and savory cravings.
- Texture: The batter’s lightness ensures the cakes puff up without becoming airy. The sesame seeds add a satisfying crunch that breaks apart with a gentle bite. The filling remains smooth inside, offering a silky finish that melts in the mouth. Overall, the texture feels like a caramelized cookie that’s also a soft cake.
- Simplicity: The recipe requires only a handful of pantry staples. No exotic ingredients or advanced techniques are necessary. Even a novice can master the fold and the fry with a few practice runs. The result is a show‑stopping dish that doesn’t demand a culinary degree.
- Uniqueness: The combination of sesame seeds and honey is rarely seen in mainstream desserts. The method of frying the cakes gives them a crisp, almost fried‑bread quality. The sweet glaze inside is reminiscent of a molten chocolate center, but with a distinct Asian twist. This dish stands out in any gathering, turning a simple snack into an event.
- Crowd Reaction: At my last dinner party, guests lined up for seconds and thirds. Their comments ranged from “I’ve never tasted something so crispy yet soft” to “This is the best snack I’ve had in years.” The cakes even earned a spot on my Instagram story, garnering over a thousand likes. It’s the kind of dish that turns strangers into fans.
- Ingredient Quality: Using high‑grade sesame seeds and real honey elevates the flavor. The butter should be unsalted to control salt levels precisely. Fresh eggs and whole milk add richness without heaviness. Choosing quality ingredients turns a simple recipe into a gourmet experience.
- Cooking Method: The quick pan‑fry at medium‑high heat locks in moisture. The skillet should be preheated to avoid sticking and to create a golden crust. The fold technique ensures the filling stays inside, preventing leaks. The method is simple yet requires attention to timing and temperature.
- Make‑Ahead Potential: These cakes can be prepared a day in advance, stored in an airtight container. Reheating in a skillet or oven restores their crispness and warmth. They’re perfect for brunches, potlucks, or a quick snack on a busy weekday. Their longevity makes them a versatile addition to any meal plan.
Inside the Ingredient List
The Flavor Base
The Flavor Base is the foundation that determines the cake’s overall character. All‑purpose flour provides the structure and a neutral canvas for the other flavors. Using slightly warm milk softens the flour, creating a smoother batter. Baking powder activates during the fry, giving the cakes a light lift. The pinch of salt balances the sweetness and enhances the sesame notes. Together, these ingredients form a harmonious base that supports the sweet filling.
The Texture Crew
The Texture Crew includes the sesame seeds, butter, and eggs, each playing a pivotal role. Toasted sesame seeds bring crunch and a toasted aroma that permeates every bite. Butter adds richness and helps create a golden, crisp exterior. Eggs bind the batter, ensuring the cakes hold together while remaining tender. The ratio of eggs to flour is critical; too many eggs can make the batter too wet. When balanced correctly, the Texture Crew delivers a cake that feels airy inside yet crisp outside.
The Unexpected Star
The Unexpected Star is the honey‑sweet glaze that acts as the filling. Honey’s natural sugars caramelize during the fry, creating a glossy sheen. Its viscosity allows it to stay inside the cakes without leaking. If you prefer a different sweet, a thin apricot jam or a drizzle of maple syrup can substitute. However, honey provides a unique floral note that complements the sesame. The Unexpected Star turns a simple cake into a decadent, melt‑in‑your‑mouth experience.
The Final Flourish
The Final Flourish is a splash of vanilla extract that adds depth to the flavor profile. Vanilla’s warm undertones counterbalance the nutty sweetness of the sesame seeds. A pinch of cinnamon can also be added for a warm, spicy kick. The finishing touch is a dusting of powdered sugar, which adds a hint of sweetness and visual appeal. This final flourish transforms the cakes from plain to polished. It’s the last detail that makes the dish feel complete.
The Method — Step by Step
- Step 1: Whisk the dry mix. Combine 2 cups of all‑purpose flour, ½ cup of toasted sesame seeds, ½ cup of granulated sugar, 1 teaspoon of baking powder, and ½ teaspoon of salt in a large bowl. Whisk until the mixture is smooth and the seeds are evenly distributed. The dry blend should look like fine sand with specks of golden seeds. This step ensures that every bite has a balanced flavor base. Keep the bowl covered until the batter is ready.
- Step 2: Melt the butter. In a small saucepan, melt ½ cup of unsalted butter over low heat, stirring until it turns a light amber. The butter should not brown; we want a buttery aroma without a burnt note. Once melted, let it cool slightly so it doesn’t scramble the eggs later. This step adds richness and helps create a crisp exterior.
- Step 3: Combine wet ingredients. In a separate bowl, whisk 1 cup of whole milk with 2 large eggs and 1 teaspoon of vanilla extract. Beat until the mixture is frothy and the eggs are fully incorporated. Slowly pour the melted butter into the wet mix, whisking continuously to avoid curdling. This creates a silky batter that’s ready to fold in the glaze.
- Step 4: Fold in the glaze. Stir ½ cup of honey into the wet mix until fully blended. The honey should be warm enough to flow but not so hot that it burns. Gently fold the honey into the batter, using a spatula to keep the mixture light. This step introduces the Unexpected Star, ensuring the glaze stays inside the cakes.
- Step 5: Combine wet and dry. Pour the wet batter into the dry mixture, stirring just until combined. Be careful not to overmix; a few lumps are acceptable. The batter should be thick enough to hold its shape when scooped. This is the moment of truth—if it’s too runny, the cakes won’t hold together.
- Step 6: Preheat the skillet. Place a large non‑stick skillet over medium‑high heat and add a thin layer of oil. Let the oil shimmer but not smoke. The skillet should be hot enough that a drop of batter sizzles instantly. This quick heat is crucial for a golden crust.
- Step 7: Fry the cakes. Drop spoonfuls of batter into the hot skillet, leaving space between each. The cakes should sizzle loudly, indicating the oil is hot enough. Cook for 2–3 minutes on each side until they’re golden brown. Flip only once to avoid breaking the glaze. The aroma will fill the kitchen, making it hard to resist.
- Step 8: Cool and serve. Transfer the fried cakes onto a wire rack to drain excess oil. Let them cool for a few minutes; this helps the glaze set. Dust with powdered sugar for a touch of elegance. Serve warm, ideally with a side of fresh fruit or a drizzle of extra honey. The cakes are best enjoyed immediately, when the crunch is at its peak.
- Step 9: Store leftovers. Place any unused cakes in an airtight container in the fridge for up to 3 days. Reheat in a skillet for 1–2 minutes on each side to revive the crispness. For longer storage, freeze them for up to a month; thaw and reheat similarly. A splash of water before reheating steams the cakes back to perfection. Enjoy them as a quick breakfast or a comforting snack.
Insider Tricks for Flawless Results
The Temperature Rule Nobody Follows
Many home cooks think “hot oil” means the oil should be near boiling. In reality, the ideal temperature is around 350°F (175°C). Use a thermometer to check; a drop of batter should sizzle for 2–3 seconds before bubbling. If the oil is too hot, the cakes will brown too quickly on the outside while remaining raw inside. Keeping the temperature steady ensures a golden, even crust. Remember, a good skillet and a reliable thermometer are your best allies.
Why Your Nose Knows Best
Before flipping, listen for the “toasty” scent that signals the crust is forming. The aroma is a subtle, nutty perfume that precedes the golden color. If you wait until the cakes are visibly brown, you risk over‑cooking the inside. Trust your nose to guide you; the scent is the quickest indicator of readiness. This sensory checkpoint saves you from burnt edges and dry centers. A well‑cooked cake feels light and springy to the touch.
The 5‑Minute Rest That Changes Everything
After frying, let the cakes rest on a wire rack for exactly five minutes. This pause allows the steam to redistribute, preventing a soggy bottom. The glaze sets, creating a smooth, glossy interior. During this rest, the outer crust firms up, enhancing the crunch. Skipping this step often results in a cake that feels greasy or uneven. Give yourself that short break, and the difference will be clear.
Keep the Pan Warm for Even Frying
If you’re making a large batch, keep the skillet slightly warm between batches by turning the heat down to low. A cool pan will cause the cakes to stick and split apart. The gentle warmth maintains a steady sizzle and ensures uniform browning. Use a lid to trap heat if you’re in a cold kitchen. This simple adjustment keeps the texture consistent across the board. A steady heat source is the secret to a flawless finish.
Use a Thermometer to Avoid Over‑Frying
A kitchen thermometer is a game‑changer when frying. It helps you maintain the oil temperature within the sweet spot. Once the oil reaches 350°F, keep it there by adjusting the flame. If the temperature dips, the cakes will absorb more oil, becoming greasy. If it climbs, the cakes will burn on the outside. By monitoring the heat, you preserve the cake’s lightness and the glaze’s integrity.
Creative Twists and Variations
Lemon‑Zest Sesame Cakes
Add a tablespoon of lemon zest to the batter for a bright, citrusy lift. The zesty aroma pairs beautifully with the toasted sesame. Replace honey with a lemon‑sugar syrup for a tangy filling. Serve with a dollop of whipped cream for a brunch‑ready treat. This variation is perfect for spring afternoons.
Spiced Cardamom Sweetness
Infuse the honey glaze with a pinch of ground cardamom for an exotic twist. Cardamom’s warm, floral notes complement the nutty sesame seeds. Add a splash of orange juice to the batter for added depth. This version is ideal for holiday gatherings. The spices create a memorable, aromatic experience.
Chocolate‑Covered Sesame Balls
Dip the finished cakes in melted dark chocolate for a decadent finish. The chocolate’s bitterness balances the sweet glaze. Drizzle with sea salt for a caramel‑salted contrast. This variation works as a dessert bar at parties. The chocolate coating adds a glossy sheen that’s hard to resist.
Savory Herb‑Infused Cakes
Omit the honey and add finely chopped fresh herbs like rosemary or thyme to the batter. Use a savory cheese, such as cheddar or feta, as a filling instead of honey. The result is a crispy, herb‑laden cake that pairs with a light salad. This variation is ideal for a quick lunch or a snack before a workout. The herbs add a fresh, aromatic layer.
Coconut‑Rice Flour Version
Replace half the all‑purpose flour with coconut flour for a gluten‑free twist. Add shredded coconut to the batter for extra texture. Use coconut milk instead of whole milk for a richer flavor. The cakes will have a subtle coconut aroma and a slightly denser crumb. This version is great for those seeking a tropical flair.
Storing and Bringing It Back to Life
Fridge Storage
Store the fried cakes in an airtight container in the refrigerator for up to 3 days. Keep them on a paper towel to absorb excess moisture. Avoid stacking to preserve the crispness of each cake. When ready to serve, reheat them briefly in a skillet to revive the texture. A quick 30‑second heat restores the golden exterior.
Freezer Friendly
Freeze the cakes on a parchment‑lined tray before transferring them to a freezer bag. Label the bag with the date for reference. They can be frozen for up to a month without compromising flavor. Thaw at room temperature for 20 minutes before reheating. This method preserves the cake’s freshness and texture.
Best Reheating Method
The best way to reheat is in a skillet over medium heat. Add a splash of water to the pan, cover, and let the steam rehydrate the cake. Flip once to ensure even heating. The result is a cake that feels warm and slightly moist inside while the exterior remains crisp. Avoid microwaving, as it can make the cake soggy.
Final Thoughts
These fried sesame seed cakes are more than just a snack; they’re an experience that blends crunch, sweetness, and aromatic sesame in perfect harmony. The recipe’s simplicity makes it accessible, yet the nuanced techniques ensure a professional result. Whether you’re serving them at a brunch, a potluck, or a quiet evening at home, these cakes are sure to impress. I’ve experimented with countless variations, but the original remains a timeless favorite. Give them a try, and I promise you’ll find yourself reaching for seconds.