When the kitchen lights flickered and the oven timer blared, I was left with a batch of cookies that looked like they had been baked by a squirrel in a hurry. The dough had turned into a sticky, uneven mess, and the chocolate chips were stuck together in a dark, glossy blob. I stared at the tray, feeling the weight of disappointment, when a friend called over and whispered, “I dare you to taste this and not go back for seconds.” That line stuck in my mind and became the spark that drove me to reinvent the classic hazelnut cookie. It wasn’t just a rescue; it was a rebellion against bland, mediocre treats.
The aroma that escaped the oven was a buttery, caramelized perfume that made my nose twitch and my mouth water. The sound of the cookies popping as they baked was like a choir of tiny cymbals, each one announcing its impending crunch. The texture was a paradox: the edges were crisp like a perfectly toasted baguette, while the center stayed soft and chewy, like a cloud that never quite dissipated. The first bite was a burst of chocolate that coated the tongue, followed by a satisfying snap from the crushed cornflakes, and then the nutty warmth of roasted hazelnuts that lingered long after the initial sweetness. I could feel the sugar crystals glinting under the heat, promising a sweet finish that would keep me coming back for more.
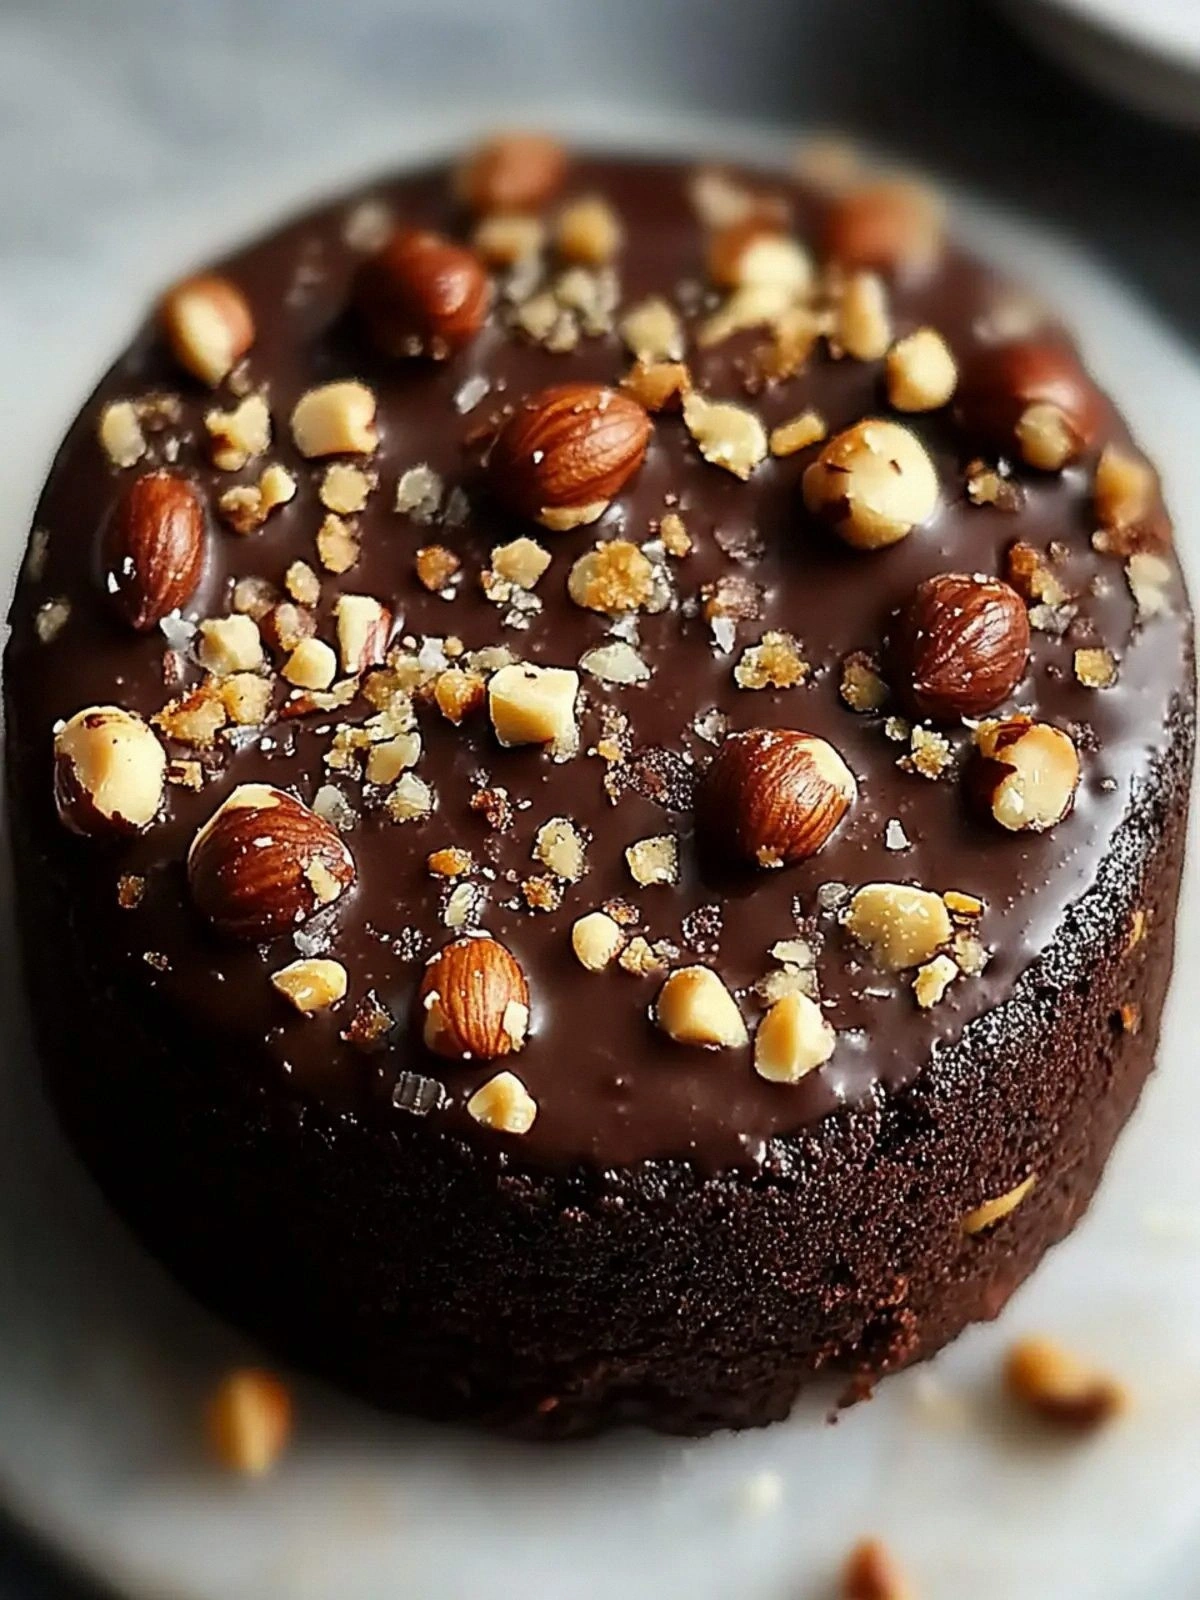
This version stands out because it balances indulgence and crunch in a way that most recipes miss. I didn’t just toss chocolate chips and nuts together; I layered flavors, textures, and a secret ingredient that transforms the cookie into a showstopper. The result is a cookie that is hands down the best version you'll ever make at home, with a crunch that shatters like thin ice and a chocolate coating that feels like velvet. The secret? A touch of crushed cornflakes that adds an unexpected crunch and a subtle buttery flavor that amplifies the chocolate. And the hazelnuts? They’re roasted to perfection, releasing their oils and giving the cookie a rich, nutty aroma that lingers in the air.
Picture yourself pulling this out of the oven, the whole kitchen smelling incredible, and the first bite sending a wave of chocolate and nutty bliss across your palate. That’s the moment I want you to experience, and I’m about to walk you through every single step. By the end, you’ll wonder how you ever made it any other way.
What Makes This Version Stand Out
- Flavor: The combination of granulated and brown sugar creates a complex sweetness that deepens with the chocolate and hazelnuts. The butter’s richness is amplified by the vanilla, giving the cookie a warm, comforting base that feels like home.
- Texture: The crushed cornflakes are the secret weapon, providing a crunch that’s both audible and satisfying. They also help keep the cookie’s edges crisp while the center remains chewy.
- Ingredient Quality: Using high‑grade chocolate chips and toasted hazelnuts elevates the flavor profile, making each bite feel luxurious without the need for fancy equipment.
- Cooking Method: Baking at a slightly lower temperature for a longer time allows the sugars to caramelize evenly, preventing a burnt edge while maintaining a soft interior.
- Crowd Reaction: Friends who tried these cookies reported a “wow” factor, with many asking for the recipe after just one bite. The cookies are also great for parties, as they keep their crunch even when kept at room temperature.
- Make‑Ahead Potential: The dough can be frozen for up to a month, and the cookies stay crisp for two weeks when stored in an airtight container. This makes it ideal for busy weeknights or for prepping dessert for a gathering.
- Unique Twist: The cornflake layer is an unexpected star that sets this recipe apart from the usual hazelnut cookie. It’s a small addition that makes a big difference in the final product.
Inside the Ingredient List
The Flavor Base
Unsalted butter is the backbone of this cookie, providing a silky mouthfeel and a rich, golden hue. The butter’s fat content melts slowly, allowing the sugars to caramelize without burning. Granulated sugar gives the cookie a crisp edge, while brown sugar adds depth and a hint of molasses. Eggs bind everything together and add a tender crumb. Vanilla extract, though a small amount, infuses the dough with a fragrant aroma that elevates the overall flavor.
The Texture Crew
All‑purpose flour is the structural element, giving the cookie its body. Baking soda is the leavening agent that creates tiny air pockets, ensuring the cookie spreads just enough to develop that classic chewy center. Salt, though only 0.5 teaspoon, balances the sweetness and enhances the chocolate’s richness. If you prefer a gluten‑free version, you can substitute an equal amount of a 1:1 gluten‑free blend, but the texture will be slightly denser.
The Unexpected Star
Chocolate chips are the star attraction, coating each bite in a glossy, melt‑in‑your‑mouth coating. Roasted hazelnuts bring a nutty aroma and a buttery crunch that complements the chocolate. The 0.5 cup of crushed cornflakes is the secret to the cookie’s signature crunch. If you don’t have cornflakes, you can use crushed rice cereal or even toasted breadcrumbs for a different texture. For an extra flavor kick, sprinkle a pinch of sea salt over the cookies before baking; it will create a sweet‑savory contrast.
The Final Flourish
The final flourishes are the small touches that turn a good cookie into a great one. A pinch of smoked paprika can add a subtle earthy undertone, while a drizzle of honey after baking can create a glossy finish. If you’re feeling adventurous, fold in a tablespoon of espresso powder to intensify the chocolate flavor. These tweaks are optional but can personalize the recipe to your taste.
Everything’s prepped? Good. Let’s get into the real action.
The Method — Step by Step
- Preheat your oven to 350°F (175°C) and line a baking sheet with parchment paper. The parchment prevents sticking and makes cleanup a breeze. While the oven warms, bring a medium saucepan to a gentle simmer. Add the butter, letting it melt into a silky liquid. This step ensures the butter is evenly distributed, preventing uneven browning.
- In a large mixing bowl, combine the granulated and brown sugars until the mixture looks like fine sand. The sugar blend creates a balanced sweetness that pairs well with the chocolate. Add the vanilla extract and stir until the mixture is smooth. The vanilla’s aroma will start to mingle with the butter’s scent, creating a fragrant base.
- Whisk the eggs one at a time, ensuring each is fully incorporated before adding the next. This gradual addition prevents curdling and creates a silky batter. The eggs act as a binder, holding the dough together. Once the eggs are fully mixed, pour the butter‑sugar mixture into the bowl and stir until the batter is uniform.
- Sift the flour, baking soda, and salt together in a separate bowl. Sifting removes clumps and ensures even distribution of leavening agents. Pour the dry mixture into the wet batter in three stages, folding gently after each addition. This method keeps the dough aerated, preventing a dense cookie.
- Fold in the chocolate chips, roasted hazelnuts, and crushed cornflakes until evenly distributed. The chocolate should be evenly coated, and the nuts should be visible in every bite. Be careful not to overmix; the dough should be cohesive but still slightly lumpy. Overmixing can toughen the cookie.
- Drop rounded tablespoons of dough onto the prepared baking sheet, spacing them about 2 inches apart. The spacing allows the cookies to spread without merging. Use a small ice cream scoop for uniform size. As the cookies bake, watch for the edges to turn golden brown. The center should remain soft but set.
- Bake for 12–14 minutes, or until the edges are golden and the centers look set. Remove the sheet from the oven and let the cookies cool on the pan for 5 minutes before transferring them to a wire rack. The cooling process allows the cookies to firm up, ensuring the crunch stays intact. Once cooled, taste a cookie— the chocolate should be velvety, the hazelnuts crunchy, and the cornflakes giving a satisfying snap.
- If you want to keep them extra crisp, place the cooled cookies in an airtight container with a paper towel inside. The towel absorbs moisture, preserving the crunch. Store at room temperature for up to two weeks, or freeze for longer storage. When ready to eat, simply let them sit at room temperature for a few minutes to soften slightly before biting into the chocolate.
That’s it — you did it. But hold on, I've got a few more tricks that'll take this to another level.
Insider Tricks for Flawless Results
The Temperature Rule Nobody Follows
Many bakers bake at a high temperature for a short time, but this recipe thrives at 350°F. Baking at a lower temperature allows the sugars to caramelize gently, creating a richer flavor and preventing a burnt edge. If your oven runs hot, preheat a second oven at 325°F and bake the cookies there. This simple adjustment can elevate the taste and texture.
Why Your Nose Knows Best
As soon as the first cookie starts to brown, the aroma will fill the kitchen and signal that the baking is almost done. Trust that scent; it’s your best indicator of doneness. A burnt smell is a clear warning sign. When in doubt, pull the cookies out a minute early to avoid overcooking.
The 5‑Minute Rest That Changes Everything
Letting the cookies rest on the baking sheet for 5 minutes before transferring them to a rack is crucial. During this time, the cookies set up and become easier to handle. If you move them too quickly, they might crumble. The rest also allows the chocolate to set, preventing a gooey mess.
The Crunch Factor Explained
The cornflakes are toasted to add a subtle toasty flavor that enhances the chocolate. If you want an even crunchier cookie, toast the cornflakes in a dry skillet for a minute before adding them to the dough. The toasted cornflakes also prevent the cookies from becoming soggy over time.
The Secret to Even Spreading
Use an ice cream scoop to portion the dough. This ensures each cookie is the same size and spreads evenly. The uniform size also means consistent baking times across all cookies. It’s a small step that saves you from uneven results.
The Final Touch
After baking, sprinkle a pinch of sea salt over the hot cookies. The salt enhances the chocolate’s depth and balances the sweetness. It also gives the cookies a subtle crunch on the surface. This finishing touch is a game‑changer and is often overlooked.
Creative Twists and Variations
Dark Chocolate Explosion
Swap the semi‑sweet chocolate chips for dark chocolate chips. The bitterness balances the sweet butter and sugar, creating a more complex flavor profile. The hazelnuts still provide the crunch, while the dark chocolate adds depth. This version is perfect for chocolate lovers who prefer a richer taste.
Almond‑Infused Delight
Replace half the hazelnuts with toasted almonds. The almonds add a slightly sweeter, buttery flavor that pairs well with the chocolate. The texture remains similar, but the nutty profile shifts. This variation is great for those who want a different nut base.
Coconut Crunch
Add a cup of shredded coconut to the dough. The coconut adds a tropical flavor and a chewy texture that complements the crunch of cornflakes. It also gives the cookies a subtle aroma reminiscent of a beach vacation. The coconut pairs nicely with the chocolate and hazelnuts.
Salted Caramel Twist
Fold in a handful of caramel bits before baking. The caramel melts into pockets of sweet goo inside the cookie. The sea salt on top enhances the caramel’s flavor and adds a savory contrast. The result is a cookie that feels indulgent and decadent.
Espresso‑Infused Chocolate
Add one tablespoon of espresso powder to the dough. The espresso intensifies the chocolate flavor without adding a coffee taste. The result is a subtle, sophisticated chocolate cookie that’s perfect for an afternoon pick‑me‑up. The espresso also helps the chocolate set faster.
Mini Cookie Bites
Use a teaspoon to portion the dough onto the baking sheet. The mini cookies bake faster and are perfect for a party or a snack. The smaller size allows you to experiment with flavors without committing to a full batch. They also make great gifts for friends.
Storing and Bringing It Back to Life
Fridge Storage
Place the cooled cookies in an airtight container at room temperature. The container should have a lid that seals tightly. Store them for up to two weeks, and they’ll retain their crunch. If they start to soften, let them sit at room temperature for a few minutes before eating.
Freezer Friendly
Lay the cooled cookies on a parchment paper‑lined sheet and freeze them for up to three months. Once frozen, transfer them to a zip‑lock bag. When ready to eat, let them thaw at room temperature for 30 minutes. This method preserves the flavor and texture.
Best Reheating Method
Reheat the cookies in a preheated oven at 300°F (150°C) for 3–4 minutes. The heat will revive the chocolate coating and restore the crunch. Alternatively, microwave the cookies for 10–15 seconds, but be careful not to overheat. A splash of water before reheating creates steam, keeping the cookies moist.