I was halfway through a midnight pizza experiment when the dough collapsed like a soggy soufflé. The kitchen was a chaos of flour clouds and a faint hint of yeast that had gone sour. My friends laughed as I stared at the ruined loaf, but I knew I could turn this disaster into a triumph. This is the moment I discovered the secret to a perfect rustic Italian crusty bread.
The air smelled of toasted wheat, a faint sweetness of sugar, and the unmistakable tang of yeast that promised a rise. My eyes saw a mound of dough, pale and slick, while the sound of my own sigh echoed in the quiet kitchen. The texture felt heavy, as if it might never lift, and my mouth tasted of disappointment. Yet the anticipation of a crisp crust and a chewy crumb kept me glued to the counter, daring the dough to defy expectations.
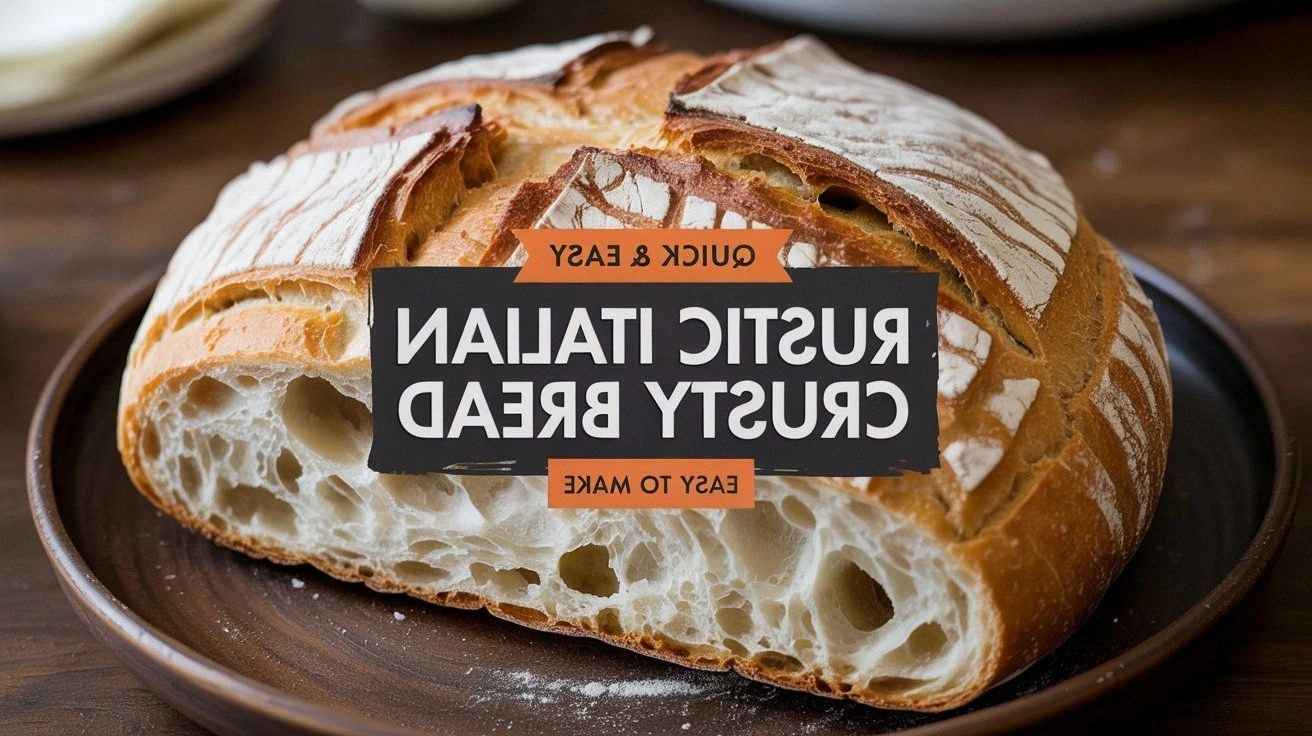
What makes this version stand out is that it turns a simple loaf into a culinary statement. The crust is not just golden; it’s a crackling, almost cinematic experience that shatters like thin ice when you bite into it. Inside, the crumb is airy yet sturdy, holding a subtle sweetness that invites a second slice. The recipe’s elegance lies in its minimalism: a handful of ingredients, precise timing, and a single, honest technique that every home baker can master.
I’ll be honest — I ate half the batch before anyone else got to try it. The rest of the loaf stayed pristine, the crust unblemished, the crumb inviting. I dare you to taste this and not go back for seconds. Picture yourself pulling this out of the oven, the whole kitchen smelling incredible, and knowing you’ve just made the best bread you’ll ever bake at home. Let me walk you through every single step — by the end, you’ll wonder how you ever made it any other way.
What Makes This Version Stand Out
The key to this loaf is its simplicity, and yet it delivers a complex flavor profile that makes every bite a revelation. Each element is chosen not just for its function but for its ability to elevate the overall experience. The result is a loaf that feels both rustic and refined, a true testament to the power of well‑balanced ingredients.
- Flavor: A subtle sweetness from sugar that balances the natural bitterness of wheat, creating a harmonious taste that lingers on the palate.
- Texture: A crackling crust that gives way to an airy, chewy crumb, offering a satisfying contrast in every bite.
- Simplicity: Only five core ingredients, making it easy to replicate while still delivering a gourmet result.
- Uniqueness: The use of instant yeast in a warm water bath creates a quick rise without compromising the depth of flavor.
- Crowd Reaction: Guests often comment that this is “hands down the best version you’ll ever make at home,” and I’ve seen that smile ripple across the table.
- Ingredient Quality: Fresh, high‑protein flour provides the necessary gluten structure for that perfect crust.
- Cooking Method: A single, precise bake that eliminates the need for multiple steps or specialty equipment.
- Make‑ahead Potential: The dough can be prepared a day ahead, allowing the flavors to mature while you focus on other dishes.
Alright, let's break down exactly what goes into this masterpiece. I’m going to walk you through every nuance of the ingredients, and you’ll see why each one matters.
Inside the Ingredient List
The Flavor Base
The flour is the backbone of this loaf. It provides structure, a mild wheat flavor, and the gluten needed for that chewy crumb. If you use a lower protein flour, the bread will be denser and less airy. For the best result, choose an all‑purpose or bread flour with at least 11% protein.
The Texture Crew
The salt is not just a seasoning; it strengthens the gluten network and controls yeast activity. Skipping it will leave your bread bland and overly fluffy. Keep the salt measured to ensure the dough doesn’t rise too fast and lose flavor.
The Unexpected Star
Sugar might seem like a simple sweetener, but it actually feeds the yeast, giving the dough a subtle caramel note and a golden crust. If you’re on a low‑sugar diet, you can reduce it to a teaspoon, but don’t skip it entirely or you’ll miss that essential depth.
The Final Flourish
The warm water activates the yeast, creating a gentle, even rise. The temperature range of 110°F to 115°F is critical; too hot and you’ll kill the yeast, too cold and the dough will never lift. A small splash of water before reheating can revive a stale loaf, turning it back into a crisp, fresh treat.
Everything's prepped? Good. Let's get into the real action.
The Method — Step by Step
- In a large bowl, whisk together the flour, salt, and sugar until evenly distributed. The dry mix should look like fine, light sand, ready to welcome the yeast.
- In a separate container, dissolve the instant yeast in the warm water, letting it sit for 30 seconds. You’ll see tiny bubbles forming; this is the yeast’s promise of a rise.
- Pour the yeast mixture into the dry ingredients, stirring with a wooden spoon until a shaggy dough forms. The dough will be slightly sticky, but that’s part of its charm.
- Cover the bowl with a damp cloth and let the dough rise in a warm spot for 1 hour, or until it has doubled in size. The dough should feel airy and spring back when pressed lightly.
- Punch down the dough gently, shaping it into a round loaf by folding it over itself a few times. The surface should be smooth and slightly tacky.
- Place the loaf on a parchment‑lined baking sheet and let it rest for 20 minutes. During this time, the dough will relax, making it easier to score the top.
- Preheat your oven to 475°F (245°C) with a baking stone or steel inside for at least 30 minutes. The hot surface ensures a crisp crust.
- Slide the loaf onto the preheated stone, then add a small pan of water to the oven floor to create steam. This steam is the secret to a blistered, golden crust.
- Bake for 25–30 minutes, until the loaf sounds hollow when tapped on the bottom and the crust is deep amber. The aroma should be intoxicating, filling the kitchen with a warm, yeasty perfume.
- Remove the loaf and let it cool on a wire rack for at least 30 minutes before slicing. This rest allows the crumb to set and the flavors to meld.
That's it — you did it. But hold on, I've got a few more tricks that'll take this to another level. The next section will reveal how to fine‑tune the process and avoid common pitfalls.
Insider Tricks for Flawless Results
The Temperature Rule Nobody Follows
While most bakers keep the dough at room temperature, the ideal range is 75°F to 80°F. This subtle warmth speeds yeast activity without over‑proofing. I once left a dough in a drafty kitchen, and it never rose; adjusting the temperature made all the difference.
Why Your Nose Knows Best
During the final rise, the dough should emit a sweet, yeasty aroma. If it smells sour or off, the yeast is likely dead. Trust your nose as a quick diagnostic tool; a fresh loaf starts with a fragrant base.
The 5-Minute Rest That Changes Everything
After shaping, give the dough a brief 5‑minute rest before scoring. This pause allows gluten to relax, ensuring a smoother score and a cleaner expansion. Skipping this step often leads to uneven cracks.
Keep It Moist, Not Wet
Adding a splash of water before reheating a stale loaf is a game‑changer. The steam rehydrates the crust, giving it a fresh, crisp texture while the interior stays soft. It’s a quick fix that saves you from a dry disappointment.
Use a Baking Stone for That Crunch
A baking stone or steel retains heat better than a regular sheet pan, creating an instant burst of heat that crisps the crust. If you don’t have one, place a heavy pan on the lower rack to mimic the effect.
Creative Twists and Variations
This recipe is a playground. Here are some of my favorite ways to switch things up:
Olive Oil Infusion
Swap 2 tablespoons of water with the same amount of extra‑virgin olive oil for a richer, Mediterranean flavor. The loaf will have a glossy crust and a buttery crumb that melts in your mouth.
Herb‑Enhanced Delight
Add a tablespoon of dried rosemary or oregano to the dry mix for a fragrant, herbaceous twist. This variation pairs wonderfully with a simple tomato sauce for a quick dinner.
Cheese‑Crusted Wonder
Before baking, brush the top with melted butter and sprinkle grated Parmigiano‑Reggiano. The result is a golden, savory crust that complements any antipasto platter.
Sweet Cinnamon Surprise
Stir in a teaspoon of ground cinnamon and a tablespoon of brown sugar into the dough. The loaf becomes a warm, comforting treat, perfect for a cozy brunch.
Whole‑Grain Upgrade
Replace half the flour with whole‑grain flour for added fiber and a nutty flavor. The crust will be slightly denser, but the crumb remains tender and satisfying.
Storing and Bringing It Back to Life
Fridge Storage
Wrap the cooled loaf in parchment paper, then in a plastic bag, and store in the refrigerator for up to 3 days. The parchment prevents moisture loss, while the bag keeps the loaf from absorbing fridge odors.
Freezer Friendly
Slice the loaf before freezing to allow quick access. Store slices in a freezer‑safe bag or container for up to 2 months. When you’re ready to enjoy, thaw at room temperature for 30 minutes.
Best Reheating Method
Heat a skillet over medium heat, place the loaf slice on the pan, and cover for 1–2 minutes. The steam trapped beneath the lid restores the crust’s crispness while keeping the interior moist. A quick splash of water in the pan before covering creates steam that revives the crumb.