It started with a burnt crust and a sigh of defeat, the kind of kitchen nightmare that makes you question every recipe you’ve ever trusted. I was in the middle of a dinner party, the guests were laughing, and my oven was turning my puff pastry into a charred, unappetizing mess. That moment of culinary despair was the spark that ignited my obsession with the perfect custard tart. I was determined to turn that disaster into a triumph, a dessert that would make everyone forget the burnt mishap and instead marvel at the buttery, caramelized finish. From that single, ruined batch, I set out to craft a version that would outshine every other custard tart out there.
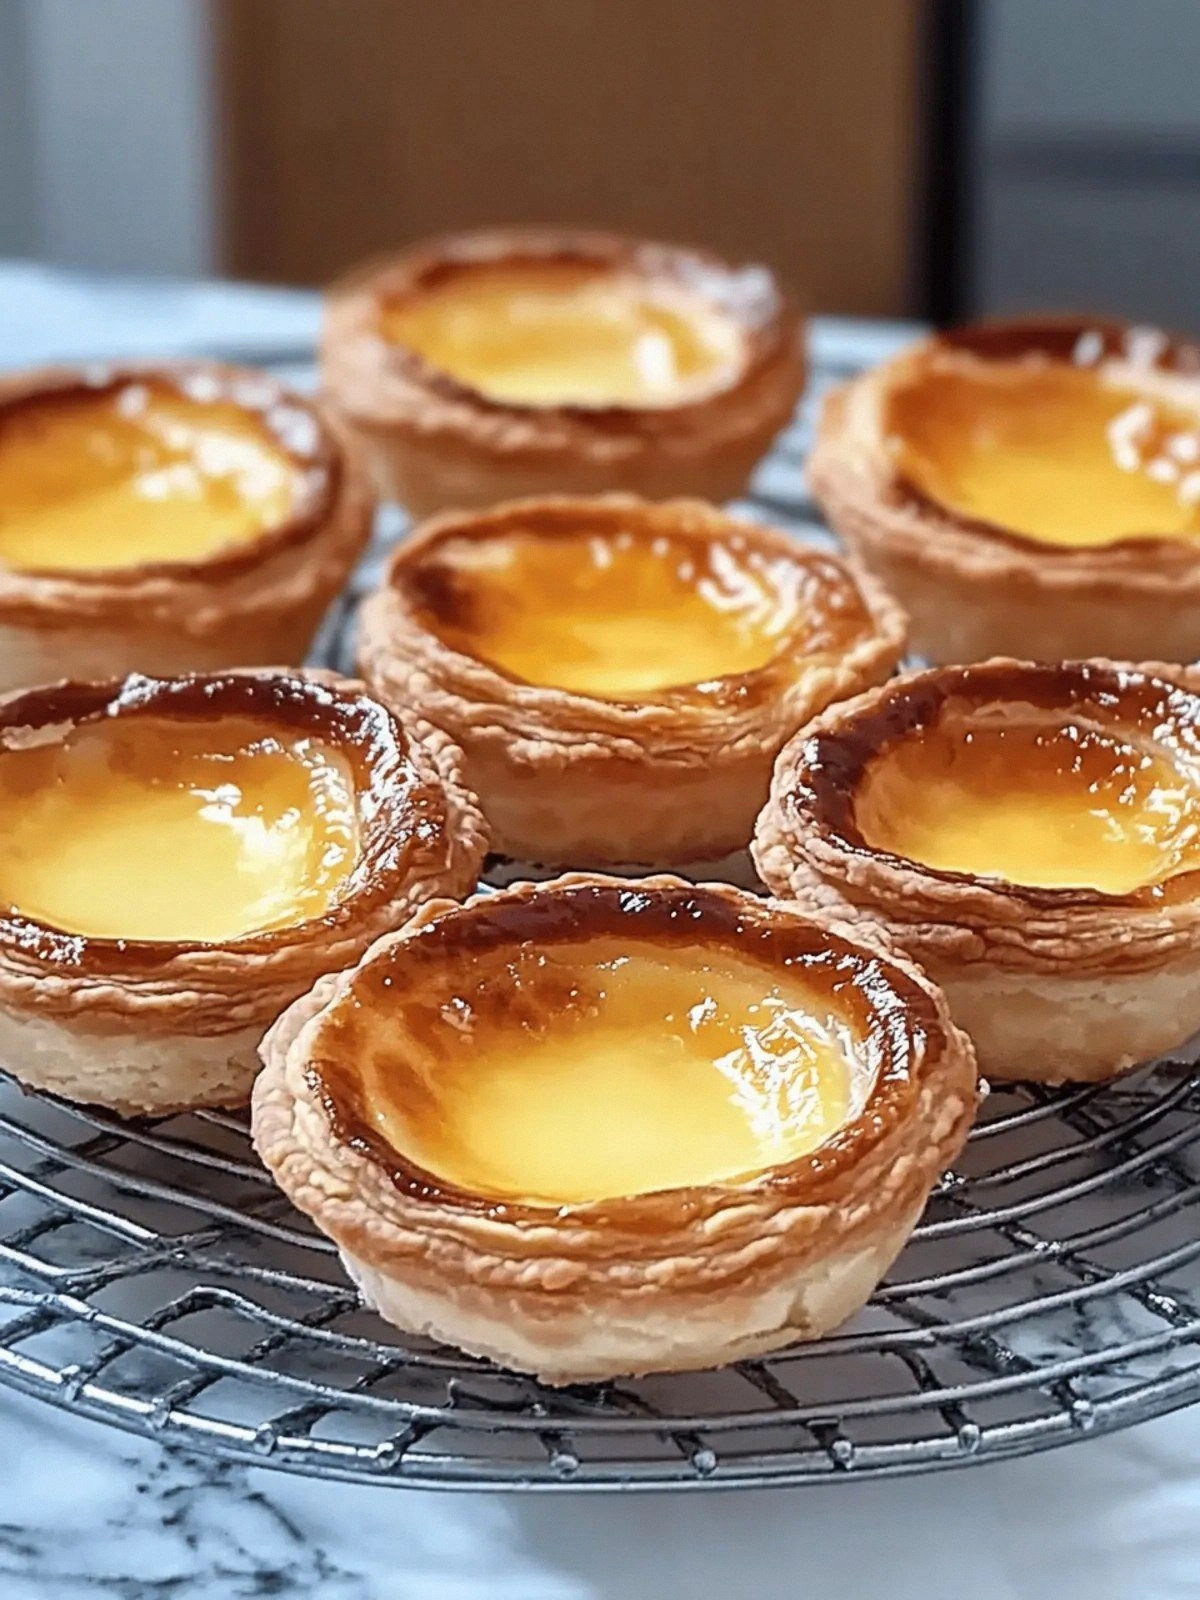
The scent of vanilla and cinnamon swirling in the air is the first thing that grabs you; it’s a warm, comforting hug that feels like a secret family ritual. The visual of golden edges crisping while the custard inside glistens like a molten sunrise is almost hypnotic. When you take a bite, the custard’s silky texture contrasts with the flaky, buttery puff pastry, creating a harmony that dances across your palate. The sound of the first crack as the pastry meets the spoon is a satisfying crackle that signals perfection. The feel of the warm tart, the slight give of the pastry, and the anticipation of the first bite combine into an unforgettable experience.
This version is a game-changer because it balances the delicate sweetness of the custard with a subtle, aromatic spice profile that lingers long after the last crumb. The use of fresh egg yolks rather than whole eggs gives the custard a richer, silkier mouthfeel that melts in your mouth like a dream. The puff pastry is pre-baked to a crisp perfection before the custard is added, ensuring the crust never becomes soggy and maintains a flaky, buttery bite. The addition of a pinch of nutmeg or a splash of orange zest can elevate the flavor profile to a whole new level of sophistication. The result is a dessert that feels like a luxurious indulgence yet is surprisingly simple to prepare.
What makes this recipe stand out is not just the flavor but also the technique that keeps the custard from curdling and the pastry from collapsing. I discovered that using a low oven temperature and a short baking time preserves the custard’s silky texture while achieving a golden crust. The trick is to let the custard set just enough that it holds its shape but remains creamy enough to be spooned. The secret is to whisk the egg yolks with sugar until the mixture turns a pale, glossy hue before slowly adding the milk, ensuring a smooth, uniform consistency. This subtle balance turns a simple custard into a masterpiece that will leave your guests begging for seconds.
Picture yourself pulling these tarts from the oven, the kitchen filling with an irresistible aroma that draws everyone in. Imagine the first bite: a buttery, flaky shell giving way to a velvety custard that sings with vanilla and cinnamon. I dare you to taste this and not go back for seconds; the combination of textures and flavors is simply addictive. This is hands down the best version you'll ever make at home, a dessert that feels like a celebration every time you serve it. Let me walk you through every single step — by the end, you'll wonder how you ever made it any other way.
What Makes This Version Stand Out
- Flavor: The custard’s richness is amplified by using fresh egg yolks and a dash of vanilla, creating a depth that standard custard recipes lack. The gentle warmth of cinnamon and optional nutmeg adds an aromatic layer that lingers on the palate. This combination turns a simple dessert into a memorable experience that feels both classic and contemporary.
- Texture: The puff pastry is pre-baked to a crisp, flaky perfection, preventing the dreaded soggy bottom. The custard’s silky consistency is achieved by careful temperature control and gradual mixing, ensuring it holds its shape without becoming rubbery. The contrast between the crunchy shell and the smooth custard provides a satisfying bite that keeps guests coming back.
- Simplicity: Despite its sophisticated taste, the recipe requires only a handful of ingredients and basic kitchen tools. The method is straightforward, with clear temperature cues and timing that even novice bakers can follow. This accessibility makes it a go-to dessert for both special occasions and everyday indulgence.
- Uniqueness: The use of a low oven temperature and a short baking time preserves the custard’s silky texture while achieving a golden crust. This technique is rarely found in other custard tart recipes, giving ours a distinct edge. The result is a dessert that stands out in both flavor and appearance.
- Audience Appeal: Whether you’re serving a crowd or a quiet family dinner, these tarts are sure to impress. The elegant presentation and rich flavor profile make them perfect for celebratory gatherings. Even the most discerning food lovers will find themselves craving a second bite.
- Make‑Ahead Potential: The tarts can be prepared in advance, making them ideal for busy schedules. Simply assemble and refrigerate, then bake when ready to serve. This flexibility adds convenience without sacrificing taste.
Inside the Ingredient List
Every element in this recipe is carefully chosen to contribute to the final flavor, texture, and visual appeal. The ingredients are grouped into four distinct categories that highlight their roles in the custard’s creation. Understanding why each component matters will help you appreciate the craftsmanship behind these tarts. If you’re curious about swapping or tweaking any ingredient, this section will give you the confidence to experiment without compromising the outcome. Everything’s prepped? Good. Let’s get into the real action.
The Flavor Base
At the heart of any custard is the combination of milk, egg yolks, and sugar. The milk provides the creamy backbone, while the yolks add richness and a silky mouthfeel. Sugar not only sweetens but also helps stabilize the custard, preventing it from curdling. A pinch of salt balances the sweetness, and the vanilla extract brings a fragrant warmth that elevates the entire dish. Skipping any of these would result in a flat, uninspired custard that fails to captivate.
Choosing the right milk can dramatically affect the final taste. Whole milk offers a luscious, buttery flavor, whereas skim milk will produce a lighter custard but may lack depth. If you’re aiming for a dairy-free version, coconut milk can be a suitable substitute, though it will introduce a subtle coconut undertone. The key is to keep the milk’s fat content consistent to maintain the custard’s velvety texture. Remember, the ratio of yolks to milk is crucial; too many yolks can make the custard too thick, while too few will yield a watery result.
The Texture Crew
Puff pastry is the star of the show, delivering a flaky, buttery shell that cradles the custard. The pastry must be handled gently to preserve its layers, yet it should be baked until crisp to prevent sogginess. Using a fresh package ensures maximum flakiness; older pastry tends to become dense and chewy. When cutting the pastry into rounds, aim for uniform thickness so each tart bakes evenly.
To achieve the perfect pastry texture, pre-bake the rounds at a low temperature (around 150°C) until they are lightly golden but not fully crisp. This step ensures the pastry holds its shape when filled. After baking, let the pastry cool completely before adding the custard; this prevents the custard from melting the shell. A quick chill in the fridge for 10 minutes can also help set the pastry’s structure. Skipping the pre-bake step often results in a soggy bottom that ruins the entire experience.
The Unexpected Star
Cinnamon is the unexpected star that gives this custard a warm, comforting aroma. A half teaspoon of ground cinnamon is enough to infuse the custard with subtle spice without overpowering the vanilla. This spice is not just for flavor; it also contributes to the custard’s color, giving it a golden hue that is visually appealing.
For those who love a bit of heat, a pinch of cayenne or a dash of smoked paprika can be added to the custard mixture. These additions create a depth of flavor that surprises the palate and adds a modern twist to a classic dessert. However, use them sparingly; the goal is to complement, not dominate, the delicate balance of sweetness and spice. If you prefer a completely aromatic experience, consider adding a few drops of orange zest or a splash of almond extract to the custard.
The Final Flourish
Powdered sugar is the final flourish that gives each tart a delicate, sweet finish. Dusting the tarts with powdered sugar before serving adds a visual elegance and a hint of sweetness that pairs beautifully with the custard’s richness. The sugar also creates a subtle contrast in texture, providing a slight crunch with each bite.
Additional spices, such as a pinch of cardamom or a dash of ground cloves, can be added to the custard for a more exotic twist. These spices should be used sparingly to avoid overwhelming the custard’s delicate flavor profile. If you’re feeling adventurous, a light drizzle of caramel or a sprinkle of toasted coconut can elevate the dessert to a gourmet level. The key is to keep the final flourish subtle, allowing the custard and pastry to shine.
Everything’s prepped? Good. Let’s get into the real action.
The Method — Step by Step
Preheat your oven to 150°C (300°F) and line a baking sheet with parchment paper. This low temperature is key to achieving a golden, crisp pastry without overbaking the custard. Place the pre-baked puff pastry rounds onto the sheet, spacing them evenly to allow heat circulation. Let them rest for 5 minutes before filling to prevent the pastry from becoming soggy.
In a medium saucepan, combine the milk, vanilla extract, and a pinch of salt. Warm the mixture over medium heat, stirring occasionally, until it just begins to steam. Avoid boiling, as this can scorch the milk and alter the custard’s flavor. The steam is a subtle indicator that the milk is ready for the yolks.
Whisk the egg yolks and sugar together in a separate bowl until the mixture turns a pale, glossy hue. This step is crucial; the whisking incorporates air, which helps create a silky custard that doesn’t curdle. Once the yolks are smooth, slowly pour the hot milk mixture into the yolks while whisking continuously to prevent curdling. The gradual mixing ensures a uniform texture.
Gently stir in the ground cinnamon and any additional spices you desire. The cinnamon should be evenly distributed to avoid clumps that could create uneven flavor pockets. Taste the custard; it should be sweet but not cloying, with a subtle spice warmth that lingers. A quick swirl of the spoon can help blend the spices into the custard.
Pour the custard mixture into each pre-baked pastry round, filling them to about two-thirds full. This ensures the custard has room to expand without spilling over the edges during baking. Use a spoon or a small ladle to distribute the custard evenly among the tarts. The custard should look smooth and glossy before it goes into the oven.
Return the baking sheet to the oven and bake for 18-20 minutes, or until the custard sets and the edges of the pastry turn a golden brown. The custard should have a slight wobble at the center, indicating it’s perfectly set. Avoid overbaking, as this will dry out the custard and make the pastry too hard.
Once baked, remove the tarts from the oven and let them cool on a wire rack for 10 minutes. This cooling period allows the custard to set fully and the pastry to crisp up slightly. While cooling, dust the tarts lightly with powdered sugar for a finishing touch that adds a delicate sweetness and visual appeal.
Serve the tarts warm or at room temperature, depending on your preference. If you like a crispier pastry, reheat them briefly in a 100°C (200°F) oven for 5 minutes before serving. The warm custard will ooze slightly, creating a luxurious, melt-in-your-mouth experience. Enjoy this decadent dessert with a cup of strong coffee or a glass of chilled milk for the perfect pairing.
That’s it — you did it. But hold on, I've got a few more tricks that'll take this to another level.
Insider Tricks for Flawless Results
Even the best recipe can be ruined by small missteps; these insider tricks will help you avoid common pitfalls and elevate your tarts to perfection. Each tip is a quick win that saves time, enhances flavor, or guarantees a flawless presentation. Whether you’re a seasoned baker or a kitchen rookie, these tricks will become part of your go-to repertoire. Let’s dive into the details and turn your custard tarts into a showstopper.
The Temperature Rule Nobody Follows
Most bakers instinctively set the oven to a high temperature, but low and slow is the secret to a silky custard. Baking at 150°C (300°F) allows the custard to set gently without curdling, while the pastry crisps up without burning. If you’re using a convection oven, reduce the temperature by 10-15°C to compensate for the increased airflow. This small adjustment can mean the difference between a perfect custard and a lumpy mess.
Why Your Nose Knows Best
The aroma of a custard baking is a reliable indicator of doneness. As the custard sets, it will emit a warm, sweet scent that’s unmistakably inviting. If you’re uncertain, gently tilt the pan; the custard should wobble slightly but not run. Trust your nose—if it smells like vanilla and cinnamon, you’re on the right track.
The 5-Minute Rest That Changes Everything
After baking, let the tarts rest on a wire rack for at least 10 minutes. This rest period allows the custard to set fully and the pastry to crisp up a bit more. A short rest also prevents the custard from spilling over the edges when you cut into it. Skipping this step often results in a soggy bottom that ruins the overall texture.
Keep It Cool to Keep It Fresh
Store any leftovers in an airtight container in the refrigerator for up to 48 hours. The custard will firm up, but a quick reheat in a 100°C (200°F) oven will revive the flaky pastry and melt the custard back to silky perfection. Avoid microwaving, as it can create uneven heat and a rubbery texture.
Dusting That Makes a Difference
Dusting the tarts with powdered sugar right before serving adds a subtle crunch and a sweet finish. Use a fine-mesh sifter to ensure an even coat. This final touch not only enhances the flavor but also gives the tarts an elegant, professional look.
That’s it — you did it. But hold on, I've got a few more tricks that'll take this to another level.
Creative Twists and Variations
This recipe is a playground. Here are some of my favorite ways to switch things up:
Nutty Delight
Add a handful of chopped toasted almonds into the custard mixture for a crunchy texture and nutty aroma. The almonds pair beautifully with the cinnamon and vanilla, creating a layered flavor profile that’s both comforting and sophisticated. This variation is perfect for holiday gatherings where you want a dessert that feels indulgent but still familiar.
Caramel Swirl
Swirl a light caramel sauce into the custard before filling the pastry rounds. The caramel adds a rich, buttery sweetness that complements the vanilla and cinnamon. The visual effect of a caramel swirl adds a touch of elegance, making the tarts look like a decadent dessert straight out of a luxury patisserie.
Orange Zest Infusion
Incorporate a teaspoon of freshly grated orange zest into the custard for a citrusy brightness that cuts through the sweetness. The orange pairs wonderfully with the cinnamon, creating a refreshing contrast that lifts the entire flavor profile. This twist is ideal for spring or summer celebrations when you want a lighter, more vibrant dessert.
Almond Extract Boost
Replace the vanilla extract with almond extract for a subtle, nutty undertone that enhances the custard’s depth. Almond extract is potent, so start with half a teaspoon and adjust to taste. This variation offers a sophisticated twist that’s sure to impress guests who appreciate nuanced flavors.
Chocolate Drizzle
After baking, drizzle a thin layer of melted dark chocolate over the cooled tarts. The chocolate adds a bittersweet contrast to the sweet custard, creating a complex flavor experience. This simple addition elevates the dessert to a dessert that feels both indulgent and refined.
Spiced Coconut
Sprinkle toasted coconut flakes over the top of the custard before baking for a tropical twist. The coconut adds a subtle sweetness and a pleasant crunch that pairs well with the cinnamon and vanilla. This variation is a hit with guests who love a touch of exotic flair in their desserts.
These variations open up a world of flavor possibilities, allowing you to tailor the tarts to any occasion or taste preference. Experimenting with these twists will keep your dessert menu fresh and exciting, ensuring that every bite is a new adventure.
Storing and Bringing It Back to Life
Even the most heavenly desserts can lose their charm if not stored properly. Knowing how to keep these tarts fresh and reheat them correctly will extend their life and preserve their texture and flavor. Below are the best practices for fridge and freezer storage, along with a foolproof reheating method.
Fridge Storage
Store the tarts in an airtight container or wrap them tightly in plastic wrap. Keep them in the refrigerator for up to 48 hours. The custard will firm up slightly, but the pastry will remain crisp. Avoid stacking the tarts to prevent crushing the delicate shells.
Freezer Friendly
For longer storage, freeze the tarts for up to 2 weeks. Wrap each tart individually in parchment paper, then place them in a freezer-safe bag. When ready to serve, let them thaw at room temperature for 30 minutes before reheating. Freezing preserves the custard’s texture, but a quick bake will revive the flaky pastry.
Best Reheating Method
To reheat, preheat the oven to 100°C (200°F). Place the tarts on a baking sheet and bake for 5-7 minutes, or until the custard is warm and the pastry is crisp. For a quick touch-up, sprinkle a tiny splash of water over the pastry before reheating; the steam will help restore moisture and prevent the pastry from drying out. This method keeps the custard silky and the pastry golden.
Following these storage and reheating guidelines ensures that your tarts stay as delightful as the first time you made them. Whether you’re prepping for a big gathering or simply enjoying leftovers, these tips will keep your desserts at their best.
Now that you’ve mastered the base recipe, let’s talk about how to keep the momentum going with these variations and storage tips. The beauty of these tarts lies in their adaptability; they can be customized for any occasion or personal preference. Whether you’re a seasoned baker or a kitchen novice, these tricks will help you create a dessert that feels both familiar and fresh. Don’t be afraid to experiment—each tweak is a step toward culinary mastery. Enjoy the process, savor the results, and let your creativity shine.
Remember, the key to a perfect custard tart is patience, attention to detail, and a willingness to experiment. With this recipe as your foundation, the sky’s the limit for flavor combinations and presentation styles. Keep the kitchen clean, measure carefully, and trust your instincts. The end result will be a dessert that not only tastes divine but also looks stunning on any table. Happy baking, and may your kitchen be filled with the warm, comforting scent of vanilla and cinnamon.