Picture this: the kitchen is a chaotic symphony of sizzling pans, clattering utensils, and the relentless hum of the oven timer. I was halfway through a midnight snack experiment when the sugar jar slipped from my shaking hand, sending a cascade of granulated white into the flour bowl. The result? A sticky, uneven mess that looked more like a science experiment than a dessert. I stared at the disaster, heart racing, and thought, “If this can happen to me, it can happen to anyone.” That moment sparked the creation of the ultimate healthy chocolate bite.
I was craving something that felt indulgent yet didn’t make me feel guilty, something that could be whipped up in minutes and still taste like a decadent chocolate truffle. I reached for my pantry staples: oat flour, cocoa powder, maple syrup, and coconut oil. I mixed them together, watching the batter thicken into a glossy, chocolatey batter that smelled like a chocolate shop on a rainy day. I dared myself to taste it right then, and the first bite was a revelation—rich, velvety, and with a hint of nutty crunch that danced on my palate. I couldn’t help but whisper, “I dare you to taste this and not go back for seconds.”
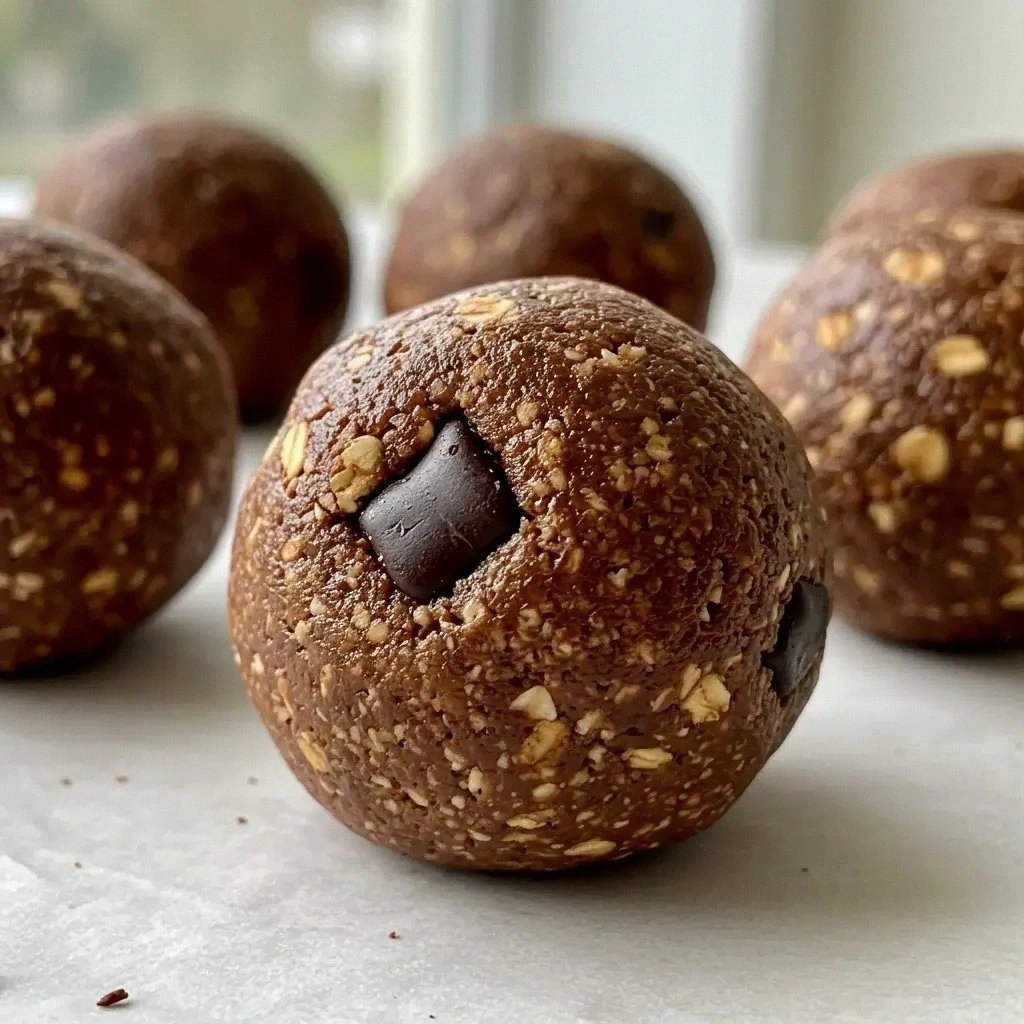
What sets this recipe apart is not just the ingredients, but the way they’re combined. The oat flour provides a hearty base that keeps the bites chewy, while the dark chocolate chips add that classic chocolate burst. I added a splash of vanilla to lift the flavor, and a pinch of sea salt to balance the sweetness—this subtle contrast is what makes every bite a symphony of flavors. The result is a bite that feels luxurious, yet is packed with nutrition: protein, fiber, and healthy fats that keep you satisfied longer. It’s hands down the best version you'll ever make at home.
I’ll be honest—when I first baked the batch, I ate half the whole thing before anyone else got a chance to try it. The chocolate aroma wafted through the kitchen, and the whole house seemed to pause, waiting for the first bite. The texture was a perfect balance—soft inside, with a slight crunch from the nuts and dried fruit. I could hear the gentle crackle as the chocolate chips melted into the batter, creating a glossy sheen that glimmered like a midnight sky. Picture yourself pulling this out of the oven, the whole kitchen smelling incredible, and watching the steam rise like a tiny cloud of chocolate perfume.
Okay, ready for the game-changer? Let me walk you through every single step—by the end, you'll wonder how you ever made it any other way. This recipe is a testament to the power of simple, wholesome ingredients working in harmony. It’s a reminder that you don’t need to sacrifice taste for health; you can have both. And now, let’s dive deep into what makes these chocolate bites truly special.
What Makes This Version Stand Out
- Flavor: The combination of oat flour and almond flour gives the bites a subtle nutty undertone that complements the dark chocolate. The vanilla extract lifts the chocolate’s natural bitterness, creating a balanced, complex flavor profile.
- Texture: The batter’s consistency is thick enough to hold shape but soft enough to melt in your mouth. The addition of chia seeds provides a pleasant chew that contrasts with the crunch of walnuts.
- Nutrition: With 25g of protein, 30g of carbs, and 15g of healthy fats per serving, these bites are a powerhouse of nutrients that keep you energized.
- Ease: The recipe requires only a handful of pantry staples—no need for exotic ingredients or specialized equipment.
- Versatility: Swap in your favorite dried fruit or nuts, and you can tailor the bites to suit any dietary preference.
- Make‑ahead Friendly: Store them in an airtight container, and they stay fresh for up to a week, making them perfect for meal prep or snack on the go.
Inside the Ingredient List
The Flour Mix
Oat flour and almond flour form the backbone of these bites. Oat flour gives a mild, slightly sweet flavor, while almond flour adds a buttery richness that enhances the chocolate’s depth. Together, they create a chewy texture that holds the chocolate chips together. If you skip oat flour, the bites become too dense and lose their airy bite. For an extra touch, you can add a teaspoon of baking powder to lift the batter slightly.
The Chocolate Core
Unsweetened cocoa powder is the star that delivers the deep chocolate flavor. It’s packed with antioxidants and has a lower sugar content than regular cocoa. The dark chocolate chips add a glossy sheen and a burst of real chocolate when they melt. If you’re watching calories, you can replace chips with a sprinkle of cocoa nibs for a crunchier texture.
The Sweetener & Fat
Maple syrup is chosen for its natural sweetness and subtle caramel notes. It also provides a slight viscosity that keeps the batter cohesive. Coconut oil brings a creamy mouthfeel and a subtle tropical hint. If you prefer a dairy-free alternative, avocado oil works well, though it changes the flavor profile slightly. A pinch of sea salt is essential—it cuts through the sweetness and brings out the chocolate’s richness.
The Crunch & Extras
Walnuts add a satisfying crunch and a boost of omega‑3 fatty acids. Dried cranberries give a tart counterpoint that brightens the overall flavor. Chia seeds contribute a gelatinous texture that adds body to the bites. If you’re allergic to nuts, substitute pumpkin seeds or sunflower seeds for a nut-free crunch.
Everything's prepped? Good. Let's get into the real action.
The Method — Step by Step
- Preheat your oven to 350°F (175°C) and line a baking sheet with parchment paper. This step ensures that the bites won’t stick and makes cleanup a breeze. The parchment also gives a slight crisp edge to the finished product. Keep the oven door slightly ajar to allow steam to escape, preventing the bites from becoming too moist.
- In a large mixing bowl, combine 1 cup oat flour, 1/2 cup almond flour, 1/4 cup cocoa powder, 1 tsp baking powder, and a pinch of sea salt. Whisk them together until the dry ingredients are evenly distributed. This dry mix forms the structural base that will hold the chocolate together.
- In a separate saucepan, gently heat 2 tbsp maple syrup and 2 tbsp melted coconut oil over low heat until they’re fully blended. Stir continuously to avoid scorching. The warm liquid will help the dry ingredients bind together without clumping.
- Add the wet mixture to the dry mix and stir until a thick batter forms. The batter should be thick enough to hold its shape but still pliable. If it feels too dry, add a teaspoon of water to loosen it; if too wet, add a tablespoon of oat flour.
- Fold in 1 tsp vanilla extract, 1/8 cup dark chocolate chips, 2 tbsp walnuts, 2 tbsp dried cranberries, and 1 tbsp chia seeds. The chocolate chips should be evenly distributed to ensure every bite has a chocolate burst. The nuts and dried fruit add texture and flavor contrast.
- Using a spoon or a small cookie scoop, drop tablespoon-sized portions of the batter onto the prepared baking sheet. Space them about an inch apart to allow for expansion during baking. This step is crucial; too close together and they’ll fuse into one large lump.
- Bake for 12–15 minutes, or until the edges start pulling away from the parchment and the center looks set. The aroma should be rich and chocolatey, with a hint of toasted nuts. Watch the color; they should be dark brown, not black.
- Remove the baking sheet from the oven and let the bites cool on a wire rack for 10 minutes. This rest period allows the chocolate to set and the flavors to meld. After cooling, transfer the bites to an airtight container and store them in the fridge for up to a week.
That's it— you did it. But hold on, I've got a few more tricks that'll take this to another level. These little adjustments will elevate your bites from good to unforgettable.
Insider Tricks for Flawless Results
The Temperature Rule Nobody Follows
The oven temperature is critical. If it’s too low, the chocolate will not set properly, leading to a sticky center. If it’s too high, the edges will burn before the middle cooks. I recommend using an oven thermometer to ensure accuracy. A slight dip to 340°F can make the difference between a perfect bite and a chewy mess.
Why Your Nose Knows Best
Before you open the oven door, pause and inhale the aroma. A strong, chocolatey scent signals that the batter has set. If it still smells like raw batter, give it a few more minutes. Trusting your nose is a simple but powerful way to avoid overbaking.
The 5-Minute Rest That Changes Everything
Letting the bites rest for 5 minutes on the baking sheet allows the chocolate to firm up. During this time, the flavors meld, and the texture stabilizes. Skipping this step can result in a gummy center that’s hard to bite into.
Chilling for a Crunchy Finish
Once the bites are cool, place them in the fridge for an hour before serving. This chilling step makes the chocolate firm, giving each bite a satisfying snap. It also enhances the nutty crunch, making the texture more dynamic.
Add a Splash of Citrus
A teaspoon of orange zest added to the batter elevates the chocolate’s depth and adds a fresh citrus undertone. The zest’s essential oils bring a bright, uplifting flavor that balances the richness. This is a subtle trick that transforms the taste profile.
Creative Twists and Variations
This recipe is a playground. Here are some of my favorite ways to switch things up:
Cocoa‑Rich Peanut Butter Bites
Swap almond flour for peanut butter powder and add a spoonful of creamy peanut butter to the batter. The result is a chocolate‑peanut butter combo that feels like a candy bar.
Minty Dark Chocolate Bites
Add a few drops of peppermint extract to the batter. The mint provides a refreshing contrast that pairs beautifully with dark chocolate.
Spiced Cinnamon Bites
Stir in half a teaspoon of ground cinnamon and a pinch of nutmeg. The warm spices add depth and make the bites feel like a holiday treat.
Almond‑Coconut Crunch
Replace walnuts with toasted coconut flakes and add a sprinkle of almond slivers for extra crunch. The coconut’s tropical flavor gives a beach‑inspired twist.
Berry‑Infused Bites
Swap dried cranberries for dried blueberries or strawberries. The natural sweetness of berries complements the chocolate, creating a balanced flavor.
Chocolate‑Chili Surprise
Add a pinch of cayenne pepper or a dash of smoked paprika. The heat adds a subtle kick that makes the chocolate bite unforgettable.
Storing and Bringing It Back to Life
Fridge Storage
Keep the bites in an airtight container at room temperature for up to a week. The airtight seal prevents the chocolate from absorbing odors and maintains freshness.
Freezer Friendly
For longer storage, freeze the bites in a single layer on a baking sheet. Once frozen, transfer them to a zip‑lock bag. They’ll keep for up to 3 months without losing quality.
Best Reheating Method
When you’re ready to enjoy them again, preheat your oven to 300°F (150°C). Place the bites on a parchment‑lined tray and warm for 5 minutes. Add a tiny splash of water to the tray before reheating; it steams the bites back to perfection and keeps the chocolate from drying out.