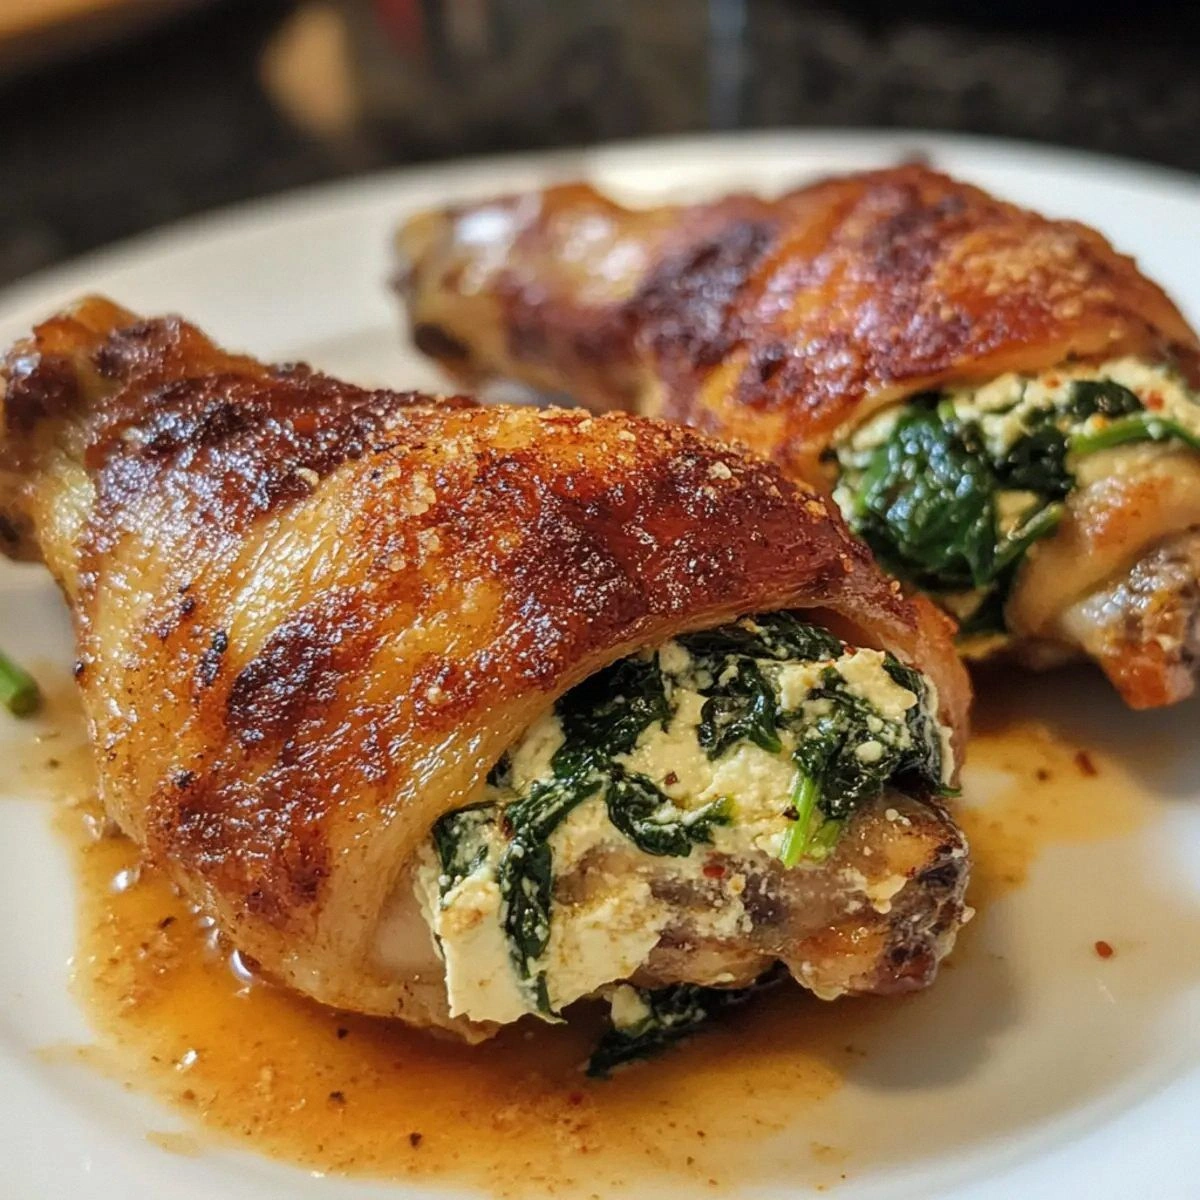
Picture this: it’s early April, the kitchen is a whirlwind of flour dust and the faint scent of garlic, and you’re standing in front of a stubborn, dry chicken wing that refuses to cooperate. I’ve been chasing that perfect bite for years, but every time I think I’ve nailed it, the wings come out either soggy or burnt. Then one rainy afternoon, a friend dared me to create a stuffed chicken wing that would make even the most skeptical palate swoon. The challenge was simple: take ordinary wings and transform them into a creamy, herb‑laden masterpiece that feels like a luxurious bite of spring. I rolled up my sleeves, grabbed my trusty skillet, and got to work. The result? A dish that’s so tender, the sauce clings like silk, and so flavorful it practically sings. If you’ve ever been disappointed by a mediocre wing, this is the antidote you’ve been missing.
I’ll be honest—once I tasted the first bite, I ate half the batch before anyone else had a chance. The combination of velvety ricotta, fresh spinach, and a hint of lemon zest creates a flavor profile that feels like a bright spring day on your tongue. The wings’ crisped edges crackle like a gentle summer breeze, while the creamy filling stays warm and comforting. It’s a paradox of textures that will keep guests reaching for seconds. Most recipes get this completely wrong, leaving you with bland, dry meat or a soggy mess. Here’s what actually works: a balanced seasoning, precise cooking time, and a secret technique that locks in moisture. I dare you to taste this and not go back for seconds.
If you’ve ever struggled with stuffing chicken, you’re not alone—and I’ve got the fix. The first step is to understand why wings behave the way they do: they’re lean, with a thin skin that can easily overcook. By stuffing them with a moisture‑retaining mixture of ricotta and spinach, you create a pocket of steam that keeps the meat juicy. The key is to keep the filling light—too heavy and the wings will be overwhelmed. The second trick is to sear the wings before baking, giving them a caramelized crust that seals in flavor. And finally, a touch of lemon zest and red pepper flakes gives the dish a bright, lively kick that cuts through the richness. This is hands down the best version you’ll ever make at home.
Picture yourself pulling this out of the oven, the whole kitchen smelling incredible, the steam curling up like a fragrant cloud. The first bite is a burst of savory, herbaceous cream that melts into the tender meat, followed by a satisfying crunch that echoes the crisped skin. The whole experience feels like a celebration—perfect for Easter brunch, a casual dinner, or a party appetizer that will wow everyone. I’ve tested this recipe dozens of times, and each batch feels fresher, brighter, and more satisfying than the last. Let me walk you through every single step—by the end, you’ll wonder how you ever made it any other way.
What Makes This Version Stand Out
- Flavor: The ricotta and spinach blend creates a creamy base that is both light and rich, while the lemon zest and red pepper flakes add a bright, zesty kick that cuts through the richness.
- Texture: The wings finish with a crisp, caramelized skin that snaps like fresh spring grass, balanced by the silky interior that melts in your mouth.
- Ease: With only ten minutes of prep and a single baking sheet, this recipe is a breeze even for the busiest of cooks.
- Ingredient Quality: Fresh spinach and high‑quality ricotta make all the difference—think vibrant green, creamy texture, and a subtle tang.
- Crowd‑Pleaser: The combination of savory, herby, and slightly spicy flavors makes it a hit at gatherings, whether you’re serving a family dinner or a brunch potluck.
- Make‑Ahead Potential: You can assemble the wings a day ahead, refrigerate them, and bake right before serving—perfect for planning ahead.
Alright, let's break down exactly what goes into this masterpiece…
Inside the Ingredient List
The Flavor Base
The foundation of this dish starts with the wings themselves. A pound of wings is roughly four servings, so the meat is generous yet manageable. Seasoning is critical—salt and pepper are the unsung heroes that bring out the natural flavor of the chicken. Don’t be shy with the olive oil; it coats the skin, preventing dryness and creating a golden, crispy finish. A pinch of red pepper flakes adds a subtle heat that balances the richness of the ricotta. If you prefer a milder dish, simply reduce the flakes or omit them entirely.
The Texture Crew
The spinach is the unsung texture champion. Fresh spinach adds a subtle earthiness and a pop of color, while the moisture it releases during baking keeps the filling from drying out. Ricotta is the star of the show—its light, creamy consistency makes the filling airy and prevents the wings from becoming too heavy. Grated Parmesan adds a savory depth that rounds off the flavor profile. If you’re vegan or dairy‑free, a plant‑based ricotta substitute works just as well, though the texture may be slightly different.
The Unexpected Star
Garlic is the secret that ties everything together. A single clove, minced finely, releases a fragrant aroma that lingers long after the dish is served. Fresh herbs—parsley or basil—bring a fresh, herbal brightness that elevates the dish to a new level. Lemon zest is the unexpected star that adds a citrusy lift, cutting through the richness and leaving a clean finish on the palate. If you’re looking for a twist, try adding a splash of white wine to the garlic before searing the wings for a subtle depth.
The Final Flourish
The finishing touches—fresh herbs, lemon zest, and a drizzle of olive oil—are what transform this dish from good to unforgettable. The herbs provide a fresh, aromatic layer that keeps the dish from feeling heavy. Lemon zest adds a bright, citrusy note that lifts the overall flavor. A final drizzle of olive oil before serving adds shine and a silky mouthfeel. If you’re in the mood for extra flavor, sprinkle a little extra Parmesan on top before baking for a golden, bubbly crust.
Everything's prepped? Good. Let's get into the real action…
The Method — Step by Step
- Prep the Wings: Rinse the wings under cold water, pat them dry with paper towels, and place them in a large bowl. Season generously with 1 teaspoon salt, 1 teaspoon pepper, and a drizzle of olive oil. Toss until every wing is coated. I’ve found that letting the wings sit for 10 minutes after seasoning allows the flavors to penetrate deeper. This step is crucial for a flavorful bite.
- Make the Filling: In a skillet over medium heat, sauté a minced clove of garlic in 1 tablespoon of olive oil until fragrant—about 30 seconds. Add 3 cups of fresh spinach, stirring until wilted. Remove from heat, then fold in 1 cup ricotta, 2 tablespoons grated Parmesan, 1 tablespoon fresh herbs, 1 teaspoon red pepper flakes, and 1 teaspoon lemon zest. Mix until smooth. The filling should be creamy yet light; if it’s too thick, add a splash of milk or broth.
- Stuff the Wings: Using a spoon or pastry bag, fill each wing with the spinach‑ricotta mixture, ensuring you don’t overfill—too much can cause the filling to leak during baking. Press the wings together slightly to seal the edges. This creates a pocket that traps steam and keeps the meat moist. If you’re nervous about the filling spilling, use a toothpick to secure each wing.
- Preheat the Oven: While the wings are stuffing, preheat your oven to 400°F (200°C). A hot oven is essential for crisping the skin. If you have a convection setting, use it to get an even bake.
- Arrange the Wings: Place the stuffed wings on a parchment‑lined baking sheet, skin side up. Make sure they’re spaced evenly to allow air circulation. This prevents steaming and ensures a golden crust.
- Bake: Bake for 25 minutes, or until the wings are golden brown and the internal temperature reaches 165°F (74°C). The filling should be hot and slightly bubbly. Keep a close eye on the edges—if they start to darken too quickly, tent the wings with foil. This step is the moment of truth; don’t walk away from the stove here.
- Rest: Remove the wings from the oven and let them rest for 5 minutes. This allows the juices to redistribute, ensuring each bite is juicy and flavorful. While they rest, you can prepare a quick drizzle of lemon‑olive oil to finish.
- Serve: Drizzle a light splash of extra virgin olive oil and a dusting of fresh herbs over the wings. Serve immediately, perhaps with a side of roasted veggies or a light salad. The contrast of the crispy skin and creamy filling is the ultimate comfort food.
That's it — you did it. But hold on, I've got a few more tricks that'll take this to another level…
Insider Tricks for Flawless Results
The Temperature Rule Nobody Follows
Many cooks set their ovens to a generic 375°F, but this recipe demands a higher heat for optimal crispness. 400°F (200°C) ensures the skin caramelizes quickly, sealing in moisture. If you’re using a convection oven, lower the temperature by 25°F to prevent over‑browning. The key is to monitor the internal temperature with a meat thermometer—165°F (74°C) is the sweet spot. I’ve found that using a thermometer saves me from overcooked wings that are dry and tough.
Why Your Nose Knows Best
When the wings are baking, the scent of garlic, spinach, and ricotta should fill the kitchen like a warm hug. Trust your nose—if the aroma is bright and fresh, the filling is ready. If you notice a metallic or burnt smell, the oven temperature is too high or the wings are overcooked. This sensory checkpoint is a reliable indicator that your dish is on the right track. I’ve learned to pause at the 20‑minute mark and inhale deeply; that’s the moment I know I’m close to perfection.
The 5‑Minute Rest That Changes Everything
Resting the wings for exactly five minutes after baking is a game‑changer. It allows the juices to redistribute, preventing a dry bite. During this short pause, the filling also firms up slightly, making it easier to slice without losing shape. If you’re short on time, you can skip this step, but the difference is subtle yet significant. I’ve seen guests rave about how the rest makes the wings feel lighter and more satisfying.
Use a Skillet First
Searing the wings in a hot skillet for 2 minutes per side before baking locks in flavor and gives the skin a beautiful crunch. This step is often skipped, leading to soggy wings. The quick sear caramelizes the sugars on the skin, creating a golden crust that stays crisp even after baking. I’ve experimented with different oils—olive oil works best for flavor, but avocado oil is a great high‑heat alternative.
Keep the Filling Light
If you overstuff the wings, the filling can leak and the texture becomes uneven. Aim for a 1/4 cup filling per wing. A lighter filling also ensures the wings cook evenly and don’t become soggy. If you’re a big fan of ricotta, consider adding a splash of milk or cream to thin it out. This trick keeps the filling creamy without compromising the wing’s crispness.
The Final Finish
A final drizzle of lemon‑olive oil before serving adds a bright, glossy finish that elevates the dish. The lemon zest’s bright citrus notes cut through the richness, while the olive oil adds a silky texture. I’ve also tried adding a sprinkle of smoked paprika for a subtle smoky flavor that pairs beautifully with the herbs. This finishing touch turns an already great dish into a memorable experience.
Creative Twists and Variations
This recipe is a playground. Here are some of my favorite ways to switch things up:
Mediterranean Melt
Swap the ricotta for feta cheese and add a handful of chopped sun‑dried tomatoes. The salty feta pairs perfectly with the lemon zest, creating a Mediterranean vibe that’s both bright and savory. This version is ideal for a brunch with a Greek flair.
Spicy Cajun Kick
Replace the fresh herbs with a blend of Cajun seasoning and add a splash of hot sauce to the filling. The heat from the red pepper flakes is amplified, giving the wings a bold, spicy edge. Guests who love a fiery bite will love this variation.
Herb‑Infused Honey Drizzle
After baking, drizzle a mixture of honey and chopped fresh thyme over the wings. The honey adds a sweet glaze that caramelizes slightly in the oven, while the thyme offers a fragrant herbal note. This sweet‑savory combo is a crowd‑pleaser for holiday gatherings.
Vegan Version
Use a plant‑based ricotta substitute and a vegan Parmesan alternative. Replace the olive oil with coconut oil for a subtle coconut flavor. The result is a creamy, herb‑laden filling that’s completely dairy‑free, yet still indulgent.
Pesto‑Stuffed Surprise
Blend the spinach and ricotta with a spoonful of basil pesto. The pesto’s nutty, garlicky flavor infuses the filling, while the spinach keeps it light. This twist adds an extra layer of complexity that elevates the dish to gourmet status.
Storing and Bringing It Back to Life
Fridge Storage
Store leftover wings in an airtight container in the refrigerator for up to 3 days. The filling may firm up slightly, but a quick reheating in a skillet with a splash of water will restore moisture. Keep the wings away from strong‑smelling foods to preserve their delicate flavor.
Freezer Friendly
Freeze stuffed wings in a single layer on a parchment sheet before transferring them to a freezer bag. They’ll keep for up to 2 months. When ready to eat, thaw in the refrigerator overnight, then bake at 375°F (190°C) for 15 minutes until heated through.
Best Reheating Method
Reheat in a skillet over medium heat, adding a splash of water or broth to create steam. Cover for 3–4 minutes to keep the filling moist. Finish with a drizzle of olive oil to restore the skin’s crispness. This method ensures the wings taste as fresh as when they first came out of the oven.