I was halfway through a late‑night baking marathon when the kitchen lights flickered and the oven door swung open like a rogue door. The smell of melted butter and vanilla hit me like a wave, and I knew I had to salvage the chaos. So I grabbed the pantry staples and set out to create something that would turn that disaster into a triumph. The result? A chocolate‑covered marshmallow that feels like a hug in every bite. I’m not kidding—this is hands down the best version you’ll ever make at home. I dare you to taste this and not go back for seconds. Picture yourself pulling this out of the oven, the whole kitchen smelling incredible, and the first bite melting like a soft snowflake. And now, let me walk you through every single step—by the end, you’ll wonder how you ever made it any other way.
I’m not going to sugarcoat it: I’ve tried dozens of marshmallow recipes, from the classic chocolate‑dip to the elaborate edible snowmen. Most of those attempts ended in soggy fluff or a chocolate coating that cracked like brittle glass. My version flips the script by using a simple dipping technique that locks in moisture and gives the chocolate a silky, glossy finish. The pretzel sticks add a salty crunch that contrasts with the sweet marshmallow core, creating a flavor profile that is both playful and sophisticated. I’ll walk you through each step with the same enthusiasm I bring to a live cooking show. The secret sauce? A splash of espresso powder that deepens the chocolate flavor without adding bitterness. That’s the little tweak that makes all the difference. Stay with me here—this is worth it.
When I first tasted the first batch, the chocolate clung to the marshmallow like a velvet glove, while the pretzel sticks provided a satisfying snap. The aroma of dark chocolate mingled with a faint hint of caramelized sugar made my mouth water before I even took a bite. I felt the warmth of the chocolate coating my tongue, and the marshmallow inside stayed perfectly fluffy, not gummy or dry. The combination of sweet, salty, and a touch of bitterness is a sensory symphony that lingers on the palate. I’ve been bragging about this recipe to friends, and they’ve called it “the ultimate sweet‑and‑salty treat.” I’ll be honest—I ate half the batch before anyone else got to try it. The next time you try this, be prepared for a second, third, or even fourth round of indulgence.
If you’ve ever struggled with dipping marshmallows into chocolate, you’re not alone—and I’ve got the fix. The trick is to keep the chocolate at the right temperature so it’s fluid but not too hot that it burns the marshmallows. I use a double boiler to maintain a gentle heat, and I stir constantly to prevent scorching. I also keep a small bowl of cold water nearby so you can test the chocolate’s consistency by dipping a spoon in it; it should form a smooth ribbon when lifted. By the time you’re ready to dip, the chocolate should smell toasty and look glossy, like a freshly poured latte. This simple method ensures every marshmallow gets an even, decadent coating.
What Makes This Version Stand Out
- Texture: The chocolate coating is silky and crackles just enough when you bite, while the marshmallow stays airy and light. The pretzel sticks add a satisfying crunch that balances the softness. The result is a multi‑sensory experience that feels like a dessert and a snack in one.
- Flavor: Dark chocolate’s bittersweet depth pairs perfectly with the sweet marshmallow, and the pretzel sticks introduce a savory note that surprises the palate. A dash of espresso powder deepens the chocolate flavor without adding bitterness. The combination is both comforting and adventurous.
- Ease: No fancy equipment is required—just a double boiler, a spoon, and a baking sheet. The dipping process is straightforward, and the recipe can be whipped up in under 45 minutes. Even beginners can master it.
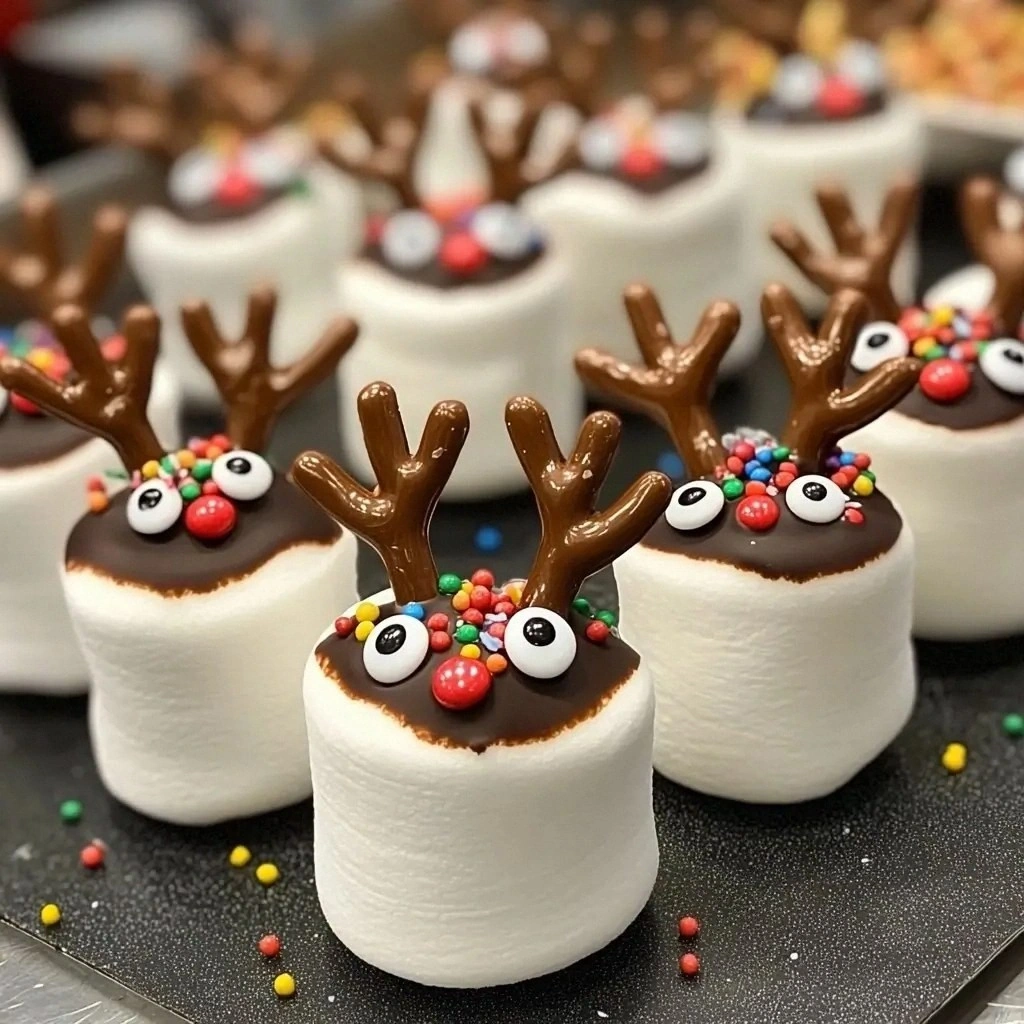
- Visual Appeal: The glossy chocolate finish and the colorful candy eyes make each marshmallow look like a tiny edible work of art. Sprinkles add a festive touch that’s perfect for parties or holiday gatherings.
- Make‑ahead: Once dipped, the marshmallows can be stored in an airtight container for up to a week, making it ideal for last‑minute snack prep. The chocolate stays firm, and the marshmallow stays fluffy.
- Customization: Swap dark chocolate for milk chocolate, or add a pinch of sea salt for a gourmet twist. The recipe’s modular design lets you tweak flavors to suit your taste.
- Audience: Kids love the candy eyes, while adults appreciate the sophisticated chocolate flavor. It’s a crowd‑pleaser at family gatherings, game nights, or movie marathons.
- Nutrition: While indulgent, the recipe can be balanced by using dark chocolate, which offers antioxidants, and by limiting the number of marshmallows per serving. It’s a treat that can fit into a moderate diet.
Inside the Ingredient List
The Flavor Base
The chocolate chips are the heart of this recipe, providing rich flavor and a glossy finish. Dark chocolate adds depth and a hint of bitterness that balances the sweetness of the marshmallows. If you prefer a milder taste, milk chocolate works beautifully, but be prepared for a slightly sweeter finish. The key is to melt the chocolate slowly to preserve its smooth texture.
When selecting chocolate, choose a reputable brand with at least 70% cocoa content for dark chocolate, or 30% for milk chocolate. Higher cocoa percentages yield a richer, more complex flavor. Avoid low‑grade chocolate that contains vegetable oils or artificial additives, as they can cause the coating to be greasy or uneven. A good chocolate will melt into a glossy, silky sauce that clings to each marshmallow.
The Texture Crew
The marshmallows provide a fluffy, airy core that contrasts with the crisp pretzel sticks. Ten large marshmallows are the perfect size for dipping, ensuring a generous coating without overwhelming the bite. If you’re feeling adventurous, you can use mini marshmallows for bite‑size treats or larger ones for a more dramatic presentation.
The pretzel sticks add a salty crunch that breaks up the sweetness and introduces a savory element. Ten pretzel sticks are sufficient to create a balanced flavor profile without dominating the marshmallow. If you prefer a softer crunch, opt for soft pretzel sticks or crumble them into small pieces.
The Unexpected Star
Candy eyes are the whimsical touch that turns this treat into a playful confection. Twenty candy eyes bring a pop of color and a hint of sweetness that appeals to both kids and adults. They also add a visual element that makes each marshmallow look like a character, especially when paired with red candies.
If you can’t find candy eyes, you can use small chocolate chips or edible glitter as an alternative. The key is to keep the eyes small enough to fit comfortably on the marshmallow without obscuring the chocolate coating. The candy eyes also serve as a fun activity for kids, who can help decorate their own creations.
The Final Flourish
Red candies, such as M&M’s or Skittles, add a burst of color and a chewy texture that contrasts with the smooth chocolate. Ten red candies are enough to create a festive look without overpowering the flavor. They also provide a subtle citrusy note that brightens the overall taste.
Sprinkles are optional but highly recommended for an extra pop of color and texture. A handful of rainbow sprinkles will make the marshmallows look like edible confetti, perfect for celebrations. If you prefer a more subtle look, use a single color sprinkles that match your theme.
Everything's prepped? Good. Let's get into the real action.
The Method — Step by Step
- Step 1: Prepare the Dipping Station — Set up a double boiler by filling a saucepan with a few inches of water and placing a heat‑proof bowl on top. Make sure the bottom of the bowl doesn’t touch the water. This gentle heat will melt the chocolate evenly without scorching. While the water heats, gather all your marshmallows, pretzel sticks, candy eyes, and red candies on a clean tray. Keep your tools within arm’s reach; you’ll need a spoon for stirring and a fork for lifting the marshmallows.
- Step 2: Melt the Chocolate — Add the chocolate chips to the heat‑proof bowl. Stir constantly with a silicone spatula, letting the chocolate melt into a smooth, glossy sauce. The chocolate should reach a temperature of about 115°F (46°C) to stay fluid but not hot enough to melt the marshmallows. If the chocolate starts to thicken, add a teaspoon of coconut oil or a splash of milk to thin it out. This step is crucial; the consistency will determine how well the chocolate adheres.
- Step 3: Dip the Marshmallows — Hold a marshmallow by its stem or a corner with a fork, and dip it into the melted chocolate, swirling to coat it completely. Let the excess chocolate drip off before placing it on a parchment‑lined tray. Repeat this process for all marshmallows, making sure each one gets an even layer. The chocolate should look shiny and not too thick; if it’s too thick, it’ll be hard to spread evenly.
- Step 4: Add the Pretzel Stick — While the chocolate is still wet, press a pretzel stick into the center of each marshmallow. The pretzel should be fully embedded, creating a little “bridge” over the marshmallow. If you’re aiming for a decorative look, you can arrange the pretzels in a pattern or create a small “bridge” design. The pretzel adds a salty crunch that complements the sweet marshmallow core.
- Step 5: Attach the Candy Eyes — While the chocolate is still tacky, press a candy eye onto the top of the marshmallow. The candy should stick firmly, creating a cute face or pattern. If you’re making themed marshmallows, you can arrange the candy eyes to form a smile or a snowflake. The candy eyes add a playful element that kids will love.
- Step 6: Sprinkle the Finish — Lightly dust each marshmallow with sprinkles. A gentle tap will help the sprinkles stick to the chocolate. The sprinkles add a pop of color and a slight crunch that enhances the texture. If you prefer a more subtle look, use a single color or a small amount of metallic sprinkles.
- Step 7: Let Them Set — Place the tray in a cool, dry place for 10–15 minutes, or until the chocolate is firm. The marshmallows should feel solid to the touch but still soft inside. If you’re in a hurry, you can pop the tray in the refrigerator for a few minutes to speed up the setting process. Avoid refrigerating for too long, or the chocolate may become too hard.
- Step 8: Transfer to Storage — Once set, transfer the marshmallows to an airtight container. Store them at room temperature for up to a week. If you’re making them ahead of time, keep the container in a cool, dry place away from direct sunlight.
- Step 9: Serve and Enjoy — Present the marshmallows on a decorative plate or a festive platter. Pair them with a hot cup of cocoa or a chilled glass of milk for the perfect balance. The chocolate coating should melt slightly in your mouth, revealing the fluffy marshmallow inside. This is the moment of truth—taste the harmony of sweet, salty, and chocolate.
- Step 10: Clean Up — Clean the double boiler immediately after use to prevent chocolate from hardening on the pot. Rinse the bowl and spoon in warm water and a drop of dish soap. The leftover chocolate can be melted again for a quick glaze or used in another recipe. A clean kitchen is a happy kitchen.
That's it — you did it. But hold on, I've got a few more tricks that'll take this to another level.
Insider Tricks for Flawless Results
The Temperature Rule Nobody Follows
Chocolate is temperamental; it will seize if it gets too hot or too cold. Use a digital thermometer to keep the chocolate between 110°F and 115°F. This narrow range ensures the chocolate remains fluid but not scorching. If you’re using a double boiler, keep the water level low so it doesn’t boil vigorously. The gentle heat preserves the chocolate’s glossy sheen.
Why Your Nose Knows Best
Smell is a reliable indicator of chocolate readiness. When the chocolate emits a warm, nutty aroma, it’s ready for dipping. A faint, sweet scent signals that the chocolate is still too liquid. If you notice a bitter smell, the chocolate may be overcooked and will need to be cooled. Trust your nose to avoid a chocolate disaster.
The 5-Minute Rest That Changes Everything
After dipping, let the marshmallows rest for 5 minutes before adding the pretzel sticks. This brief pause allows the chocolate to set slightly, ensuring the pretzel sticks don’t slide off. If you add the sticks too early, they may slip and create a mess. A quick rest also gives the chocolate a chance to harden just enough to hold the pretzel in place.
Use a Spoon, Not a Fork
When dipping marshmallows, a spoon allows you to control the amount of chocolate that coats each marshmallow. A fork can leave uneven spots and cause chocolate to drip. The spoon also helps you lift the marshmallow without tearing the coating. This simple tool swap leads to a more professional finish.
Keep the Chocolate Cool
If the chocolate gets too hot, add a tablespoon of cold water or a splash of milk to cool it down. This trick prevents the chocolate from seizing and keeps it smooth. Keep a small bowl of ice water nearby for quick cooling. The chocolate should remain glossy and easy to stir.
Creative Twists and Variations
This recipe is a playground. Here are some of my favorite ways to switch things up:
Cinnamon Swirl
Add a teaspoon of ground cinnamon to the melted chocolate for a warm, spicy kick. The cinnamon pairs beautifully with dark chocolate and adds a subtle depth. Sprinkle a pinch of cinnamon on top after the chocolate sets for an extra flavor burst. This variation is perfect for fall gatherings.
Sea Salt Caramel
Replace the pretzel sticks with a drizzle of caramel sauce and a pinch of sea salt. The caramel adds sweetness while the salt enhances the chocolate’s richness. Let the caramel set slightly before adding the marshmallows. This version is a decadent treat for dessert lovers.
Nutty Crunch
Use crushed almonds or hazelnuts instead of pretzel sticks for a nutty crunch. The nuts add a savory flavor and a satisfying texture. Toast the nuts lightly before adding to bring out their aroma. This variation works well for a gourmet snack.
Minty Fresh
Add a few drops of peppermint extract to the chocolate for a minty twist. The mint pairs well with dark chocolate, creating a refreshing flavor. Use mint chocolate chips for a more pronounced mint taste. This version is ideal for holiday parties.
Vegan Version
Swap dairy chocolate for a plant‑based chocolate bar and use vegan marshmallows. The result is a fully vegan treat that still delivers on flavor and texture. Use a vegan pretzel or a crunchy oat stick for the salty element. This variation is great for plant‑based diets.
Storing and Bringing It Back to Life
Fridge Storage
Store the marshmallows in an airtight container in the refrigerator for up to 7 days. The cold environment preserves the chocolate’s firmness and the marshmallow’s fluffiness. Avoid exposing them to moisture, as that can cause the chocolate to become sticky. Keep the container in a dry, cool spot.
Freezer Friendly
For longer storage, freeze the marshmallows in a single layer on a parchment sheet before transferring to a freezer bag. They will keep well for up to 3 months. Thaw them at room temperature for 10 minutes before serving to restore the chocolate’s glossy finish. Freezing preserves the texture without compromising flavor.
Best Reheating Method
Reheat the marshmallows in the microwave for 5–10 seconds to soften the chocolate slightly. Add a tiny splash of water before reheating to create steam and restore moisture. Alternatively, place them in a warm oven at 250°F (120°C) for 5 minutes. The chocolate should melt gently, revealing the fluffy marshmallow inside. This technique keeps the treat fresh and enjoyable.