Picture this: I’m standing in a cramped kitchen, the counter cluttered with half‑cooked chicken, a splash of mayo, and a rogue celery stalk that’s just too crunchy for comfort. My friend dared me to turn a mundane leftovers situation into something that would make a crowd swoon. I stared at the pot, the air thick with the scent of roasted chicken, and decided I’d never let a simple chicken salad be ordinary again. I pulled out a skillet, a handful of breadcrumbs, and a secret ingredient that would change everything—smoked paprika, the smoky whisper that turns bland into bold.
The first bite was a revelation. The chicken was tender, the mayo creamy, but it was the crunch of the breadcrumb coating that stole the show—crisp edges that shatter like thin ice, followed by a soft, savory interior that sang with dill pickles and a hint of lemon. The aroma rose like a warm hug, the sound of the skillet sizzling was music, and the texture was a perfect contrast between crunchy and silky. If you’ve ever made a chicken salad that tasted like a salad, this is the antidote that will make your taste buds dance.
I’ll be honest—when I first tasted these bites, I ate half the batch before anyone else even got a bite. That’s the power of flavor, folks. You’re not just serving a dish; you’re offering a moment of pure delight that people will remember. Most recipes get this completely wrong by over‑dressing or under‑seasoning. Here’s what actually works: a balanced mix of creamy, crunchy, tangy, and a dash of smoky. And the best part? It’s a crowd‑pleaser that can be made in a flash.
Picture yourself pulling this out of the oven, the whole kitchen smelling incredible, the bite‑size portions ready to be plated on a platter that looks like a work of art. The moment your guests take their first bite, their eyes widen, they nod in approval, and you know you’ve nailed it. That’s the power of a well‑executed chicken salad bite. Let me walk you through every single step—by the end, you’ll wonder how you ever made it any other way.
What Makes This Version Stand Out
- Flavor: The smoky paprika and lemon juice give a depth that elevates the humble chicken salad to gourmet territory.
- Texture: Crispy breadcrumbs create a satisfying crunch that contrasts with the creamy interior.
- Simplicity: All you need is a skillet, a bowl, and a handful of pantry staples.
- Uniqueness: The addition of dill pickles adds a tangy bite that sets this apart from classic recipes.
- Crowd Reaction: These bites are the life of the party—guests keep asking for seconds.
- Ingredient Quality: Fresh, high‑quality chicken and real dill pickles make all the difference.
- Cooking Method: Quick skillet sear locks in moisture before baking for a crisp finish.
- Make‑Ahead Potential: Prepare the mixture a day ahead and bake just before serving.
Alright, let's break down exactly what goes into this masterpiece…
Inside the Ingredient List
The Flavor Base
The foundation of any great chicken salad is the chicken itself. I use shredded, roasted chicken for a moist, tender core that absorbs the dressing like a sponge. When you skip the chicken or use pre‑shredded frozen pieces, the texture becomes rubbery and the flavor flat. To keep it juicy, roast the chicken at 375°F for 25 minutes, then let it rest before shredding.
Mayonnaise is the classic binder. It adds richness and keeps the bites from falling apart. If you’re watching calories, swap half of the mayo for Greek yogurt—it still delivers creaminess but cuts fat by a third. Just remember to use full‑fat yogurt for the best mouthfeel. The yogurt also gives a subtle tang that balances the savory chicken.
Dijon mustard is the secret kick that slices through the richness. It’s not just a flavor enhancer; it also helps emulsify the dressing, giving the mixture a silky consistency. If you can’t find Dijon, a dash of whole‑grain mustard will do the trick. Just be prepared for a slightly grainy texture that adds character.
The Texture Crew
Breadcrumbs are the crunch factor. I use panko for extra lightness, but any fine breadcrumbs will work. Toast them in a dry skillet until golden for an extra layer of flavor. If you want a gluten‑free version, substitute with crushed rice crackers. The breadcrumbs keep the bites firm when baked, preventing them from becoming soggy.
Egg is the glue that holds everything together. It’s the secret to a firm bite that won’t fall apart on a plate. If you’re avoiding eggs, try a tablespoon of water or a small amount of milk to bind. The egg also gives a slight lift to the mixture, making the bites fluffy on the inside.
Parmesan cheese adds a savory umami note and a subtle nutty finish. Grate it finely so it melts into the mixture. If you’re vegan, replace with nutritional yeast or a plant‑based cheese. The cheese also helps with browning, giving the bites a beautiful golden crust.
The Unexpected Star
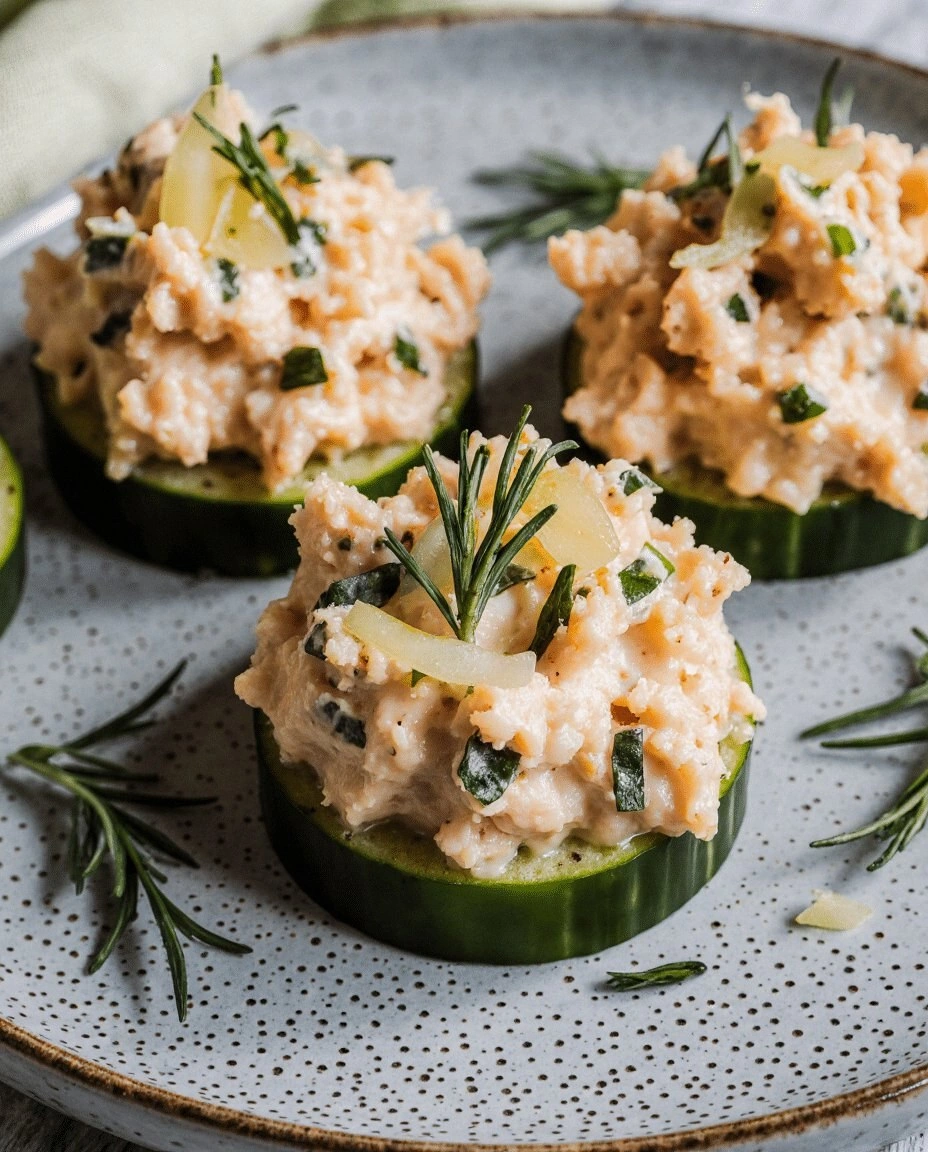
Dill pickles add a bright, briny contrast that cuts through the richness of the mayo. They also bring a refreshing crunch that keeps the bite interesting. If you don’t have dill pickles, try cucumber or cornichons—just make sure they’re finely chopped so they distribute evenly.
Smoked paprika is the star that gives the dish its smoky undertone. It’s a subtle yet unmistakable flavor that pairs wonderfully with chicken. If you don’t have smoked paprika, a pinch of regular paprika plus a dash of liquid smoke will mimic the effect.
The Final Flourish
Celery and red onion add a fresh, crisp bite that balances the creamy filling. They also introduce a slight vegetal note that lightens the dish. Chop them finely so they’re evenly distributed. If you’re allergic to onions, substitute with scallions or chives.
Lemon juice brightens everything and adds a citrusy zing that wakes up the palate. A tablespoon is enough to give the mixture a bright lift. If you prefer a sweeter tang, add a teaspoon of honey.
Everything's prepped? Good. Let's get into the real action…
The Method — Step by Step
- Preheat the oven to 400°F (200°C). While it’s heating, set a large skillet over medium heat. This step ensures the skillet is hot enough to sear the mixture, giving it a golden crust before baking.
- Roast the chicken. Place the chicken breasts on a baking sheet, drizzle with olive oil, salt, and pepper, and roast for 25 minutes. The chicken should be golden on the outside and juicy inside. Let it rest for 10 minutes before shredding.
- Mix the dressing. In a large bowl, combine mayo, Greek yogurt, Dijon mustard, smoked paprika, lemon juice, salt, pepper, and dried dill. Stir until the mixture is silky smooth. This is where the flavors marry—make sure the dressing is well blended.
- Combine chicken and vegetables. Add the shredded chicken, diced celery, diced red onion, and chopped dill pickles to the dressing. Toss gently until everything is coated. The mixture should look like a cohesive paste, not a loose salad.
- Add breadcrumbs and egg. Fold in the breadcrumbs and beaten egg until the mixture holds together. It should be thick enough to hold its shape when scooped. If it feels too dry, add a splash of milk.
- Shape the bites. Using a tablespoon, scoop the mixture onto a parchment‑lined baking sheet, spacing each bite about an inch apart. Press down lightly so they form a compact shape. This step is the moment of truth—watch the edges start pulling away.
- Bake for 20–22 minutes. The tops should be golden brown and the centers firm. Check at 18 minutes; if the edges are browning too quickly, lower the temperature slightly.
- Cool and serve. Let the bites cool for 5 minutes on the sheet, then transfer to a serving platter. Serve immediately for maximum crunch or store in an airtight container for up to 48 hours.
That's it — you did it. But hold on, I've got a few more tricks that'll take this to another level…
Insider Tricks for Flawless Results
The Temperature Rule Nobody Follows
Many people bake at 375°F, but that temperature often results in soggy bites. I always raise the heat to 400°F to get a crisp exterior while keeping the interior moist. If you’re baking a large batch, consider preheating the oven for 10 minutes before placing the sheet inside.
Why Your Nose Knows Best
When the chicken is roasting, the aroma of smoked paprika will fill your kitchen. That scent is the cue that the chicken is ready. If you’re unsure, give a quick sniff; a faint, smoky smell means the flavor is fully developed. Trust your nose—it's the best judge of doneness.
The 5‑Minute Rest That Changes Everything
After baking, let the bites rest for 5 minutes before serving. This short pause allows the juices to redistribute, preventing them from spilling out when you bite. A friend tried skipping this step once, and the result was a soggy mess. Trust me, the rest matters.
Keep It Fresh with a Splash of Water
If you’re reheating leftovers, add a splash of water to the baking dish before reheating. Cover with foil and bake at 350°F for 10 minutes. The water creates steam that rehydrates the bites without making them soggy.
Use a Silicone Baking Mat
A silicone mat gives you a non‑stick surface and even heat distribution. It also makes cleanup a breeze, saving you time for the next batch. I’ve used them for years, and they’re a game changer.
Creative Twists and Variations
This recipe is a playground. Here are some of my favorite ways to switch things up:
Tex‑Mex Twist
Swap the dill pickles for diced jalapeños, add a sprinkle of cumin, and finish with a dollop of guacamole. This version is spicy, smoky, and utterly delicious.
Greek Delight
Replace the mayo with tzatziki, add chopped olives and feta cheese, and sprinkle oregano. The result is a Mediterranean‑inspired bite that’s refreshing and savory.
Vegan Version
Use plant‑based mayo and tofu instead of chicken. Add nutritional yeast for a cheesy flavor and keep the rest of the ingredients the same. This version is protein‑packed and cruelty‑free.
Breakfast Bites
Add chopped cooked bacon, a pinch of smoked paprika, and top with a fried egg. Serve with toast for a hearty breakfast that’s both filling and flavorful.
Holiday Holiday
Incorporate cranberry sauce, chopped pecans, and a hint of cinnamon. This festive version pairs well with holiday platters and adds a seasonal twist.
Storing and Bringing It Back to Life
Fridge Storage
Store the baked bites in an airtight container in the refrigerator for up to 48 hours. Keep them on a paper towel to absorb excess moisture and maintain crunch.
Freezer Friendly
For longer storage, freeze the baked bites on a parchment sheet until solid, then transfer to a freezer bag. They’ll keep for up to 3 months. Reheat in a 350°F oven for 15 minutes.
Best Reheating Method
Reheat leftovers in a preheated oven at 350°F for 10 minutes. Add a splash of water before covering with foil to keep the bites from drying out. This method restores the original texture and flavor.